< Previous | Contents | Next >
Enabling Frame.io Integration in Preferences
An Internet Accounts panel in the System tab of the DaVinci Resolve Preferences lets you sign into your Frame.io account and specify a local cache location for media being synced with Frame.io.
![]()
You’ll need to enter your login name and password to enable Frame.io integration, but once entered, DaVinci Resolve will sign in automatically when DaVinci Resolve opens.
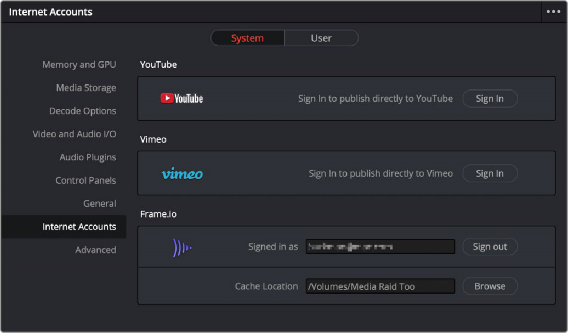
The Internet Accounts panel of the System tab of the DaVinci Resolve Preferences window (login deliberately obscured)
The local cache location is used to store clips you import into a DaVinci Resolve project from the Frame.io volume in the Media Storage panel of the Media page.
Deliver and Upload to Frame.io
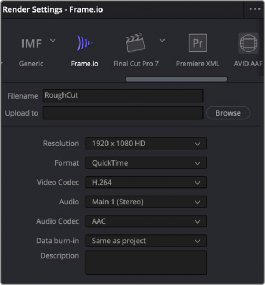
A Frame.io preset at the top of the Deliver page’s Render Settings panel lets you render and upload a program for review. All options in the Render Settings panel update to present suitable controls for this process.
![]()
Choosing the Frame.io preset
When you choose the Frame.io preset, the Location field turns into an Upload To field, and the Browse button lets you choose a project and folder path to which to upload the exported result.
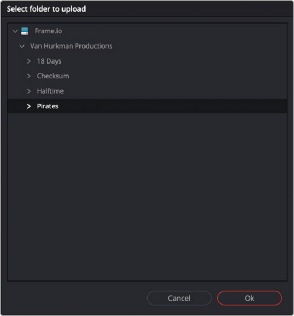
Choosing a Frame.io account to deliver a program to
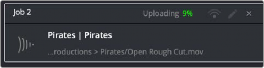
When you export to Frame.io, the available choices in the Resolution, Format, Video Codec, and Type pop-up menus are limited to those that are most suitable for Frame.io file sharing. Choose the desired export options, then click the Add to Render Queue button to add this job to the Render Queue as you would with any other export. When that job is rendered, it automatically proceeds to upload to Frame.io, and an upload percentage indicator appears in the job listing to show how far along this upload is. When it’s finished, the job displays the text “Upload completed.”