< Previous | Contents | Next >
Resolve Live has been designed to let you use all of the features of DaVinci Resolve to grade these on- set video previews, in the process saving video snapshots that contain a captured image, your grade, and reference timecode from the camera. The idea is that, using Resolve Live, you can work with the cinematographer to develop looks and test lighting schemes on the footage being captured during the shoot, and then later you can use those looks to build dailies, and as a starting point for the final grade once the edit has been completed.
![]()
Additionally, you can use Resolve Live in conjunction with other Color page features such as the
Alpha output to build test composites to check green screen shots, comparing them against imported background images in order to aid camera positioning and lighting adjustments. The built-in video scopes can also be used to monitor the signal levels of incoming video. Finally, you can use 1D and
3D LUTs to monitor and grade log-encoded media coming off the camera.
Configuring Your System for Resolve Live
Setting up your Camera and Hardware for Resolve Live
Setting up Resolve Live is straightforward. Whether you’re using a tower workstation or a laptop, any of the Blackmagic Design DeckLink or UltraStudio video interfaces can be used to connect your DaVinci Resolve workstation to a camera and external video display. The important thing to keep in mind is that, if you want to connect to a live incoming signal and output that signal for monitoring at the same time, you need to either use two separate DeckLink PCIe cards or UltraStudio Thunderbolt
interfaces, or a single DeckLink card/Ultrastudio with multiple separate inputs and outputs on a single PCIe card/device.
During the shoot, the digital cinema camera in use needs to be connected to your DaVinci Resolve workstation video input via HD-SDI or HDMI, which must be configured to carry both the video image and timecode that mirrors the timecode being written to each recorded clip. Most cameras allow timecode output over HD-SDI and HDMI, and both DeckLink and UltraStudio interfaces can pass this timecode to DaVinci Resolve. Without a proper timecode reference, you won’t be able to take the shortcut of automatically syncing your saved Snapshots to recorded camera original media using ColorTrace, although you can always apply grades manually.
— Install and update the Blackmagic Design Decklink card or Ultrastudio device you will be using for live video input in your DaVinci Resolve workstation (see your Blackmagic Design hardware documentation for specific details).
— Connect the video camera’s SDI or HDMI video output to the Blackmagic device’s video input. Make sure that embedded timecode out of the camera is enabled as well.
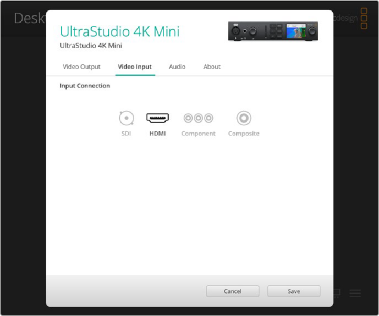
— Select the appropriate video input for your device in the Blackmagic Desktop Video Setup application on your computer.
![]()