
< Previous | Contents | Next >
Video input options in the Blackmagic Desktop Video Setup
NOTE: the resolution and frame rate that your camera is outputting through the SDI/HDMI cable.
NOTE: the resolution and frame rate that your camera is outputting through the SDI/HDMI cable.
NOTE: the resolution and frame rate that your camera is outputting through the SDI/HDMI cable.
Setting up DaVinci Resolve for Resolve Live
Once the hardware is set up, you will need to check the configuration of DaVinci Resolve to be able to make use of the live grading features of Resolve Live.
The first setting is to select the appropriate video input hardware in the Video I/O settings. The Video I/O panel of the System Preferences provides two sets of options for configuring video interfaces connected to your computer, one for capture, and one for monitoring. Resolve Live uses the video hardware input selected in the capture device. You will need to restart DaVinci Resolve if you modify these settings.
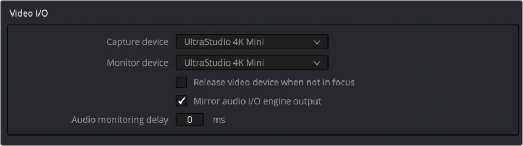
Video input/output options in the System Preferences
Next, you should begin with a new empty project. You should set up the new project’s Timeline and Video Monitoring settings to match the format and frame rate coming out of your camera.
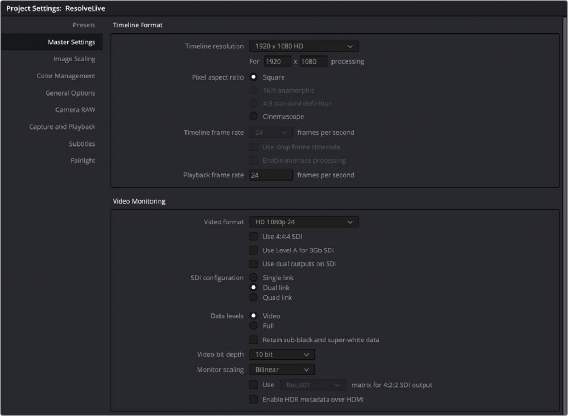

IMPORTANT: You must set up the resolution and frame rate in your new project’s Timeline format and Video Monitoring format in the project’s Master Settings to match the resolution and frame rate of the video coming out of the camera.
IMPORTANT: You must set up the resolution and frame rate in your new project’s Timeline format and Video Monitoring format in the project’s Master Settings to match the resolution and frame rate of the video coming out of the camera.
IMPORTANT: You must set up the resolution and frame rate in your new project’s Timeline format and Video Monitoring format in the project’s Master Settings to match the resolution and frame rate of the video coming out of the camera.
![]()
Make sure your Timeline format and Video Monitoring size and frame rate match your camera’s video output in the Master Settings

TIP: Having an empty Media Pool and Timeline doesn’t mean you can’t install useful LUTs and pre-import reference stills and saved grades to the Gallery, as these can be valuable tools for expediting your on-set grading.
TIP: Having an empty Media Pool and Timeline doesn’t mean you can’t install useful LUTs and pre-import reference stills and saved grades to the Gallery, as these can be valuable tools for expediting your on-set grading.
TIP: Having an empty Media Pool and Timeline doesn’t mean you can’t install useful LUTs and pre-import reference stills and saved grades to the Gallery, as these can be valuable tools for expediting your on-set grading.
Then add a new empty timeline, since the live grading workflow involves capturing live graded snapshots to an otherwise unoccupied timeline. One recommended way of organizing the live grades of a shoot is to create one new project per day of shooting. This way, snapshots captured during shoots using all 24 hours of time-of-day timecode won’t conflict with one another. Also, separate projects can make it easier to use ColorTrace to copy grades from your live grade snapshots to the camera original media you’ll be creating dailies from, eventually.
Once you’ve created your new project, you also need to choose the disk where all snapshots you take will be saved. By default, snapshots are saved on the scratch disk at the top of the Scratch Disks list in the Media Storage panel of the System Preferences. They’re automatically saved in a folder named identically to the current project, inside a folder called Resolve Live.