
< Previous | Contents | Next >
Blackmagic Cloud Storage provides a centralized and secure space online for your media assets and proxies. How you use this space is up to you, from a multi-user world-wide collaboration session, to a single user just picking up their laptop and leaving their workstation behind, to simply having a secure back up of media from an old spinning hard drive. Blackmagic Cloud Storage is completely integrated into DaVinci Resolve and the existing Blackmagic Cloud service.
All Blackmagic Cloud users, both new and existing, get a limited amount of free storage.
You can log into cloud.blackmagicdesign.com to access this storage, and purchase project libraries and/or additional storage. User plans and prices are listed there.
The Free Storage can be used to:
— Upload camera captures from the Blackmagic Camera app.
— Downloads require logging into the Blackmagic Cloud Website, and manually downloading the clips.
The Paid Storage can be used to:
— Sync media and proxies for DaVinci Resolve Cloud collaboration projects.
— Remote Camera Collaboration from the Blackmagic Camera app.
— Upload camera captures from the Blackmagic Camera app.
Setting up a Blackmagic Cloud Project
NOTE: To use Blackmagic Cloud, you must first sign up for a Blackmagic Cloud account at cloud.blackmagicdesign.com and then sign into your account in DaVinci Resolve.
NOTE: To use Blackmagic Cloud, you must first sign up for a Blackmagic Cloud account at cloud.blackmagicdesign.com and then sign into your account in DaVinci Resolve.
NOTE: To use Blackmagic Cloud, you must first sign up for a Blackmagic Cloud account at cloud.blackmagicdesign.com and then sign into your account in DaVinci Resolve.
Setting up a Blackmagic Cloud based project has been refined and simplified in 18.6, allowing you to set up all the configuration options, including Blackmagic Cloud Storage, from one easy setup screen.
1 From DaVinci Resolve’s Project Manager, select Cloud from the Project Library options in the upper left. Your Blackmagic Cloud Library should be active (highlighted in orange).
2 Click the New Project button or right-click in the background and select New Project from the contextual menu. Or import an existing local DaVinci Resolve project that you want to add to the Blackmagic Cloud.
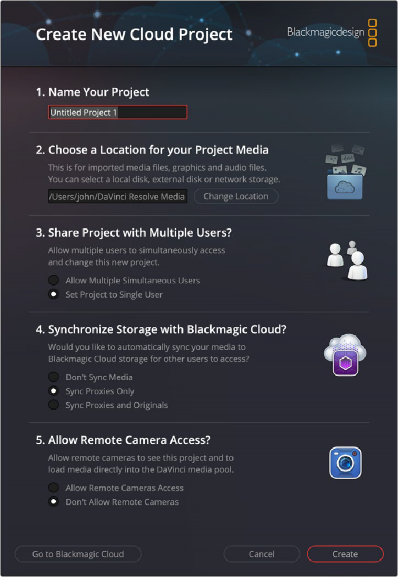
3 Choose the options you want in the Create New Cloud Project dialog.
4 Click the Create Button.
The Create New Cloud Project dialog box lets you set up the media locations and sharing parameters of your project.
Select Remove Unused Clips from the Media Pool option menu
— Name Your Project: Type in a name for your Cloud Project.
— Choose a Location for your Project Media: Choose a location on your file system for imported media files, graphics, and audio files you wish to use for the project.
— Share Project with Multiple Users?: Lets you determine if you want to share this project with other users.
— Allow Multiple Simultaneous Users: Enables collaboration mode for working with multiple people on the same project concurrently.
— Set Project to Single User: Disables collaboration mode and is designed for one person working on the project at a time.
— Synchronize Storage with Blackmagic Cloud?: These options let you choose what media to upload and sync to your Blackmagic Cloud Storage account for other users’ access.
— Don’t Sync Media: Does not upload any media to Blackmagic Cloud Storage.
— Sync Proxies Only: Uploads only proxy media to Blackmagic Cloud Storage.
— Sync Proxies and Originals: Uploads both proxies and the original media to Blackmagic Cloud Storage. This can use an extremely large amount of storage depending on the amount and size of the original media.
— Allow Remote Camera Access: Sets permissions for users of the Blackmagic Camera app.
— Allow Remote Cameras Access: Allows Blackmagic Camera app users that are members of this project to upload media from their phones to the Blackmagic Storage account and will add it to the project’s Media Pool directly.
— Don’t Allow Remote Cameras: Does not allow Blackmagic Camera app users to upload footage to this project, even if they happen to be a member of it.
One you press Create, a new project will be made with the parameters you’ve set above.
If at any time you wish to change these parameters after a project has been created, you can access them again by opening the Project settings, and selecting the Blackmagic Cloud tab.
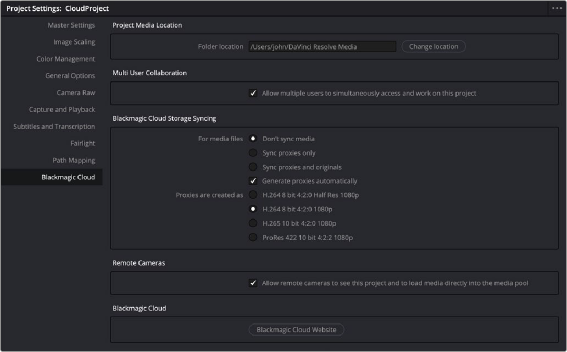
You can modify all the cloud settings of an existing Blackmagic Cloud project in the Project Settings