< Previous | Contents | Next >
Presentations in DaVinci Resolve
The Presentations application is designed to work in conjunction with DaVinci Resolve. Each “clip” in Presentations is linked to a DaVinci Resolve timeline. Any markers added by members in Presentations are updated to the timeline in DaVinci Resolve automatically and vice versa.
Sending a Timeline to Presentations
Each “clip” in Presentations is a DaVinci Resolve timeline. In order to populate the Clips column with footage to work with, you will first need to export your timeline from DaVinci Resolve to Presentations.
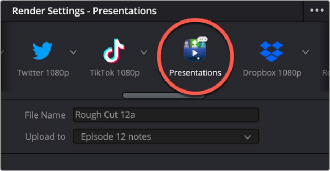
The Presentations Render Preset in the Deliver page.
1 Make sure you are signed into your Blackmagic Cloud account in the Internet Accounts section of the DaVinci Resolve Preferences.
2 Make sure you are a member of the presentation you wish to send the timeline to.
3 Open the timeline you wish to send.
4 In the Deliver page, select the Presentations render preset.
5 In the File Name field, type in a name for your timeline to appear as in Presentations.
6 In the Upload to field, select the presentation you wish to upload the timeline to. If the presentation is not in the list, see steps 1 and 2.
7 Click on the Add to Render Queue button at the bottom of the Render Settings.

There are no video or audio codec parameters to set, and DaVinci Resolve will proceed to render your timeline and upload it automatically to the selected presentation. Any member can upload a timeline to a presentation, not just the administrator.
The timeline will now appear as a “clip” in the Clips column of the presentation.
8 Click on the Render All button under the Render Queue.