< Previous | Contents | Next >
Manually Locking and Unlocking Timelines
You can also manually manage the locking of timelines. Opening a timeline automatically locks other collaborators out of making changes to that timeline, but it does allow other users to modify the bin that timeline appears within. This allows for greater flexibility in setting up your Media Pool and avoids locking media or other timelines in the same folder. You can still manually choose to lock individual Media Pool bins to secure their contents independently.
— Right-click that timeline in the Media Pool and choose Timelines > Unlock Timeline from the contextual menu.
1 Right-click that timeline in the Media Pool and choose Timelines > Lock Timeline from the contextual menu.
2 Other collaborators will be unable to modify the timeline while you have a lock on it, however they will be able to modify any other clips and timelines in the bin.
Automatic Clip Locking
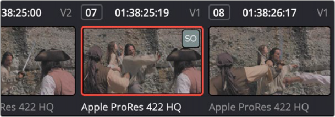
Clip locking in the Fusion and Color pages works similarly. As multiple compositing artists work in the Fusion page, and multiple colorists work in the Color page, the first compositing artist or colorist to select any given clip has an automatic lock on that clip. Other compositing artists or colorists will see a badge on that clip in the Thumbnail timeline showing that it’s locked as well as letting them know who has the lock. In the following screenshot, the SO badge in the corner of clip 7 in the Color page Thumbnail timeline indicates that clip is locked.
Badges in the Thumbnail timeline indicate which clips are locked because a collaborator is grading them
Automatically Checking In Work When You Change Clips
When you’re finished with the clip you’re working on, you need only select another clip for the changes you made to the previously selected clip to be automatically saved and pushed to all other colorists who are working on that timeline in the Color page. No refresh is needed. This is the main difference between clip locking in the Color page and bin locking.