
< Previous | Contents | Next >
Another set of controls at the right of the Stereo 3D palette lets you swap and copy grades, and swap clips, in situations where you need to reverse what’s applied to a pair of left- and right-eye clips.
![]()
Swap and Copy grades between eyes
— Swap Grade: Exchanges the grades that are applied to the left- and right-eye clips.
— Swap Shot: A checkbox that, when enabled, switches the actual media used by two corresponding left- and right-eye clips. Useful in situations where the eyes of a stereo 3D clip were mislabeled, and you want to switch the clips without rebuilding both EDLs.
— Copy Right to Left: Copies the right-clip grade to the corresponding left-eye clip.
— Copy Left to Right: Copies the left-clip grade to the corresponding right-eye clip.
Batch Grade Management for Stereo 3D Projects
There are also a series of batch-processing commands that are useful for stereoscopic grading that are available when you right-click one or more selected clips in the Thumbnail timeline:
— Stereo 3D Batch Copy: Copies every grade from the left-eye clips to the right-eye clips.
— Stereo 3D Batch Sync: Copies grades from one eye to the other only when their node graphs have the same number of nodes. This prevents you from accidentally overwriting a custom grade with a different node structure that was necessary to match two eyes for a problem shot.
The Copy Grade, Swap Grade, Swap Shots, Ripple Link, and Switch Eye commands are also available from the Stereo submenu of the Timeline contextual menu.
Automatic Image Processing for Stereo 3D
It’s common during stereoscopic shoots for minor divergences in geometry and color to appear in the source footage. To make the process of grading stereo 3D media less onerous, DaVinci Resolve provides a set of auto-adjustment controls at the right of the Stereo 3D palette that gives you a starting point for matching left- and right-eye clips together.
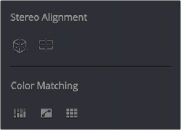
Auto align and color match buttons
Options for Auto Processing
You can choose which frame should be used to automatically analyze and process stereo clips using the Alignment and Matching controls from the Stereo 3D palette option menu. You can choose Auto Process > First or Middle, depending on what works best for your media.
Auto Process—Stereo Alignment
![]()
For the stereoscopic effect to work without causing headaches, it’s critical that both eyes are aligned. This can be tricky to adjust using manual controls, but is something that can be automatically analyzed. You can perform stereo 3D alignment to a single clip, or you can select a range of clips to align all of them automatically at once. There are two options. Which is more appropriate depends on the type of geometry issues you’re needing to address.
— Transform Alignment: Analyzes the image and makes vertical and rotational adjustments to line up the left- and right-eye images as closely as possible.
— Vertical Skew: Analyzes the images and makes a vertical-only adjustment to line up the left- and right-eye images.
1 Select one or more stereo clips in the Thumbnail timeline of the Color page.
2 Choose which frame of each clip you want to use for the analysis by opening the Stereo 3D palette, clicking the Option menu, and choosing Auto Process > First or Auto Process > Middle.
3 Click either of the Stereo Alignment buttons. The button to the left is for Automatic Transform, while the button to the right is for Automatic Vertical Skew.
If you selected multiple clips, then the Stereo Alignment window appears, and a progress bar shows the remaining time this operation will take.
Auto Process—Color Matching
Due to the design of different stereo 3D rigs, sometimes the color and contrast of one eye’s media doesn’t precisely match that of the corresponding eye. DaVinci Resolve provides two commands for quickly and automatically matching two eyes together.
— Stereo Color Match (Primary Controls): Uses the Lift/Gamma/Gain controls to match one eye to the other. The result is a simple adjustment that’s easy to customize, but may not work as well as Custom Curves in some instances.
— Stereo Color Match (Custom Curves): Uses the Custom Curves to create a multipoint adjustment to match one eye to the other. The result can be more effective with challenging shots.

TIP: For the best results, it’s recommended to use automatic color matching in a separate node, independent of other corrections.
TIP: For the best results, it’s recommended to use automatic color matching in a separate node, independent of other corrections.
TIP: For the best results, it’s recommended to use automatic color matching in a separate node, independent of other corrections.
— Stereo Color Match (Dense Color Match): Performs a pixel by pixel, frame by frame color match that is incredibly accurate. This operation is processor intensive, so if you’re going to batch process many clips, or if you’re matching long clips, you’ll want to make sure you have adequate time. Because this is so precise match, it’s recommended to use Dense Color Match after you’ve used one of the stereo alignment commands.