< Previous | Contents | Next >
— Anaglyph (Color): Similar to Anaglyph (B/W), except that regions of close alignment are shown in full color. Incidentally, both anaglyph modes can be previewed on ordinary displays using old-fashioned red/cyan anaglyph glasses, enabling stereo 3D monitoring on non-stereo 3D-capable displays.
NOTE: Only displays the eye corresponding to the currently selected timeline in the Viewer. However, this option also works in conjunction with the “Use Dual Outputs on SDI” checkbox in the Master Settings of the Project Settings which, when turned on, outputs each eye to an individual HD-SDI output of your Blackmagic I/O card.
NOTE: Only displays the eye corresponding to the currently selected timeline in the Viewer. However, this option also works in conjunction with the “Use Dual Outputs on SDI” checkbox in the Master Settings of the Project Settings which, when turned on, outputs each eye to an individual HD-SDI output of your Blackmagic I/O card.
NOTE: Only displays the eye corresponding to the currently selected timeline in the Viewer. However, this option also works in conjunction with the “Use Dual Outputs on SDI” checkbox in the Master Settings of the Project Settings which, when turned on, outputs each eye to an individual HD-SDI output of your Blackmagic I/O card.
![]()
— Difference: Superimposes grayscale versions of both eyes using the difference composite mode. Corresponding left/right-eye pixels that are perfectly aligned appear black, while pixels with disparity appear white. This mode is extremely useful for evaluating geometric differences between both eyes, as well as for identifying the point of convergence, without the distraction of color that the anaglyph modes present.
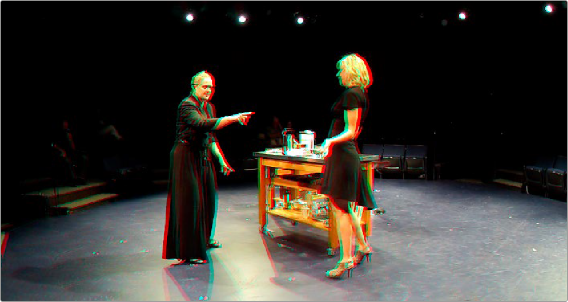
The Viewer set to display an anaglyph stereo image in color
Floating Windows
Floating Windows are meant to correct for “Window violations,” where elements of the image with negative parallax, that project forward from the screen plane towards the audience, are cut off by the edge of the frame. In these instances, differences between the images being shown to the left and right eyes can result in a visual paradox that’s difficult for viewers to reconcile. Specifically, when a forward-projecting element is cut off by the left or right edge of the frame, one eye sees things that the other eye does not.
If the subject is moving quickly, this may not be an issue, but if the cut off (or occluded) element lingers onscreen, it causes problems for viewers that defeat the stereo 3D illusion. The viewer’s binocular vision (or stereopsis) is providing one depth cue, while occlusion is providing a completely different depth cue.
![]()
To fix this, you can use Floating Windows to crop the cut off object from the eye on the side of the object that’s cut off, thus eliminating the portion of the stereo image that is unseen to the other eye that causes the problem.
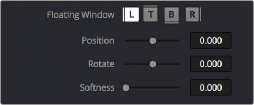
Floating Window controls
The objective of using Floating Windows is to manipulate the illusion of the viewer’s “window into the scene.” In addition to fixing Window violations, it has been proposed that Floating Windows can be used as a creative tool by manipulating the geometry of this Window to alter subtly the viewer’s perception of the screen orientation.
— By cropping the right-hand side of the right-eye frame, you also create the illusion that the right edge of the “window into the image” is tilted farther forward toward the viewer.
— By cropping the left-hand side of the left-eye frame, you create the illusion that the left edge of the Window is tilted toward the viewer.
— If you crop both the left-hand side of the left-eye frame and the right-hand side of the right-eye frame, you create the illusion that the entire plane of the “virtual screen” is coming toward you.
— If you apply opposite-angled Windows to the left- and right-eye clips at one or both of the edges of the frame, it appears to “tilt” the screen toward or away from the viewer.
Animating Floating Windows
Floating Windows can be animated using the Float Window keyframing track, found within the Sizing track of the Keyframe Editor, to push the edge of the frame in as needed, and then pull it back out when the partially occluded subject has moved fully into the frame. For more information about animating keyframing tracks, see Chapter 145, “Keyframing in the Color Page.”
— L/R/T/B buttons: Lets you choose an edge to which to apply a Floating Window. Click the button corresponding to the edge you want to adjust. Each edge has its own position, rotate, and softness settings.
— Position: Adds masking to the currently selected edge.
— Rotate: Rotates the currently selected edge, letting you create an angled Window.
— Softness: Feathers the edge of the currently selected edge, letting you create a soft Window that can be less noticeable to viewers.