< Previous | Contents | Next >
![]()
These affect individual clip frame rate, geometry, and data levels.
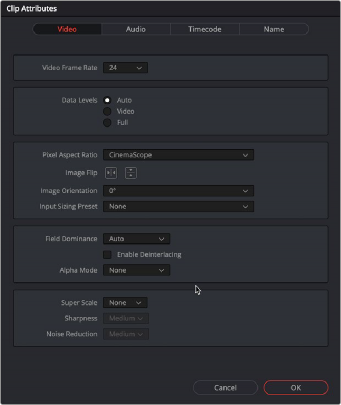
The Video panel of the Clip Attributes Window
— Video Frame Rate: In cases where a clip’s frame rate was specified incorrectly by another application or recording device, or if there is no frame rate metadata available at all, you can change what DaVinci Resolve considers the frame rate of the source clip to be by either using this menu to choose a frame rate from 1 to 120 fps, or choosing Custom and entering a value from 1 to 32,000 fps (to accommodate high-speed and specialty format video). Changing a clip’s Video Frame Rate will change its duration and relative playback speed in DaVinci Resolve. A clip’s audio, however, will be unaffected. Please note, just because extremely high frame rate media is supported, do not expect real time performance at excessively high frame rates, and understand
that what performance your workstation is capable of depends on its configuration and the speed of your storage.
— Data Levels: In certain circumstances, you may find that you need to manually choose appropriate data levels for clips that are not being interpreted correctly, choosing between Auto, Video, and Full. For more information on this setting, and how it affects the image data in your project, see Chapter 9, “Data Levels, Color Management, and ACES.”
— Pixel Aspect Ratio: In projects using a mix of media with different frame sizes, you can assign specific pixel aspect ratios using this drop-down menu. You can also change the Pixel Aspect Ratio to a manual value to adjust and compensate for various motion picture capture technologies. Select Custom from the Pixel Aspect Ratio menu, and then enter a numeric value in the box below.
The value is the X in the 1:X ratio. For example, you would type in 1.6 to get a pixel aspect ratio of 1:1.6.
— Horizontal and Vertical Image Flip: Modifies the horizontal and vertical image flip camera metadata for r3d clips, which is useful for stereoscopic 3D projects shot with a mirrored camera rig that reverses the media from one eye, or in cases where steadicam rigs result in upside- down clips. These settings are different from the Flip Image controls in the Sizing palette of the Color page.
— Image Orientation: For media that has an orientation setting, this lets you change the rotation of that media so that it’s correctly oriented. Four settings let you adjust by 0º, 90º right, 180º, and 90º left.
![]()
— Input Sizing Preset: You can use this panel to assign a Sizing palette preset to select clips. For example, if you have a special Input Format Preset for standard definition PAL widescreen clips that you’ve edited into a high definition project, you can do a sort in the Media Pool to isolate them, and then select them all and apply this preset.
— Field Dominance: By default, the Auto setting enables DaVinci Resolve to automatically determine whether a particular clip is Upper- or Lower-field dominant. If this automatic determination is wrong, you can choose Upper or Lower to manually override this.
— Enable Deinterlacing: (only available in Studio version) This checkbox is only enabled if “Enable video field processing” is turned off in the Master Settings panel of the Project Settings. Turning the Enable Deinterlacing checkbox on sets DaVinci Resolve to deinterlace clips using the Deinterlace quality setting that’s located in the Image Scaling panel of the Project Settings.
Normal is a high-quality deinterlacing method that is suitable for most clips, while High is a more processor-intensive method that can sometimes yield better results, depending on the footage. The DaVinci Neural Engine option uses advanced machine learning algorithms to reconstruct the frame, which will ideally give even better results than the High setting.
— Alpha Mode: The options presented here depend on the format of the clip you’ve selected, since only certain formats (such as ProRes 4444, QuickTime Animation, OpenEXR, TIFF sequences, and so on) are capable of containing alpha channels. If you’ve imported clips with embedded alpha channels, this panel lets you enable or disable their use in DaVinci Resolve (by choosing None), choose the type of alpha channel (Premultiplied or Straight), or invert the alpha channel. If you select a clip that doesn’t contain an alpha channel, then most of these options don’t appear.
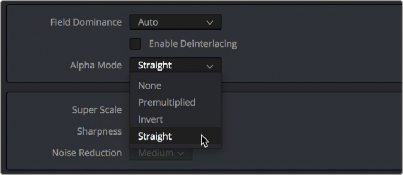
The Alpha Mode options that are available when a clip has an embedded alpha channel
— Super Scale High Quality Upscaling: For instances when you need higher-quality upscaling than the standard Resize Filters allow, you can now enable one of three “Super Scale” options in the Video panel of the Clip Attributes window for one or more selected clips. Unlike using one of the numerous scaling options in the Edit, Fusion, or Color pages, Super Scale actually increases the source resolution of the clip being processed, which means that clip will have more pixels than it