< Previous | Contents | Next >
If you want to save all your clips together in one master destination folder without the timecode in the file name, simply deselect the checkbox.
![]()
— Roll/Card, Reel Number, Clip Number, and Program Name: These are ways to identify the clip with metadata.
— Flags: You can use these color coded flags to tag clips.
— Good Take: Corresponds to ‘circled take’ metadata in the media pool.
— Log Clip: Adds a clip to the media pool. After you mark ‘in’ and ‘out’ points for a section you want to scan, confirm the metadata is correct, and then click ‘log clip’. For more information, refer to the ‘Logging and Capturing Individual Clips’ and ‘Logging and Capturing Multiple Clips’ sections in the DaVinci Resolve manual.
Film Scanning Workflows
The following sections describe how to scan film using DaVinci Resolve and to control the Cintel scanner. Throughout, the features outlined in the previous section are presented in
the order in which you’ll perform each step of the scanning process.
Before You Begin
Before turning your scanner on and loading film, you should first dust the gate to make sure your scans are as clean as possible. This can be accomplished using compressed air, but if the gate is extremely dirty, you can remove it to give it a more thorough cleaning. Once that’s finished, turn on the Cintel Scanner, open DaVinci Resolve and create the project you’ll be using to scan film, and then click the ‘Cintel scan’ button on the media page. Now click the ‘Film Scanner’ tab to select DaVinci Resolve’s film scanner panel.
Before you load film into the scanner or do anything else, click the ‘calibrate’ button at the bottom left of the film scanner panel. While you should always dust the gate of the scanner before loading a new reel of film, clicking the calibrate button eliminates any unremovable blemishes in your scanner’s optics from the scans you’re about to make.
Load and Align the Film
Load the film you want to scan. In the presence of an image the scanner will automatically align a frame. You should note that the image may be framed incorrectly if you first load blank film leader.
Next, choose the film type. If necessary, use the ‘perf nudge’ and ‘frame’ buttons to manually improve the alignment of the framing bar to the scanner’s sensor such that the bottom of the previous frame and the top of the next frame are just visible at the top and bottom of the viewer, and the current frame is centered vertically. It’s important to make sure the image in the viewer is not zoomed in when you do this.
Focus the Scanner
Just as you need to focus the lens on a camera, you’ll need to focus the projected film image on your scanner’s sensor. To achieve perfect focus, turn on the Focus Assist checkbox in the Film Scanner capture settings of DaVinci Resolve. This superimposes a focus peaking overlay over the Ultra HD image that’s output from the scanner’s HDMI output, and is also displayed in DaVinci Resolve’s capture window. For the best results, connect an Ultra HD display to your Cintel scanner so that you can monitor at the maximum available resolution while you focus.
![]()
With Focus Assist turned on, focus peaking will detect the film grain of the scanned image whenever the film plane is in perfect focus. This enables the operator to focus the scanner even if the film image is out of focus. Simply monitor the Ultra HD output of the scanner while you turn the Cintel scanner’s focus wheel. Your image will be in focus when the grain running throughout the image displays peaking outlines.
You can verify the focal adjustments you’ve made by checking the edges of your film’s perforations. When these are sharp, your film will be in focus.
Reset the Timecode
To set the timecode for the roll of film you’re about to scan, you need to locate the zero frame for that roll. It’s standard practice to punch a small physical hole within the frame before the first frame of necessary film on a roll, to use as a permanent reference for whenever that roll is scanned. This is referred to as the marker frame, lab roll hole, or head punch. By always setting the first frame
of timecode to match the marker frame, subsequent film scans will have the same frame count as previous scans, making it possible to rescan and reconform the same material whenever necessary.
1 Use the transport controls under the viewer to locate the marker frame.
2 Click the ‘viewer’ option menu and choose ‘current frame timecode.’
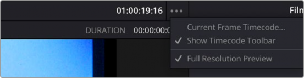
Choosing Current Frame Timecode from the Viewer Option menu
3 Enter a timecode value in the dialog box that appears. For example, if you’re scanning the first roll of a project, you can enter 01:00:00:00.
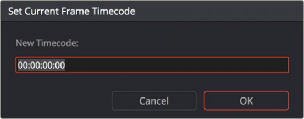
The Set Current Frame Timecode dialog
4 When you’re done, click OK.
Timecode cannot be a negative value, so don’t set the start frame to zero. Another common organizational technique is to change the hour number whenever you change rolls, to coincide with the film roll’s number, which makes it easy to identify a scanned clip with the corresponding source roll and frame range.
Your Cintel Scanner has built in ‘Options Interface’ ports for adding optional hardware in the future. This offers the ability to add optional features such as reading KeyKode from the camera negative, or optical/magnetic audio. For more information, see the ‘Optional Audio and KeyKode Reader’ section.
Choose a Location to Save the Scanned Frames
![]()
Once all this is done, scroll down to the ‘capture info’ controls in DaVinci Resolve’s film scanner panel, and click the ‘browse’ button to choose a location for the scanned files. You can use the other fields in this section to set what prefix you want to add to the name of the scanned files and enclosing folders. The ‘file name prefix’ updates the file name preview that’s shown at the top in the header. The header also shows the file path, resolution, frame rate, duration, and the format. Specify what roll, reel,
clip, and program information you want associated with the scanned media. The ‘timestamp prefix’ checkbox in the ‘Capture info’ controls is selected by default and will save your clips to independent sub-folders within the destination folder, together with a timecode prefix in the file name.
If you want to save all your clips together in one master destination folder, simply deselect the checkbox.
When you capture an HDR clip, the scanner completes a high exposure scan and saves it in a hidden folder named .HDR inside the same folder as the standard scan. If you delete the .HDR folder, the scan converts to a normal clip after refreshing it in the media storage and re-importing the clip into media pool. This is useful if there is a problem with the HDR portion of the scan, as you can easily convert it to a regular CRI clip.
Check the Codec

The Cintel Raw Format
The Cintel Raw Format Bayer pattern of each film frame scanned with your Cintel scanner’s sensor is saved with embedded scanner metadata as a 12-bit linear Cintel Raw Image,
or CRI, image sequence. When grading in DaVinci Resolve, CRI images are automatically debayered as 12-bit log encoded image data.
The logarithmic encoding is similar, but not identical to Cineon encoding. For example, negative film is encoded using a Gamma of 2.046 for density, while print film is encoded using a full range Gamma 2.2 curve to ensure that no image data is clipped. Both of these logarithmic encodings can be converted to a linear color space using the ‘Cintel to Linear’ 1D LUT, before converting to other color spaces you may want to work in.
The film is scanned using the full sensor aperture of 4096x3072 to keep the audio waveform visible for optical audio and to accommodate perforation visibility for stabilization. The image is then cropped and the resolution of the capture files depends on the source film format after overscan for perforations and the audio area are removed. For more information about scanning resolutions for different types of film, see the ‘specifications’ section.
DaVinci Resolve selects the ‘Cintel Raw’ codec by default, or you can choose ‘Cintel Raw 3:1’.

The Cintel scanner creates Cintel Raw files with variable bitrate lossless compression by default. This is visually lossless compression and achieves approximately 3:2 reduction in file size depending on image content. However, Cintel Raw 3:1 uses lossy compression with a ratio of approximately 3:1. This is still very high quality but may not always be visually lossless.
For example, files for 35mm 4 perf are approximately 12.5MB with Cintel Raw and approximately 6.3MB with Cintel Raw 3:1. Files for 16mm are approximately 4MB with Cintel Raw and approximately 2MB with Cintel Raw 3:1.
![]()