< Previous | Contents | Next >
If deselecting the ‘Auto adjust audio scan height’ checkbox, make sure the ‘height’ setting places the guide box at the optimal position for the frame. Making manual adjustments can help if you need them, but don’t forget to turn the automatic features back on afterwards!
— Audio waveform color is white: Depending on the scanned film type, the audio waveform may be black or white. If the waveform is white, make sure the corresponding checkbox is enabled. This will ensure the white information in the waveform is used during audio extraction. If the waveform is black and the surrounding audio area is white, disable the checkbox so DaVinci knows to use
![]()
the black information in the waveform. Other automatic features, such as mid point and mono detection, also rely on this setting being set correctly.
— Override firmware stability: In rare instances, the condition of the film may have created large movements in the frame due to the internal firmware stabilization. This can cause the audio extraction guide box to misalign with the optical track. If this occurs, enabling ‘override firmware stability’ lets the audio extraction guide box track the film perforations independently and adjust its positioning for potentially better results.
— Variable density audio: If your film contains variable density audio, make sure you select the ‘Variable density audio’ checkbox so DaVinci Resolve knows the type of audio to extract. The default state is set to ‘off’ for variable area audio soundtracks.
If you haven’t used variable density audio before, you can visually identify it as a tight sequence of shaded lines, similar to a bar code with the lines squeezed closer together. By comparison, ‘variable area’ soundtracks appear as an audio waveform.
Color Space and Sizing
A pair of 1D LUTs, ‘Cintel Negative to Linear,’ and ‘Cintel Print to Linear,’ have been provided to help you convert scanned media to a color space in which you can do further work. You can apply these LUTs via a node in the ‘color’ page to convert the original scans to a Linear color space. However, if you want to convert the image to Rec. 709 or to Cineon for further adjustment, you’ll want to apply a second LUT in a second node. The default color space for print is a 2.2 gamma standard log curve, and all others are 2.046 film density log gamma.
In general for negative film, it’s best to “color invert” after the second LUT is applied. Furthermore, normally some grading is required on the Linear data to remove black offsets, due to Dmin, for proper conversion into the destination color space. There are a variety of VFX IO LUTs available in the 3D LUT submenu of each node’s contextual menu that let you convert an image from Linear color space to any other color space you want to work within.
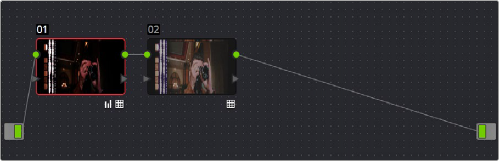
Using three nodes to convert a film scan using LUTs; node 1 converts from Negative or Print to Linear, node 2 converts from Linear to Rec. 709, and node 3, if required, inverts the color

NOTE: Applying a LUT within a node will clip any image data falling below 0 and above 1. To prevent clipping, you can use the Lift/Gamma/Gain controls within any node with a LUT applied to adjust your image levels prior to the transform applied by the LUT within that node.
NOTE: Applying a LUT within a node will clip any image data falling below 0 and above 1. To prevent clipping, you can use the Lift/Gamma/Gain controls within any node with a LUT applied to adjust your image levels prior to the transform applied by the LUT within that node.
NOTE: Applying a LUT within a node will clip any image data falling below 0 and above 1. To prevent clipping, you can use the Lift/Gamma/Gain controls within any node with a LUT applied to adjust your image levels prior to the transform applied by the LUT within that node.
![]()
The format of the film you’re scanning and the way the material was originally shot both affect the framing. You can adjust the final framing of your scanned clip by resizing, zooming, stretching, panning, tilting, and more. On the ‘Color’ page, open the ‘Sizing’ palette and use the ‘Input Sizing’ mode to create the necessary framing. To save your sizing preferences as a preset, open the menu, select ‘save as new preset’ and enter a name for your preset.
Once you’ve created an appropriate sizing preset for a given type of media, you can apply that preset to multiple film scans all at once, in either the Color page or in the Media Pool using the ‘change input sizing preset’ command, found in the contextual menu of selected clips. For more information on sizing, see Chapter 150, “Sizing and Image Stabilization.”
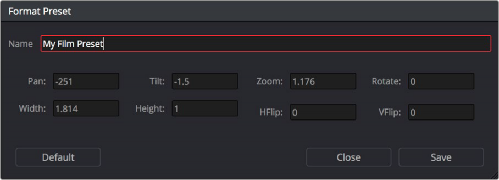
Creating a sizing preset in the Sizing palette of the Color page