< Previous | Contents | Next >
You can filter the contents in the media storage to make it easier to manage them.
If the ‘timestamp prefix’ checkbox was deselected in the ‘capture info’ section when your clips were scanned, and you want to have extracted audio automatically embedded in your clips, always remember to extract audio from the clips inside the media pool.
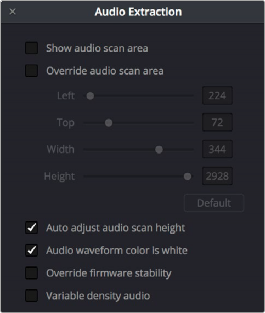
Audio Extraction Settings
Normally, once you have selected the film type, the automatic features in DaVinci Resolve will extract your optical audio perfectly. However, the condition of the optical track can vary with the condition of the film being loaded and in some instances this can confuse the automation. If this happens, you can bypass the automatic features and make adjustments manually.
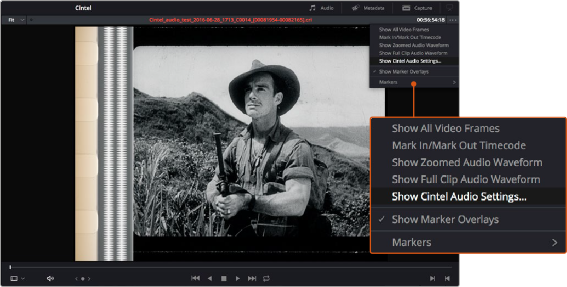
For manual adjustments, simply open the ‘Audio Extraction’ settings window by clicking on ‘Show Cintel Audio Settings’ in the inspector options near the top right of the viewer.
— Show audio scan area
— Override audio scan area
![]()
The Audio Extraction settings let you make manual adjustments, if needed.
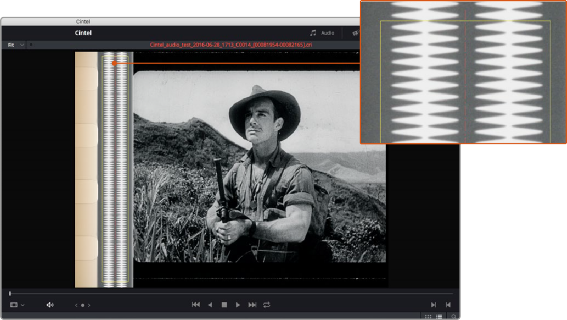
This checkbox turns the audio scan area guides on or off. The guides are displayed as a box on the side of the frame covering the optical audio scan area and shows what optical information will be used during extraction. The position of the guides will conform to the film type you have selected. However, you can change the position manually if you need to. The audio scan area guides are also great indicators to show you what is happening during the extraction process so you can identify any potential troubles and make manual adjustments.

TIP: If you need a closer inspection of the audio scan area guides, you can zoom into the viewer and move the viewer position up or down, and left or right. Simply choose the amount of zoom from the sizing options at the top left corner of the viewer, then click and drag the viewer with your mouse or track pad.
TIP: If you need a closer inspection of the audio scan area guides, you can zoom into the viewer and move the viewer position up or down, and left or right. Simply choose the amount of zoom from the sizing options at the top left corner of the viewer, then click and drag the viewer with your mouse or track pad.
TIP: If you need a closer inspection of the audio scan area guides, you can zoom into the viewer and move the viewer position up or down, and left or right. Simply choose the amount of zoom from the sizing options at the top left corner of the viewer, then click and drag the viewer with your mouse or track pad.
Inside the box is a thin red line. This line is the mid point detector which detects the separation between stereo audio channels. When mono sound is detected during audio extraction, the mid point detector disappears and the guides will adjust automatically to suit the width of the mono optical track.
![]()
When ‘show audio scan area’ setting is turned on, the audio area guides will be visible so you can see exactly what information is being used and monitor the extraction process.
This setting provides sliders for adjusting the horizontal and vertical positioning, width, and height of the audio scan area guides.
These settings include:
— Left and Width: If your film type is such that audio appears on the right side of the frame, you can simply adjust the ‘left’ slider to move the guide box to the right. Normally, this will happen automatically if you have the corresponding film type selected, but the setting gives you more flexibility for adjustments if you need it. Similarly, the ‘width’ setting is used to adjust the width of the scan area.
These are helpful tools for making subtle adjustments to the side edges of the guide box if there are unwanted elements inside the film’s optical audio area. This can happen due to perforation wear and tear, or varying print qualities, and can sometimes interfere with the quality of the audio extraction. You can help avoid this by making a subtle movement to the side edges to keep the stray elements outside of the guide box.
— Top: This setting adjusts the vertical position of the guide box.
— Height: Sometimes film frames on older rolls of film may be slightly smaller than normal due to shrinkage over time. When making manual adjustments to the guide box, you can make adjustments for film shrinkage using the ‘height’ slider.
— Auto adjust audio scan height: This setting is on by default and automatically adjusts the guide box height to align with the audio waveform at the top of each frame. The automatic feature works well for normal audio conditions, however, if during extraction you notice the box moving randomly and the quality of the extraction is affected, it may be due to similar features in the audio track overlapping between frames. If this occurs, deselect the checkbox and try the extraction again.