< Previous | Contents | Next >
The Timeline Selection drop-down at the top of the Cut page Viewer
The Enlarge, Lock, Audio Enable, and Video Enable buttons in the header of a timeline track
About Tracks in the Cut Page Timeline
Tracks in the Cut page timeline combine a clip’s audio and video into a single track for convenience, as this makes it easy to keep audio and video organized and in sync when superimposing many clips together. This means that tracks have both video and audio enable controls in the track header controls, so that you can selectively disable video and mute audio when necessary.
![]()
Each track also has a lock control, which lets you prevent clips on that track from being altered in any way.
Enlarging Tracks
Track size can be enlarged and minimized by clicking on the Track Sizing icon on the left side of the track header. An expanded video track shows a full size video and audio track, if attached. This makes it easier to see just the track you want to focus on. Only one track can be expanded at a time.
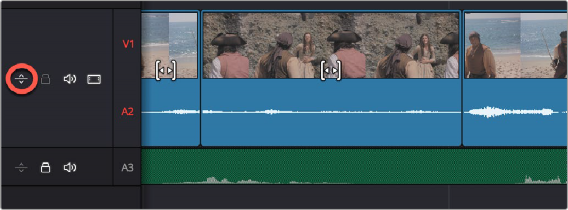
Clicking on the Track Sizing icon expands the track to show the full audio track of the clip
Adding Tracks

TIP: Dragging a new clip to the undefined gray area at the top of the Timeline also adds a new track.
TIP: Dragging a new clip to the undefined gray area at the top of the Timeline also adds a new track.
TIP: Dragging a new clip to the undefined gray area at the top of the Timeline also adds a new track.
If your timeline doesn’t have enough tracks, you can click on the Timeline Actions menu and select Add Video/Audio/Subtitle track, or right-click anywhere in the Timeline and choose “Add Track,” and a new track will be added on top of the previously existing tracks.