< Previous | Contents | Next >
If you want to delete a specific track along with all clips on that track, you can right-click anywhere in that track’s header and choose “Delete Track.”
If your timeline has too many empty tracks, you can right-click anywhere in the track header and choose “Delete Empty Tracks” and all empty tracks will be removed.
Navigating Clips in the Viewer and Timeline
![]()
Before you can start editing, you need to find which parts of which clips you want to use, and define where in the currently open timeline you want to make an edit. The Single Viewer in the Cut page has three options that let you choose what media you want to play through using the transport controls found at the bottom.
Viewer Options
Three options, selectable via buttons at the upper left of the Viewer, let you control what the Viewer shows.
![]()
The Viewer option buttons, (left to right) Source Clip, Source Tape, Timeline, and Safe Area
— Source Clip: This option shows the currently selected clip in the Media Pool. This is the mode the Viewer automatically switches to whenever you double-click a clip in the Media Pool. In Source Clip, a scroll area appears at the bottom of the Viewer, the width of which represents the duration of the currently open clip. A playhead within the scroll area lets you scrub through the clip as a zoomed-in waveform and shows whatever audio is playing within the clip. Handles to the left and right of the scroll area let you reposition In and Out points within the clip to choose a section you want to edit into the Timeline. These In and Out points can also be set using the I and O keys. Once set, you can drag In and Out points to change them.
![]()
The scroll area in Source Clip option, with In and Out points positioned to either side of the playhead
— Source Tape: Using this option, every single clip in the currently open bin, and any subfolders in that bin, of the Media Pool is shown in the Viewer as a “stringout” in the scroll area at the bottom of the Viewer. In the scroll area, each clip appears one after the other in a long strip, with the order determined by the Sort order. This makes it easy to scrub through a whole collection of clips while you’re figuring out what you want to use. As you play through, whichever clip the playhead intersects is selected in the Media Pool, so you know which clip you’re looking at.
![]()
The scroll area in the Source Tape, with each clip separated by a thin line
— Timeline: This option shows the current frame at the position of the playhead in the Timeline. Whenever you click, drag, or adjust a clip in the timeline area, the Viewer switches to the Timeline. In this option there is no scroll area; you must use the timeline area to scrub through your program. However, in the space where the scroll area would otherwise be, icons appear to indicate when the playhead is positioned at the first or last frame of a clip in the Timeline.
![]()
The scroll area in the Timeline option shows icons to indicate the beginning and end of clips
![]()
— Safe Area: This drop-down menu overlays many useful framing guides over the Viewer to let you see what part of the image will be included and what will part will be cropped out if you change the Timeline’s aspect ratio. The framing guides can be turned on and off by toggling the Safe Area Framing Guide icon in the Viewer, and the exact guides can be selected in the drop-down menu.
— Social Media: 1:1, 4:5, 9:16, 1.91:1, 16:9.
— Broadcast and Film: 1.33, 1.66, 1.77, 1.85, 2.35.
— Safe Area Guides: These options add additional guide lines on the Viewer to protect your composition from possibly being cut off at the extreme edges of a physical cathode ray tube. While somewhat anachronistic in this age of flat screen digital televisions, many legacy programs still adhere to these guidelines. Safe Areas still can be useful guides in ensuring your image is not inadvertently cropped by the variety of mobile devices and social media sites in use today.
Action | Keep all movement and important action within this box. |
Title | Keep all on screen text within this box. |
Center | Designates the exact middle of the image. |
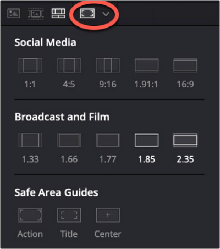
The Safe Area Framing Guide icon (circled) and the possible framing options