< Previous | Contents | Next >
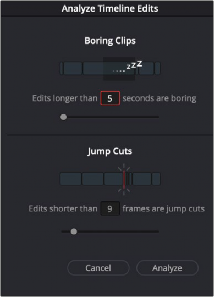
— Analyze: Starts the live analysis of your timeline using the criteria you’ve selected above. The Boring Detecter is persistent and continues to function as you make further edits in the Cut page. It can be turned off by clicking the Boring Detector icon again.
![]()
The Boring Detector’s Analyze Timeline Edits window
Setting In and Out Points
Ordinarily, source media is much longer than the actual clips you’ll be using in a program, so it’s important to be able to define a range of media you want to edit into the Timeline. This is done by setting In and Out points, either in the Media Pool in Thumbnail or Filmstrip mode, or in the Viewer in Source Clip or the Source Tape.
Setting In and Out Points Using the Keyboard
When scrubbing through a thumbnail or filmstrip in the Media Pool, you can press the I (In) or O (Out) keys to define a range of media. The edit points appear superimposed over the thumbnail area of the clip, as well as the scroll area of the Viewer if the clip is being mirrored there.
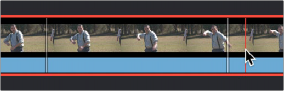
Defining a range of media in the Media Pool using In and Out points (in white)
When scrubbing or shuttling through media in the Viewer in Source Clip or the Source Tape, or through your program with the Viewer in Timeline mode, you can press the I (In) or O (Out) keys to define a range of media.
![]()