< Previous | Contents | Next >
The index provides information about your timeline in a simplified spreadsheet format; it is used for both reference and timeline navigation. The index is broken up into the Edit Index, Tracks, and Markers tabs.
Edit Index
![]()
Clicking the Edit Index button opens the Edit Index. By default, this shows an EDL-style list view of all the edit events in the current timeline. Whichever timeline is selected in the Timeline list displays its events here. However, the contents of the Edit Index can be filtered using commands found in the Option drop-down, described later in this section.
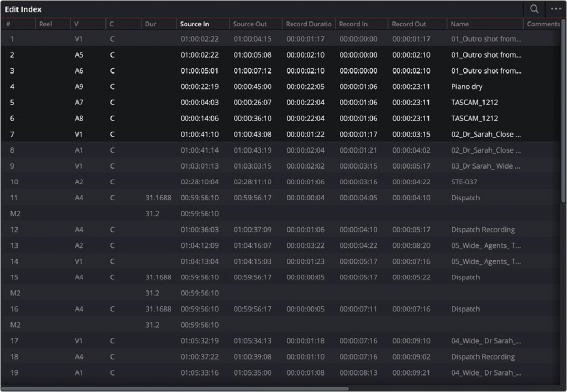
Edit Index List shown open
Each clip and transition is shown as an individual event, each of which contains multiple columns of information. If you re-edit a timeline, your changes are also reflected in this list. The Edit Index is
useful for creative editors that are looking for specific effects that are used in the current timeline, or for finishing editors that need more information about a specific clip, or who might need to filter the entire edit by specific criteria in order to troubleshoot various issues.
Navigating the Timeline Using the Edit Index
Whenever you move the Timeline playhead to intersect a clip, the Edit Index updates to show only the clips on the video track the intersecting clip is on, and that clip’s event is highlighted in the Edit Index. This makes it easy to see the correspondence between a clip in the Timeline and its event, which is helpful when troubleshooting problems. There are also commands available in the Option menu to display only clips on enabled tracks, only video clips, and only audio clips.
Edit Index Columns
Each event populates several columns of information. These columns can be rearranged by dragging them to the left or right, depending on what information is most important to you.
The available columns of information are:
— #: The event number (which corresponds to the clip number shown in the Thumbnail timeline of the Color page).
— Reel: The reel name of the corresponding clip.
— Match: Flags clips that have clip conflicts, which display a question mark in this column. Once the clip conflict has been resolved, this flag disappears.
— V: Video event.
— C: The event type (C for cut, D for dissolve or transition).
— Dur: A number showing the duration of a transition in frames.
— Source In/Source Out: The Source In and Source Out timecode indicating the range of timecode referenced by that clip; corresponds to the timecode locations of each clip’s In and Out point relative to the source media it comes from.
— Record Duration: The duration of the clip in the Timeline, determined by the Record In/Out timecodes.
— Record In/Record Out: Record In and Record Out timecode indicating that clip’s position in the Timeline.
![]()
— Name: The name of the clip.
— Comments: Whatever comments were present in the EDL that was imported. For example, clip names exported from the original NLE to be used as reel names in RED workflows using EDL import.
— Source Start/ Source End: The very first and last frame of media available in the Source Media for that clip.
— Source Duration: The duration, in timecode, of the total source media available in that clip.
— Codec: The codec of the corresponding clip.
— Source FPS: The frame rate of the corresponding clip.
— Resolution: The frame size of the corresponding clip.
— Color: The color of flags or markers applied to that clip.
— Notes: Notes entered inside of markers applied to clips or the Timeline.
— EDL Clip Name: Shows the name of the imported EDL, if that’s available.
— Marker Keywords: Lists all keywords found in a particular marker.
The columns in the Edit Index can be customized to prioritize the information that’s important to you.
— To show or hide columns: Right-click at the top of any column in the Edit Index and select an item in the contextual menu list to check or uncheck a particular column. Unchecked columns cannot be seen.
— To rearrange column order: Drag any column header to the left or right to rearrange the column order.
— To resize any column: Drag the border between any two columns to the right or left to narrow or widen that column.
You can also customize column layouts in the Edit Index. Once you’ve customized a column layout that works for your particular purpose, you can save it for future recall.
— To create a column layout: Show, hide, resize, and rearrange the columns you need for a particular task, then right-click any column header in the Media Pool and choose Create Column Layout. Enter a name in the Create Column Layout dialog, and click OK.
— To recall a column layout: Right-click any column header in the Media Pool and choose the name of the column layout you want to use. All custom column layouts are at the top of the list.
— To delete a column layout: Right-click any column header in the Media Pool and choose the name of the column layout you want to delete from the Delete Column Layout submenu.
Filtering the Edit Index
You can use options found in the Edit Index’s option menu to filter specific things that you want to check out, whether to go through all of the marked clips to see if there are any notes you need to address, or to isolate all offline clips, or to go through edits to see if there’s anything you need to fix. You can filter the Edit Index in the following ways:
— Show All: Shows all entries in the list. Choose this option after using any of the other options to go back to seeing the entire timeline.
![]()
— Show Active Track Items: Filters out all clips that appear on tracks above or below tracks identified with a destination control. For example, if you have three video tracks and the destination control is on track V2, then all clips on tracks V1 and V3 will be hidden from the Edit Index.
— Show Video Track Items: Filters out all audio clips so only video clips appear in the list.
— Show Audio Track Items: Filters out all video clips so only audio clips appear in the list.
— Show Flags: Isolates clips with flags in the list. A submenu lets you choose to show all clips with flags or only clips with a particular color of flag.
— Show Markers: Isolates all clips with markers in the list. A submenu lets you choose to show all clips with markers or only clips with a particular color of marker.
— Show Clip Colors: Isolates all clips that have been labelled with clip colors in the list. A submenu lets you choose to show all clips that are labelled using any clip color or only clips labelled with a particular color.
— Show Through Edits: Filters only clips that have through edits, or cuts where continuous timecode appears from the outgoing to the incoming half of the edit, that you may or may not want to remove, depending on why they’re there.
— Show Offline Clips: Isolates all offline clips (clips that have become unlinked from the corresponding source media on disk) in the Timeline, so you can quickly navigate to each one and troubleshoot the issue.
— Show Clip Conflicts: Filters all clips with clip conflict warning badges (indicating there is reel, name, and timecode metadata that overlap that of another clip) in the Timeline, so you can quickly navigate to each one and check whether they’re using the correct clip.
— Show Clips With Speed Effects: Filters all clips with linear or variable Speed Effects in the Timeline.
— Show Clips With Composite Effects: Filters all clips with Composite mode or Opacity settings other than the default (Normal, 100).