< Previous | Contents | Next >
To enable or disable playback post-roll:
— Choose Timeline > Playback post-roll
Switching Among Multiple Timelines
Timelines can be organized like any other clip in the Media Pool. To open or switch among timelines, use the following procedures.
To switch timelines, do one of the following:
— Double-click a timeline in the Media Pool on any page.
— Turn on Stacked Timelines in the Timeline View Options menu of the Edit page toolbar, so that all timelines you open appear as tabs. Clicking different tabs switches to that timeline.
— In the Edit page Timeline Viewer, choose a timeline from the Timelines drop-down menu at the top of the viewer.
— In the Color page, choose a timeline from the Timelines drop-down menu at the top of the Viewer.
— In the Fairlight page, choose a timeline from the Timelines drop-down menu to the left of the transport controls.

Toolbar
At the center of the toolbar that sits above the Timeline, several buttons let you choose different tools and options for performing various editing functions.

Buttons in the toolbar

Timeline View Options: The controls let you customize the look of the clips on the tracks (Filmstrip, Thumbnail, or Minimized), audio waveform displays,
stacked timelines, subtitles, and the adjustable height of the video and audio tracks.
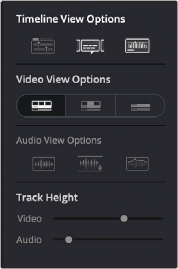
Selecting the Timeline View options

Selection Mode: The default mode in which you can move and resize clips in the Timeline, roll edits, and do other basic editing tasks. In this mode, making specific selections in the Timeline and using the nudge commands of Comma and Period resizes, moves, or rolls the selection, as does absolute or relative timecode entry.

Trim Edit Mode: In this mode, the Trim tool lets you make slip, slide, ripple, and roll edits by dragging different parts of clips in the Timeline, by making specific selections and using the “nudge” keyboard shortcuts of Comma and Period to move the selection left or right, or by making specific selections and using timecode entry to make relative or absolute adjustments.

Dynamic Trim Mode: This mode works in conjunction with either the Selection or Edit modes. With Dynamic Trim mode enabled, you can either resize and move clips (in Selection mode), or ripple, slip, or slide them (in Trim mode) using the JKL keyboard shortcuts that play forward and backward through the Timeline. While enabled, the spacebar triggers the Play Around Current Selection command. The Toolbar button for this mode also changes to show you whether you’re in slip or slide mode for nudging, timecode-entry adjustment, or dynamic trim (set by pressing the S key).


Blade Edit Mode: Lets you add cuts to clips at the playhead in the Timeline by clicking.

Insert Clip: Performs an insert edit to the Timeline with whatever clip is in the Source Viewer.

Overwrite Clip: Performs an overwrite edit to the Timeline with whatever clip is in the Source Viewer.

Replace Clip: Performs a replace edit to the Timeline with whatever clip is in the Source Viewer.

Snapping: Enables or disables clip snapping. When turned on, clip In and Out points, markers, and the playhead all snap to one another for reference while you’re editing.

Linked Selection: Enables or disables audio/video linking. When turned on, clicking a video clip in the Timeline automatically selects the corresponding audio clip if they’re linked together. When turned off, clicking a video clip won’t select its audio. Clip linking can be toggled while you work by pressing the Option key while clicking to make selections in the Timeline.

Position Lock: Prevents clips from being moved to the left or right, and it prevents all ripple operations. Essentially ensures all the Timeline elements stay in sync and can’t be adjusted accidentally.

< Previous | Contents | Next >