< Previous | Contents | Next >
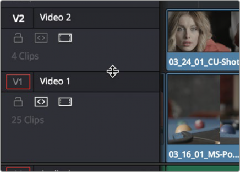
— Auto Select button: On by default. Light gray when that track is selected, dark gray when that track is not selected. When this control is on, clips on that track are automatically included in operations that affect all clips that intersect the position of the playhead, or that intersect
a region defined by the Timeline In and Out points. When this control is off, clips on that track are ignored by those same operations. Furthermore, rippling is suspended on tracks with Auto Select turned off for operations that would otherwise ripple the Timeline. Note, manual selections made in the Timeline that highlight specific clips take precedence over the Auto Select controls, so if Auto Select is turned off on track 1, but you’ve selected a clip on track 1, the selected clip will be still be affected by whatever operation you’re about to perform.
— Audio Channel Type indicator: Audio tracks also show which channel configuration that track uses, listing the number of channels for mono, stereo, 5.1, 7.1, and adaptive.
— Number of clips: The number of clips on that particular track of the Timeline is listed, but only if the track is tall enough to have room for them.
— Vertical and horizontal scroll bars: If your project is longer than the current width of the Timeline, or the number of video tracks is taller than the current height of the Timeline, these scroll bars let you drag to navigate around your program.
— Individual Timeline track resizing: Any track in the Timeline can be individually resized by dragging its top divider in the Track Header area.
![]()
Timeline Options
Resizing an individual timeline track by dragging its top border in the Track Header
Specific elements and behaviors within the Timeline can be customized in various ways.
Selection Follows Playhead
As of DaVinci Resolve 17, the Clip selection no longer automatically moves along with the playhead. Instead, a new set of commands lets you create and move a selection by holding down the Command key and pressing the Up, Down, Left, and Right Arrow keys. This allows you to select clips above and below the current track and to the left and right, independently of the playhead.
You can return the Clip Selection mode back to its previous behavior of automatically selecting the top clip it’s intersecting by choosing the option Timeline > Selection Follows Playhead.
Show Playhead Shadow
Ordinarily, the playhead is shown in the Timeline as a single line that indicates the beginning of the frame that you’re viewing in the Timeline Viewer. However, you can choose Show Playhead Shadow from the User Preferences UI Settings to display an orange-ish background surrounding the playhead.
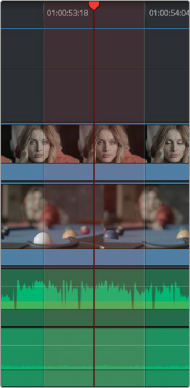
(Left) The playhead’s default look, (Right) The playhead showing the optional playhead shadow
![]()
This shadow can make it easier to see the playhead’s position, and it can also serve as a measuring tool for projects where you have an interest in visualizing a specific offset, in frames, both before and after the current position of the playhead. This offset can be adjusted by changing the Pre- and Post-Playhead Shadow Length parameters in the Editing panel of the User Preferences, which let you

TIP: You can set the “Pre-playhead shadow length” to 0, and the “Post-playhead shadow length” to 1 if you want to display a “Media Composer-style” playhead that shows the duration of the current frame.
TIP: You can set the “Pre-playhead shadow length” to 0, and the “Post-playhead shadow length” to 1 if you want to display a “Media Composer-style” playhead that shows the duration of the current frame.
TIP: You can set the “Pre-playhead shadow length” to 0, and the “Post-playhead shadow length” to 1 if you want to display a “Media Composer-style” playhead that shows the duration of the current frame.
specify the number of frames to shadow both before and after the playhead. The default length of the playhead shadow is 5 frames.
Enabling and Disabling Audio Scrubbing
Audio scrubbing is enabled by default, meaning that you’ll hear audio when dragging the playhead with the mouse back and forth. While this can be useful when you’re searching for audio cues, it can also be distracting if you’re just focused on the picture.
— Choose Timeline > Audio Scrubbing (Shift-S)
Playback Post-Roll
Enables the playhead to continue playing past the last clip in the Timeline for a duration equal to the “Post-roll time” Project Setting in the Editing panel. This is good for editors that want to experience a few moments of playback after cutting or fading to black after the last frame of audio and video in the Timeline.