< Previous | Contents | Next >
Right-clicking on a timecode field to use the Copy
Timecode command
Gang Viewers (Playhead Ganging)
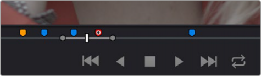
Ordinarily, the playhead movement in the Source and Timeline Viewers is independent. However, if you click the Option menu at the upper right-hand corner of either Viewer and turn Gang Viewers on, the movement of the Source and Timeline Viewer playheads is locked together, so that they move in unison. This is useful when you’re marking the In and Out points of a clip in the Source Viewer to match the duration of a clip or other event in the Timeline.
![]()
When the Source and Timeline Viewers are ganged, you can still switch focus back and forth between the Source and Timeline Viewers, and your video output device will consistently switch to output whichever Viewer is in focus.
Adding Markers
While markers, flags, and clip labels are covered in much more detail elsewhere in the editing section, the use of markers is so important that a summary of how to add and edit markers appears here. Markers are used to call attention to a particular frame within a specific clip. Markers can be individually colored, and can have customized name and note text. Whenever you enter text into a marker, that marker displays a small dot that indicates there’s more information inside of it. Once placed, markers snap to In and Out points, edit points, the playhead, and other markers whenever snapping is enabled, making it easy to use markers to “measure” edits and trims that you make in the Timeline.
Adding Markers to Clips
You can place markers on the jog bar of source clips in the Source Viewer (or in the Media Page Viewer) and on clips that are selected within a timeline.
Markers placed on a source clip
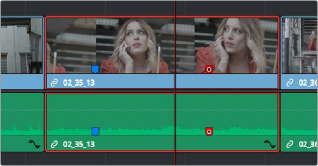
Markers placed on a clip in the Timeline
— To place a marker without doing anything else, move the playhead to the frame you want to mark, and then press M.
— To place a marker and immediately open the marker dialog to enter a name or note within it during playback, press Command-M. Playback pauses until you enter the text you want to and close the marker dialog again, at which point playback continues.
— Move the playhead to the frame you want to mark, then right-click in the jog bar and choose a marker color from the Add Marker submenu of the contextual menu.
![]()
Once you’ve added some markers, you may want to edit their contents to make them more useful.
1 Do one of the following:
— Press Command-M to add a marker during playback and immediately open its edit dialog.
— Double-click any marker you want to edit.
— Move the playhead to the frame containing the marker you want to annotate using Shift-Up Arrow/Down Arrow and press M.
— Select a marker anywhere in the Source Viewer or Timeline, and press Shift-M.
2 When the marker dialog opens, you can modify several properties.
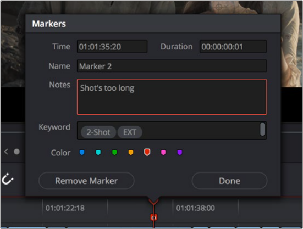
The properties found in the marker dialog
For much more information about markers, see Chapter 40, “Marking and Finding Clips in the Timeline.”