< Previous | Contents | Next >
Now that you’ve used playback commands to review your clips, you can place In and Out points to set the range of each clip that you want to edit into the Timeline. If you don’t set In or Out points, then the entire clip will be edited into the Timeline. If you do set In and Out points, those points will be saved in the Media Pool and used the next time you edit that clip.
Setting Clip In and Out Points in the Media Pool
You can set In and Out points right in the Media Pool to prepare for editing.
— Set the Media Pool to Metadata view, then move the pointer over the Thumbnail and wait a moment until dragging the pointer begins to skim through that clip. As you skim, press I and O to set In and Out points to encompass the part of that clip you’re going to want to use.
![]()
— Set the Media Pool to Thumbnail view, then move the pointer over a clip and wait a moment until dragging the pointer begins to skim through that clip. As you skim, press I and O to set In and Out points to encompass the part of that clip you’re going to want to use. When you’re finished, that clip’s thumbnail will show a range indicator at the bottom to show how much of the clip you’ve selected.
— Set the Media Pool to List view, then select a clip to expose it in the Filmstrip at the top of the Media Pool, drag the pointer through the Filmstrip to watch it play, and press I and O to set In and Out points to the appropriate range.
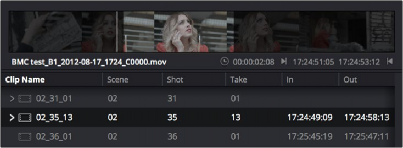
Marking In and Out points in the Filmstrip of the Media Pool in List view
The Filmstrip will dim the heads and tails to let you see the range of media you’ve marked. Once you’ve marked In and Out points in the Filmstrip, you can drag them to the left and right to move them.
Setting Clip In and Out Points in the Source Viewer
For a better look at your footage, you can set In and Out points in the Source Viewer in preparation for editing.