< Previous | Contents | Next >
5 To toggle among selecting the video+audio of the edit, just the video, or just the audio, press Option-U.
6 Perform whatever operation you need to. When you’re finished, using Up-Arrow or Down-Arrow to move the selection backward or forward in the Timeline, or press Command-Shift-A to deselect it.
Using Auto Select Controls to Define Selections
The Timeline Auto Select controls are extremely useful and versatile controls that serve many purposes. In short, they give you a way to specify which tracks will be affected or considered when you’re performing an operation upon multiple superimposed clips on multiple tracks of the Timeline.
Also, the Timeline Auto Select controls are particularly convenient when you’re using keyboard shortcuts to edit and you don’t want to have to grab your mouse to explicitly select a single clip, since you can turn Auto Select on or off via keyboard shortcuts.
Defining Selections With the Help of Auto Select Controls
![]()
Here is the easiest example of when the Auto Select controls are indispensable. In the following example, there are two superimposed video clips and three superimposed audio clips. Supposing you only want to delete the media from tracks V2, V1, and A1, but you want to leave the media on A2 and A3 alone, you can turn off the Auto Select controls for tracks A2 and A3, and set Timeline In and Out points to define the range of the clips you want to delete. When you press the Delete key, only the media on the Auto Select-enabled tracks is deleted.
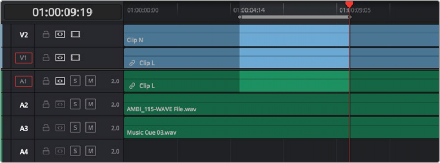
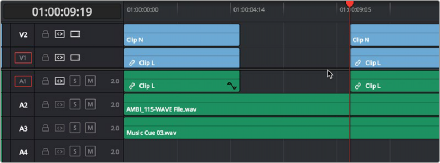
Before and After deleting a clip with Auto Select on Tracks A2, A3, and A4 turned off

TIP: If you set In and Out points to perform an operation and you don’t see any shading in the Timeline to indicate which parts of the Timeline will be affected and which won’t, chances are you have another selected clip in the Timeline somewhere you can’t see that’s overriding auto select. Press Command-Shift-A to de-select all and things should go back to normal.
TIP: If you set In and Out points to perform an operation and you don’t see any shading in the Timeline to indicate which parts of the Timeline will be affected and which won’t, chances are you have another selected clip in the Timeline somewhere you can’t see that’s overriding auto select. Press Command-Shift-A to de-select all and things should go back to normal.
TIP: If you set In and Out points to perform an operation and you don’t see any shading in the Timeline to indicate which parts of the Timeline will be affected and which won’t, chances are you have another selected clip in the Timeline somewhere you can’t see that’s overriding auto select. Press Command-Shift-A to de-select all and things should go back to normal.