< Previous | Contents | Next >
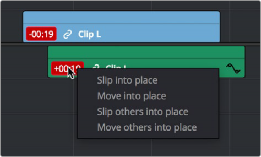
— Slip others into place: Slips the content of all other items that are linked to the selected clip, without moving them, so that all linked items are in sync.
— Move others into place: Moves all other items that are linked to the selected clip so that all linked items are in sync.
Commands in the contextual menu of sync tooltips
Manually Unlinking and Relinking Audio and Video
![]()
By default, clips that you import into DaVinci Resolve have their video and audio linked together, which makes it easy to maintain the relationship and sync of the audio and video components of a clip while you’re editing. However, there are many reasons you might want to override this automatic relationship, either breaking the A/V linking of a clip’s audio and video completely, or breaking it and relinking in a different way, or to different clips.
— To unlink audio and video from one another: Select a clip, then right-click it and choose Link from the contextual menu (or press Option-Command-L). Unlinked clips do not appear with a chain icon before the clip name in the Timeline.
— To link audio and video clips to one another: Command-click an audio clip and a video clip so they’re both selected, then right-click the selected clips and choose Link from the
contextual menu (or press Option-Command-L). A chain icon appears before the name of linked clips in the Timeline.
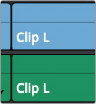
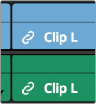
(Left) linked video and audio with a chain icon to the left of the clip name, (Right) unlinked audio and video
items have no icon.
Linking Multiple Clips in the Timeline
You don’t just have to link audio and video clips that sync together, though. You can actually link any number of video and audio clips that you want to be able to select, move, and edit together as one, even if they were never originally meant to be synced. This makes linking an organizational mechanism as much as a sync management tool.