< Previous | Contents | Next >
The Inspector has been redesigned to make it easier to find specific controls and to adjust common settings for your clips. Instead of a long vertical list, different aspects of the Inspector have now been organized into panels, with each controlling specific grouped sets of parameters for your clip.
The Inspector is activated by clicking on the Inspector panel in the upper-right section of the User Interface toolbar. The Inspector is broken up into individual Video, Audio, Effects, Transition, Image, and File panels. Inspector panels that are not applicable to your clip or selection are grayed out.
![]()
The Inspector Panel icon in the upper right of the UI toolbar

The Inspector panels showing Video, Audio, and File parameters available for adjustment; others are grayed out.
![]()
— To activate or deactivate a control: Click the toggle to the left of the control’s name.
The orange dot on the right means the control is activated. A gray dot on the left means the control is deactivated.
— To reveal a control’s parameters: Double-click the control’s name.
— To reset controls to their defaults: Click the reset button to the right of the control’s name.
Video
The Video panel of the Inspector exposes a vast array of controls designed to manipulate the size, speed, and opacity of your clips.
Transform
The Transform group includes the following parameters for resizing and repositioning your clips:
— Zoom X and Y: Allows you to blow the image up or shrink it down. The X and Y parameters can be linked to lock the aspect ratio of the image, or released to stretch or squeeze the image in one direction only.
— Position X and Y: Moves the image within the frame, allowing pan and scan adjustments to be made. X moves the image left or right, and Y moves the image up or down.
— Rotation Angle: Rotates the image around the anchor point.
— Anchor Point X and Y: Defines the coordinate on that clip about which all transforms are centered.
— Pitch: Rotates the image toward or away from the camera along an axis running through the center of the image, from left to right. Positive values push the top of the image away and bring the bottom of the image forward. Negative values bring the top of the image forward and push the bottom of the image away. Higher values stretch the image more extremely.
— Yaw: Rotates the image toward or away from the camera along an axis running through the center of the image from top to bottom. Positive values bring the left of the image forward and push the right of the image away. Negative values push the left of the image away and push the right of the image forward. Higher values stretch the image more extremely.
— Flip Image: Two buttons let you flip the image in different dimensions.
— Flip Horizontal control: Reverses the image along the X-axis, left to right.
— Flip Vertical control: Reverses the clip along the Y-axis, turning it upside down.
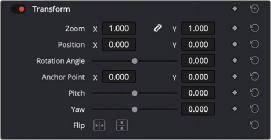
The Transform section of the Video Inspector panel
![]()
Smart Reframe (Studio Version Only)
The Smart Reframe feature makes it easier to quickly reframe material across extreme aspect ratio changes. It’s useful for situations where you’ve shot a 16:9 horizontal video and find yourself needing to create a vertically-oriented 9:16 version for mobile phones and social media deliverables, or
using 4:3 archival footage in a 2.39:1 widescreen movie. Smart Reframe can be used manually, or automatically executed using the DaVinci Resolve Neural Engine.
— Object of Interest: Tools for selecting the subject that the resize will frame around.
— Auto: DaVinci Resolve’s Neural Engine will analyze the clip and choose its most representative object. This will be the only option if more than one clip is selected for Smart Reframing.
— Reference Point: Allows you to manually adjust a bounding box around the subject to reframe around.
— Reframe: This button executes the Smart Reframe command. This can take some time depending on the length and number of clips.
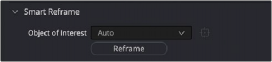
The Smart Reframe section of the Video Inspector panel
Cropping
The Video Inspector controls the image’s cropping parameters.
— Crop Left, Right, Top, and Bottom: Lets you cut off, in pixels, the four sides of the image. Cropping a clip creates transparency so that whatever is underneath shows through.
— Softness: Lets you blur the edges of a crop. Setting this to a negative value softens the edges inside of the crop box, while setting this to a positive value softens the edges outside of
the crop box.
— Retain Image Position: Clicking this checkbox will lock the crop parameters in place when you resize the image using the Transform tool above. Unchecking this box will scale and position the crop as well as the image.
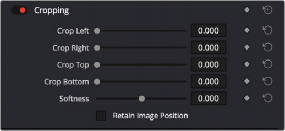
The Cropping section of the Video Inspector panel
Dynamic Zoom
![]()
The Dynamic Zoom controls, which are off by default, make it fast and easy to do pan and scan effects to zoom into or out of a clip. Turning the Dynamic Zoom group on activates two controls in the Inspector that work hand-in-hand with the Dynamic Zoom onscreen adjustment controls. For more information on using the Dynamic Zoom controls, see Chapter 50, “Compositing and Transforms in the Timeline.”
— Dynamic Zoom Ease: Lets you choose how the motion created by these controls accelerates. You can choose from Linear, Ease In, Ease Out, and Ease In and Out.
— Swap: This button reverses the start and end transforms that create the dynamic zoom effect.
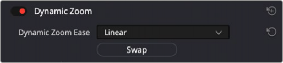
The Dynamic Zoom section of the Video Inspector panel
Composite
Composite modes can be used to combine clips that are superimposed over other clips in the Timeline.
— Composite Mode: This selects the type of composite mode to combine the superimposed clips. The default “Normal” means no compositing mode is applied. For more information on Composite Modes, see Chapter 50, “Compositing and Transforms in the Timeline.”
— Opacity: This slider makes a clip more or less transparent in addition to compositing already being done.
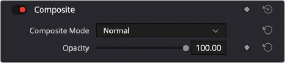
The Composite section of the Video Inspector panel
Speed Change
You can change the speed of your clip directly in the Video Inspector’s Speed Change controls. This method has the benefit of being available in both Cut and Edit pages.
— Direction: Selects the desired motion of the clip, forward, backward, or freeze frame.
— Speed %: Adjusting this slider changes the clips motion on a percentage basis. This value can be keyframed.
— Frames Per Second: Adjusting this slider changes the clips motion by increasing or decreasing the number of frames per second to play the clip back at. This value can be keyframed.
— Duration: You can directly select how long you want the clip to be by setting a specific duration here in HH:MM:SS:FF format. This will then automatically adjust the speed of the clip to playback all frames in that exact amount of time.
— Ripple Sequence checkbox: If you want the speed change you’re about to make to ripple the Timeline, pushing or pulling all clips following the current one to accommodate the clip’s new size, then turn on this checkbox.
![]()
— Pitch Correction checkbox: Checking this box will perform pitch correction on the audio attached to the clip so that while the audio duration is changed to match the picture speed, it will still sound natural. Be aware that pitch correction on large speed adjustments may not sound as good as pitch corrections made to small speed adjustments.
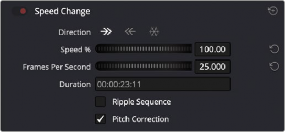
The Speed Change controls in the Video Inspector
Stabilization
These controls let you smooth out or even steady unwanted camera motion within a clip. The analysis is performed in such a way as to preserve the motion of individual subjects within the frame, as well as the overall direction of desirable camera motion, while correcting for unsteadiness.
These are the same stabilizer controls found in the Color page’s Tracker palette (minus the tracker graph), and the resulting stabilization analysis is mirrored on the Color page, where you can see the data visualized on the graph, if necessary.
A pop-up menu provides three different options that determine how the selected clip is analyzed and transformed during stabilization. You must choose an option first, before clicking the Stabilize button above, because the option you choose changes how the image analysis is performed. If you choose another option, you must click the Stabilize button again to reanalyze the clip.
— Perspective: Enables perspective, pan, tilt, zoom, and rotation analysis and stabilization.
— Similarity: Enables pan, tilt, zoom, and rotation analysis and stabilization, for instances where perspective analysis results in unwanted motion artifacts.
— Translation: Enables pan and tilt analysis and stabilization only, for instances where only X and Y stabilization gives you acceptable results.
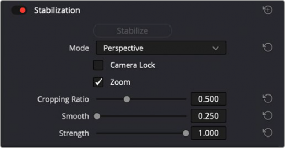
The Stabilization section of the Video Inspector panel
The other controls let you customize how aggressively the selected clip is stabilized.
— Stabilization Toggle: The toggle control for the Stabilization controls lets you turn stabilization off and on to be able to compare the stabilized and unstabilized image.
— Camera Lock: Turning on this checkbox disables Cropping Ratio and Smooth, and enables the stabilizer to focus on eliminating all camera motion from the shot in an effort to create a locked shot.
— Zoom: When this checkbox is turned on, the image is resized by a large enough percentage to eliminate the blanking (black edges) that is the result of warping and transforming the image to eliminate unwanted camera motion. The lower a value Cropping Ratio is set to, the more DaVinci Resolve will need to zoom into an image to eliminate these blanked edges. If you turn
![]()
this off, the image is not zoomed at all, and whatever blanking intrudes into the image is output along with the image, on the assumption that you’ll have dedicated compositing artists deal with eliminating this blanking by filling in the missing image data in a more sophisticated manner. You may also leave this checkbox turned off if you’re planning on animating the Input Sizing Zoom parameter to dynamically zoom into and out of a shot being stabilized to eliminate blanking only where it occurs, using only as much zooming as is necessary for each region of the shot.
— Cropping Ratio: This value limits how hard the stabilizer tries to stabilize, by dictating how much blanking or zooming you’re willing to accept in exchange for eliminating unwanted motion. A value of 1.0 results in no stabilization being applied. Progressively lower values enable more aggressive stabilization. Changing this value requires you to click the Stabilize button again to reanalyze the clip.
— Smooth: Lets you apply mathematical smoothing to the analyzed data used to stabilize the clip, allowing camera motion in the shot while eliminating unwanted jittering. Lower values perform less smoothing, allowing more of the character of the original camera motion to show through, while higher values smooth the shot more aggressively. Changing this value requires you to click the Stabilize button again to reanalyze the clip.
— Strength: This value is a multiplier that lets you choose how tightly you want to use the stabilization track to eliminate motion from a shot using the current analysis. With a value of 1, stabilization is maximized. Since some clips might look more natural with looser stabilization, choosing a number lower than 1 lets a percentage of the original camera motion show through. Zero (0) disables stabilization altogether. As an additional tip, you can invert the stabilization by choosing –1 when pasting a stabilization analysis from another clip to perform a match move based on the overall motion of the scene, and you can use a negative value either lower than 0 or higher than –1 to under or overcompensate when inverting the stabilization, simulating the effects of parallax where foreground and background planes move together but at different speeds.
Lens Correction
The Lens Correction group (only available in Resolve Studio) has two controls that let you correct for lens distortion in the image, or add lens distortion of your own.
— Analyze: Automatically analyzes the frame in the Timeline at the position of the playhead for edges that are being distorted by wide angle lens. Clicking the Analyze button moves the
Distortion slider to provide an automatic correction. If you’re analyzing a particularly challenging clip, a progress bar will appear to let you know how long this will take.
— Distortion: Dragging this slider to the right lets you manually apply a warp to the image that lets you straighten the bent areas of the picture that can be caused by wide angle lenses. If you clicked the Analyze button and the result was an overcorrection, then dragging this slider to the left lets you back off of the automatic adjustment until the image looks correct.
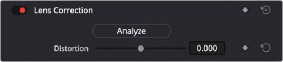
The Lens Correction section of the Video Inspector panel
Retime and Scaling
The Retime and Scaling group has four parameters that affect retiming quality and clip scale:
![]()
— Retime Process: Lets you choose a default method of processing clips in mixed frame rate timelines and those with speed effects (fast forward or slow motion) applied to them, on a clip-by- clip basis. The default setting is “Project Settings,” so all speed-effected clips are treated the same way. There are three options: Nearest, Frame Blend, and Optical Flow, which are explained in more detail in the Speed Effect Processing section of Chapter 51, “Speed Effects.”
— Motion estimation mode: When using Optical Flow to process speed change effects or clips with a different frame rate than that of the Timeline, the Motion Estimation pop-up lets you choose
the best-looking rendering option for a particular clip. Each method has different artifacts, and the highest quality option isn’t always the best choice for a particular clip. The default setting is “Project Settings,” so all speed-effected clips are treated the same way. There are several options. The “Standard Faster” and “Standard Better” settings are the same options that have been available in previous versions of DaVinci Resolve. They’re more processor efficient and yield good quality that are suitable for most situations. However, “Enhanced Faster” and “Enhanced Better” should yield superior results in nearly every case where the standard options exhibit artifacts, at the expense of being more computationally intensive, and thus slower on most systems.
The Speed Warp setting is available for even higher-quality slow motion effects using the DaVinci Neural Engine. Your results with this setting will vary according to the content of the clip, but in ideal circumstances this will yield higher visual quality with fewer artifacts than even the Enhanced Better setting.
— Scaling: Lets you choose how clips that don’t match the current project resolution are handled on a clip-by-clip basis. The default setting is “Project Settings,” so that all mismatched clips use the same method of being automatically resized. However, you can also choose an individual method of automatic scaling for any clip. The options are Crop, Fit, Fill, and Stretch; for more information see the 2D Transforms section of Chapter 149, “Sizing and Image Stabilization.”
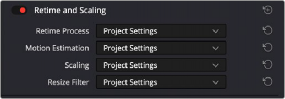
The Retime and Scaling section of the Video Inspector panel
— Resize Filter: For clips that are being resized in any way, this setting lets you choose the filter method used to interpolate image pixels when resizing clips. Different settings work better for different kinds of resizing. There are four options:
— Sharper: Usually provides the best quality in projects using clips that must be scaled up to fill a larger frame size, or scaled down to HD resolutions.
— Smoother: May provide higher quality for projects using clips that must be scaled down to fit an SD resolution frame size.
— Bicubic: While the Sharper and Smoother options are slightly higher quality, Bicubic is still an exceptionally good resizing filter and is less processor intensive than either of those options.
— Bilinear: A lower quality setting that is less processor intensive. Useful for previewing your work on a low-performance computer before rendering, when you can switch to one of the higher quality options.
![]()
— Other Resize Methods: A selection of specific resize algorithms is available if you need to match them to other VFX workflows.
— Deinterlace Quality (Interlaced Clips Only): Allows per clip deinterlace-quality adjustments regarding how DaVinci Resolve combines the two fields of interlaced media into progressive frames.
— Normal: A high-quality deinterlacing method that is suitable for most clips. For many clips, Normal is indistinguishable from High. Normal is always used automatically during playback in DaVinci Resolve.
— High: A more processor-intensive method that can sometimes yield better results, depending on the footage, at the expense of slower rendering times.
— DaVinci Neural Engine: This option uses the advanced machine learning algorithms of the DaVinci Neural Engine to analyze motion between the fields of interlaced material and reconstructs them into a single frame. This option is very computationally intensive but, ideally, will deliver an even more aesthetically pleasing result than the “high” setting.
Super Scale
For instances when you need higher-quality upscaling than the standard Resize Filters allow, you can now enable one of the “Super Scale” options in the Inspector. Unlike using one of the numerous
scaling options in the Edit, Fusion, or Color pages, Super Scale actually increases the source resolution of the clip being processed, which means that clip will have more pixels than it did before and will
be more processor-intensive to work with than before, unless you optimize the clip (which bakes in the Super Scale effect into the optimized media) or cache the clip in some way. For more detailed information on Super Scale, see Chapter 11, “Image Sizing and Resolution Independence.”