< Previous | Contents | Next >
After you’ve created one or more multicam clips and edited them into a timeline, actually executing a multicam edit is simple.
1 Open the Timeline you created to hold the multicam clip or clips comprising your edit, and position the playhead where you want to start editing.
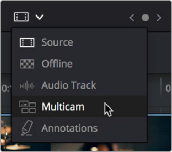
2 Choose Multicam from the Source Viewer mode drop-down.
Switching the Source Viewer to Multicam viewing
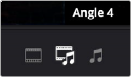
The Source Viewer changes to display all of the different angles within that clip as switching controls.
![]()
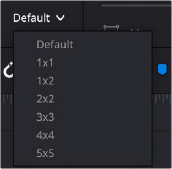
3 Choose how many angles you want to display from the drop-down menu at the bottom right of the Source Viewer. If you’re using a computer that’s not very fast, you may need to reduce the number of angles you’re viewing to maintain real time playback.
Choosing how many angles to view in the Multicam Viewer
If there are more angles within the multicam clip intersecting the playhead in the Timeline than the Multicam Viewer is set to show, then page controls appear to the left of this drop-down menu that let you choose which set of angles you want to view.
You can move to another page of angles by doing one of the following:
— Click any dot to jump to that page of angles.
— Click the arrows to move among next/previous sets of angles.
— Choose Edit > Multicam > Previous Page (Option-Shift-Left Arrow) or Next Page (Option-Shift-Right Arrow).
4 Choose whether you want to switch both the audio and video, just the video, or just the audio using the Audio/Video selection buttons at the bottom center of the Multicam Viewer. You can also choose Edit > Multicam > Video and Audio (Option-Shift-[ ), Video Only (Option-Shift-] ), Audio Only (Option-Shift-\).