< Previous | Contents | Next >
Many of the instructions in this section require the use of the Inspector, which can be opened or closed by clicking the Inspector button at the far right of the Edit and Cut page toolbars, or by double- clicking a transition or generator in the Timeline.
There are three ways that the parameters of clips in the Timeline can be displayed in the Inspector:
— If no clips are selected in the Timeline, then the clip in the highest auto-select-enabled track that intersects the playhead will have its parameters shown in the Inspector.
— The Inspector always shows the parameters of one or more selected items in the Timeline, which will override the clip in the highest track that intersects the playhead, if necessary. Changing the selection changes which parameters are displayed, and the parameters you edit in the Inspector only alter the currently selected clip. If multiple clips are selected, the Inspector displays “Multiple Clips” and allows you to adjust the parameters of all selected clips at the same time.
— Choosing Timeline > Selection Follows Playhead sets DaVinci Resolve to always select whichever clip intersects the playhead in the Timeline. The result is that the Inspector always displays the parameters of the clip at the playhead, with the added bonus that the clip at the playhead is also selected for other editorial functions. If there are multiple superimposed clips intersecting the playhead all at once, the topmost video clip with an enabled Auto Select control will be selected, thus exposing its parameters in the Inspector, and all other clips will be ignored.
Inspector Effects Controls
![]()
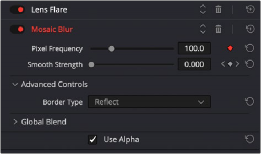
Different Effects clips in the Timeline expose different controls. Whichever panels are exposed, parameters within each panel are organized into groups, with a title bar providing the name of that group, along with other controls that let you control all parameters within that group at the same time.

The Effects Inspector controls
These controls include:
— Enable button: A toggle control to the left of the parameter group’s name lets you disable and re- enable every parameter within that group at once. Orange means that track’s enabled. Gray is disabled.
— Parameter group title bar: Double-clicking the title bar of any group of parameters collapses or opens them. Even more exciting than that, Option-double-clicking the title bar of one parameter group collapses or opens all parameter groups at once.
— Keyframe and Next/Previous Keyframe buttons: This button lets you add or remove keyframes at the position of the playhead to or from every single parameter within the group. When the button is highlighted orange, a keyframe is at the current position of the playhead. When it’s dark gray, there is no keyframe. Left and right arrow buttons let you jump the playhead from keyframe to keyframe for further adjustment.
— Reset button: Lets you reset all parameters within that group to their default settings.