< Previous | Contents | Next >
The Fairlight FX Noise Reduction custom UI interface
— To rearrange the order of multiple video filters applied to a clip: Click the move up or move down buttons in any filter’s title bar, to the left of each filter’s Trash Can button.
![]()
— To disable or re-enable a filter: Click the toggle control at the far left of each filter’s title bar. Orange means that track’s enabled. Gray is disabled.
— To remove a filter: Click the Trash Can button.
— To reset a filter: Click the Reset button at the far right of the filter’s title bar.
— To open or collapse a filter’s parameters: Double-click the title bar.
— To open or collapse the parameters of all filters: Option-click the title bar.
Once applied to a clip, video filters can also be keyframed or automated just like any other Inspector setting, to create dynamic effects that change over time.
Render in Place
Render in Place allows you to render and bake in all effects that are applied to a single clip on the Edit page Timeline. This command, which only works in the Edit page, creates an entirely new media file that replaces the original clip on the Timeline. This new file is created in the same directory as the original source file and is added to the Media Pool automatically.
You can use Render in Place to improve the playback performance of a computationally intensive clip, or use it to create a new high-quality master media with effects that have been finalized baked in.
For example, perhaps you have created a clip with a complicated speed ramp, and you want to pass it to another editor or vfx artist in a round-trip rendering scenario, but you are worried about how other programs may interpret the speed effects. In this scenario you could render the clip in place at master quality, and then render and deliver the program.
Render in Place is not a one way operation. Afterwards, you have the option to “Decompose to Original” to bring back the original clip with the original effects, if you need to make a change because the clip was not really as finalized as you were hoping.
1 Select one or more clips on the Edit Page timeline. Selecting multiple clips results in each clip being individually rendered in place, but as a batch operation.
2 Right-click the selection, and choose “Render in Place” from the contextual menu.
3 Choose the appropriate Render Clip Options, and then click the “Render” button.
— Start Timecode: Sets the starting timecode value for the clip.
— Format: Selects the media file format.
— Codec: Selects the video codec.
— Type: Specifies the compression parameters of the selected codec.
— Include Handles: Gives you the option to specify the number of frames before and after the clip In/Out points to be rendered.
— Include Video Effects: Turn on this checkbox to bake in all effects that have been applied to the clip, such as sizing, Open FX or Resolve FX, and speed effects. Turning this checkbox off renders the clip with speed effects baked in, but no other effects applied.
![]()
— Include Fusion Composition: Turn on this checkbox to bake in any compositions attached to the clip.
— Include Color Grading Effects: Turn on this checkbox to bake in any color grading attached to the clip from the Color page.
— Render at Source Resolution: When checked the newly rendered media will be at the resolution of the original source media, rather than the timeline resolution.
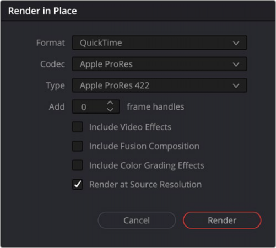
The Render in Place options
4 Use the File dialog that appears to choose where you want to save the resulting media. Choose a location and click Open.
A progress bar appears to show you how long this will take. When finished, your new media is saved in the designated location, added to the Media Pool, and will replace each corresponding source clip on the Timeline.