
< Previous | Contents | Next >
When this key is pressed and held, it allows the user to slip in place the footage of the clip to the left of the Smart Indicator back and forth by moving the search dial. A four-way multiview will show the In and Out points for both source and destination clips as you slip. The clip that will slip will be highlighted in orange. Release the key to confirm the edit.
In the Edit page, the target clip for the slip is always the clip nearest to the left of the playhead position.
SLIP DEST (Slip Destination)
When this key is pressed and held, it allows the user to slip in place the footage of the clip to the right of the Smart Indicator back and forth by moving the search dial. A four-way multiview will show the In and Out points for both source and destination clips as you slip. The clip that will slip will be highlighted in orange. Release the key to confirm the edit.
In the Edit page, the target clip for the slip is always the clip nearest to the right of the playhead position.
TRANS DUR (Transition Duration)/SET
Holding down this key when a transition is under the Smart Indicator or playhead will allow you to change the duration of the transition using the search dial. Turning the dial left will shorten the transition, and right will lengthen it. Once the duration is correct, release the key.
TIP: Multiple transitions can be changed at the same time by holding down Command and selecting the transitions on the Upper Timeline, then pressing the appropriate transition key (CUT, DIS, SMTH CUT).
TIP: Multiple transitions can be changed at the same time by holding down Command and selecting the transitions on the Upper Timeline, then pressing the appropriate transition key (CUT, DIS, SMTH CUT).
TIP: Multiple transitions can be changed at the same time by holding down Command and selecting the transitions on the Upper Timeline, then pressing the appropriate transition key (CUT, DIS, SMTH CUT).
![]()
Double Pressing this key (SET) allows you to set the current transition length as the default transition duration.
Transition Keys
This set of keys provide immediate shortcuts to the most commonly used transition commands.
CUT
This key will change any existing transition to a simple cut at the Timeline edit point, as shown by the Smart Indicator. It will not add a new cut at the playhead position. To do this use the Split Clip (Command-\) function instead.
The LED on this key will illuminate to show you the Cut Transition is armed in Live Overwrite mode.
In the Edit page, this key will change any existing transition to a simple cut at the edit closest to (either before or after) the playhead.
DAVINCI RESOLVE SPEED EDITOR
DAVINCI RESOLVE SPEED EDITOR
DAVINCI RESOLVE SPEED EDITOR
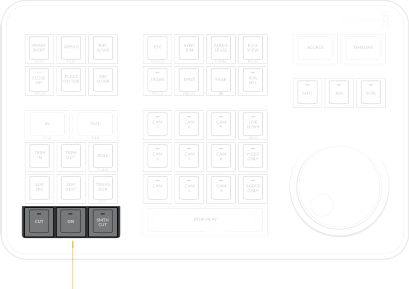
Transition keys for Cut, Dissolve, and Smooth Cut
DIS (Dissolve)
This key will add a one second dissolve centered between the two shots at the Timeline edit point, as shown by the Smart Indicator. If there is another transition already present there, it will replace it.
The LED on this key will illuminate to show you the Dissolve transition is armed in Live Overwrite mode.
![]()
In the Edit page, this key will change any existing transition to a dissolve at the edit closest to (either before or after) the playhead.
SMTH CUT (Smooth Cut)
This key will add a Smooth Cut transition centered between the two shots at the Timeline edit point, as shown by the Smart Indicator. If there is another transition already present there, it will replace it.
The LED on this key will illuminate in Live Overwrite mode to show you the Smooth Cut transition is armed.
In the Edit page, this key will change any existing transition to a Smooth Cut at the edit closest to (either before or after) the playhead.
Smooth Cuts are special-purpose transitions designed to make short jump cuts in the middle of a clip unnoticeable. This is done by using optical flow processing to match the same features on either
side of a cut in order to automatically morph a subject from one position to another over the duration of the transition.
The Smooth Cut effect works best on clips such as sit-down interviews and close-up head shots with a minimum of background and subject motion, and where the subject’s position on either side of the cut is not significantly different. A good example of when Smooth Cut is effective is when you’re cutting pauses, partial repeats, filler sounds such as “um” or “you know,” or other speech disfluencies out of an interview clip to tighten the dialog, and you want to eliminate the little “jump” that occurs at the cut without having to cut away to B-roll. Applying a short two- or four-frame Smooth Cut transition to the edit can make this kind of edit invisible, as long as the speaker doesn’t change position significantly during the cut. The more motion there is in the background of the shot, and the more the speaker changes position, the harder it will be to get a useful result using Smooth Cut. Although the default duration for any transition is one second, you’ll find that Smooth Cut transitions may work much better when they’re short; 2- to 6-frame Smooth Cut transitions often work best to disguise jump cuts.