< Previous | Contents | Next >
Replacing Nodes Using the Toolbar
The Fusion toolbar, located above the Node Editor, displays a selection of frequently-used nodes, displayed as buttons with distinct icons. These buttons make it fast to add Merge, Background, Paint, Mask, Transform, and many other commonly used nodes with the click of a button, or the drag of your pointer.
![]()

TIP: If you don’t know which node a particular icon corresponds to, just hover your pointer over any toolbar button and a tooltip will display the full name of that tool.
TIP: If you don’t know which node a particular icon corresponds to, just hover your pointer over any toolbar button and a tooltip will display the full name of that tool.
TIP: If you don’t know which node a particular icon corresponds to, just hover your pointer over any toolbar button and a tooltip will display the full name of that tool.
The Fusion page toolbar.
— To add a node after a selected node: Select a node in the Node Editor and then click a toolbar button.
— To add a disconnected node to the Node Editor: Deselect all nodes in the Node Editor and then click a toolbar button.
— To insert a new node into the node tree: Drag a toolbar button into the Node Editor and onto the connection line between any two compatible nodes. When the connection highlights as the node is over it, drop the node and it’ll be inserted.
![]()
— To create a disconnected node: Drag a toolbar button into an empty part of the Node Editor. Dragging a toolbar button into the Inspector also creates a disconnected node.
— To insert a new node after a node loaded into a viewer: Drag a toolbar button onto a viewer to insert a new node after whichever node is viewed, regardless of whether any nodes are selected.
1 Drag a button from the toolbar so that it’s directly over the node in the Node Editor that you want replaced. When the node underneath is highlighted, drop the node.
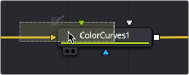
Dragging a node from the toolbar to replace an existing tool.

TIP: When you replace one node with another, any settings that are identical between the two nodes are copied into the new node. For example, replacing a Transform node with a Merge will copy the existing center and angle values from the Transform to the Merge.
TIP: When you replace one node with another, any settings that are identical between the two nodes are copied into the new node. For example, replacing a Transform node with a Merge will copy the existing center and angle values from the Transform to the Merge.
TIP: When you replace one node with another, any settings that are identical between the two nodes are copied into the new node. For example, replacing a Transform node with a Merge will copy the existing center and angle values from the Transform to the Merge.
2 Click OK in the dialog to confirm the replacement.