< Previous | Contents | Next >
Markers help identify important frames in a project that might affect how you keyframe animation. They may indicate the frame where a dragon breathes fire at a protagonist, the moment that someone passes through a portal, or any other important frame in a composition that you need to keep track of. Markers added to the Timeline in the Cut, Edit, Fairlight, or Color page will appear in the Keyframes Editor and Spline Editor of the Fusion page. They can also be added from the Keyframes Editor or the Spline Editor while working in Fusion Studio or the Fusion page. Markers in Fusion appear as a small handle with a line extending vertically through the graph view when selected.
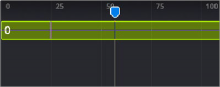
A marker being moved in the Keyframed Editor
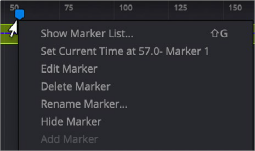
— Right-click at a frame in the Timeline Ruler of the Keyframes Editor and choose Add Marker from the contextual menu.
The most important attribute of a marker is its position. For it to add value, a marker must be placed on the frame you intended it to be on. Hovering the cursor over a marker displays a tooltip with its current frame position. If it is on the wrong frame, you can drag it along the Time Ruler to reposition it.

NOTE: Markers attached to clips in the Edit page Timeline are visible on MediaIn nodes in Fusion’s Keyframes Editor but not editable. They are not visible in the Spline Editor.
NOTE: Markers attached to clips in the Edit page Timeline are visible on MediaIn nodes in Fusion’s Keyframes Editor but not editable. They are not visible in the Spline Editor.
NOTE: Markers attached to clips in the Edit page Timeline are visible on MediaIn nodes in Fusion’s Keyframes Editor but not editable. They are not visible in the Spline Editor.
![]()
Markers added to the Time Ruler are editable in the Fusion page, and the changes appear back in the other DaVinci Resolve pages. Time Ruler markers can be added, moved, deleted, renamed, and given descriptive notes from within Fusion’s Keyframes or Spline Editor.
Jumping to Markers
Double-clicking a marker jumps the playhead to that marker’s position.
Renaming Markers
By default, a marker uses the frame number in its name, but you can give it a more descriptive name to go along with the frame number, making it easier to identify. To rename a marker in Fusion, right- click over the marker and choose Rename Guide from the contextual menu. Enter a name in the dialog and click OK.