< Previous | Contents | Next >
— Build Direction: When auto-building or laying out a node tree, Build Direction controls whether tools are organized horizontally or vertically.
— Scale: The Scale menu allows you to select the default zoom level of the Node Editor when a new composition is created.
Pipe Grab Distance
The Pipe Grab Distance slider allows you to choose how close the pointer must be (in pixels) to a connection line in the node tree when selecting them.
Link Grab Distance
The Link Grab Distance slider allows you to choose how close the pointer must be (in pixels) to a knot on a node before a connection is made or removed. 0 pixels means you must be directly on the knot, while a maximum setting of 20 means you can be 20 pixels from a knot and still connect to it.
Group Opacity
This slider controls the opacity of an expanded group’s background in the Node Editor.
Frame Format
![]()
Frame Format preferences allow you to select the resolution and frame rate for the nodes that generate images like Background, fast noise, and Text+. It also sets the color bit depth for final renders, previews, and interactive updates in the viewer. The color bit depth settings only apply to Fusion Studio. Rendering in DaVinci Resolve always use 32-bit float.
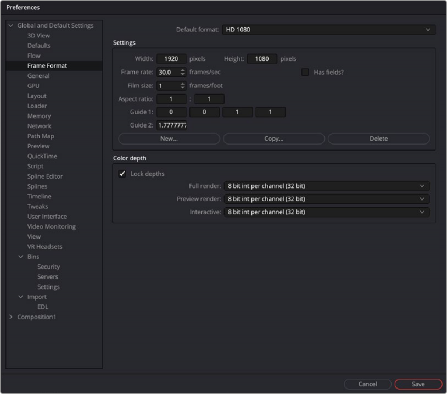
The Frame Format preferences
Default Format
This drop-down menu is used to select the default resolution for Generator tools from a list of presets. This is only a default setting; these settings can be overridden using the Resolution settings in a node’s Inspector.
Use the Edit boxes to change any of the default settings. When creating a new setting, press the New button and enter a name for the setting in the dialog box that appears and enter the parameters.
Settings
The Settings section defines the format that is selected in the Default Format menu. You can modify an existing format or create a new one.
— Width/Height: When creating a new format for the menu or modifying an existing menu item, you specify the Width or Height in pixels of the format using these fields.
— Frame Rate: Enter or view the frames per second played by the format. This sets the default Frame Rate for previews and final renders from the Saver tool. It also sets the playback for the comp itself, as well as the frame to time code conversion for tools with temporal inputs.
— Has Fields: When this checkbox is enabled, any Creator or Loader tool added to the Node Editor will be in Fields process mode.
— Film Size: This field is used to define how many frames are found in one foot of film. The value is used to calculate the display of time code in Feet + Frames mode.
— Aspect Ratio: These two fields set the pixel aspect ratio of the chosen frame format.
![]()
— Guide 1: The four fields for Guide 1 define the left, top, right, and bottom guide positions for the custom guides in the viewer. To change the position of a guide, enter a value from 0 to 1. The bottom-left corner is always 0/0, the top-right corner is always 1/1. If the entered value’s aspect does not conform to the frame format as defined by the Width and Height parameters, an additional guide is displayed onscreen. The dotted line represents the image aspect centered about Guide 1’s Center values.
— Guide 2: This setting determines the image aspect ratio in respect to the entire frame format width and height. Values higher than 1 cause the height to decrease relative to the width. Values smaller than 1 cause height to increase relative to width.
— New: You use the New button to create a new default setting in the drop-down menu. Once you click the button, you can name the setting in the dialog box that appears.
— Copy: The Copy button copies the current setting to create a new one for customization.
— Delete: The Delete button will remove the current setting from the default drop-down list.
Color Depth
The three menus in the Color Depth section are used to select the color mode for processing preview renders, interactive renders, and full (final) renders. Processing images at 8-bit is the lowest color depth and is rarely sufficient for final work these days but is acceptable for fast previews. 16-bit color has much higher color fidelity but uses more system resources. 16-bit and 32-bit float per channel uses even more system resources and is best for digital film and HDR rendered images.
Generally, these options are ignored by the composition unless a Loader or Creator tool’s Color Depth control is set to Default.