< Previous | Contents | Next >
— Press Q for Position
— Press W for Rotation
— Press E for Scaling
![]()
The Position, Rotation, and Scale modes in the Transform toolbar
Using Onscreen Transform Controls
In all three modes, red indicates the object’s local X-axis, green the Y-axis, and blue the Z-axis, respectively (just remember RGB = XYZ). You can drag directly on the red, green, or blue portion of any onscreen control to constrain the transform to that axis, or if you drag the center of the onscreen control, you can apply a transform without constraints. Holding Option and dragging in the viewer allows you to freely translate in all three axes without clicking on a specific control.
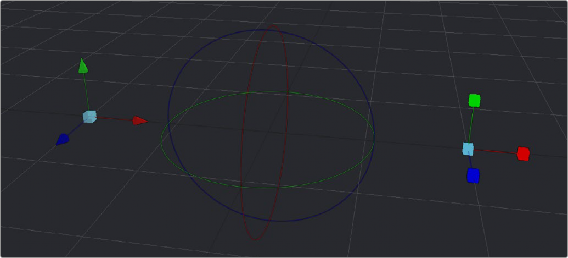
![]()
From left to right, the Position, Rotation, and Scale onscreen Transform controls
If the Scale’s Lock XYZ checkbox is enabled in the Inspector, only the overall scale of the object is adjusted by dragging the red or center onscreen control, while the green and blue portions of the onscreen control have no effect. If you unlock the parameters, you are able to scale an object along individual axes separately to squish or stretch the object.
Selecting Objects
With the onscreen controls visible in the viewer, you can select any object by clicking on its center control. Alternatively, you can also select any 3D object by clicking its node in the Node Editor.
Pivot
In 3D scenes, objects rotate and scale around an axis called a pivot. By default, this pivot goes through the object’s center. If you want to move the pivot so it is offset from the center of the object, you can use the X, Y, and Z Pivot parameters in the Inspector.