< Previous | Contents | Next >
Determines which channel of the connected input image is used to displace the geometry.
Use these sliders to scale (magnify) and bias (offset) the displacement. The bias is applied first and the scale afterward.
— Point to Camera: When the Point to Camera checkbox is enabled, each vertex is displaced toward the camera instead of along its normal. One possible use of this option is for displacing a camera’s image plane. The displaced camera image plane would appear unchanged when viewed through the camera but is deformed in 3D space, allowing one to comp-in other 3D layers that correctly interact in Z.
— Camera: This menu is used to select which camera in the scene is used to determine the camera displacement when the Point to Camera option is selected.
Common Controls
The Settings tab controls are common to many 3D nodes, and their descriptions can be found in “The Common Controls” section at the end of this chapter.
Duplicate 3D [3Dp]
![]()
The Duplicate 3D node
Duplicate 3D Node Introduction
Similar to the 2D version called the Duplicate node, the Duplicate 3D node can be used to duplicate any geometry in a scene, applying a successive transformation to each, and creating repeating patterns and complex arrays of objects. The options in the Jitter tab allow non-uniform transformations, such as random positioning or sizes.
Inputs
The Duplicate 3D node has a single input by default where you connect a 3D scene. An optional Mesh input appears based on the settings of the node.
— SceneInput: The orange Scene Input is a required input. The scene or object you connect to this input is duplicated based on the settings in the Control tab of the Inspector.
— MeshInput: A green optional mesh input appears when the Region’s tab Region menu is set to mesh. The mesh can be any 3D model, either generated in Fusion or imported.
Basic Node Setup
The output of a Duplicate 3D node typically connects to a Merge 3D node, integrating it into a larger scene. The 3D geometry you want duplicated, in this case a Cube 3D, is connected to the orange input.
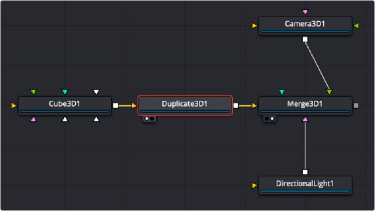
A Cube 3D is duplicated
![]()
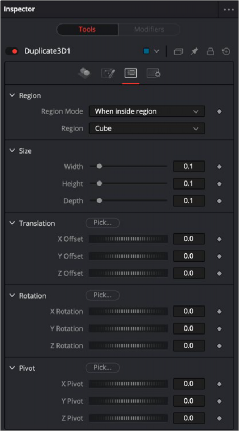
Inspector
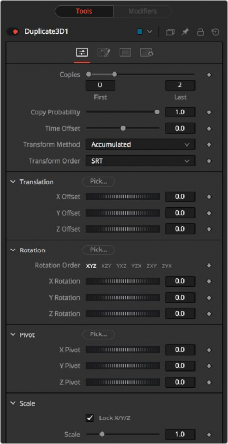
Duplicate 3D controls
Controls Tab
The Controls tab includes all the parameters you can use to create, offset, and scale copies of the object connected to the scene input on the node.
Use this range control to set the number of copies made. Each copy is a copy of the last copy, so if this control is set to [0,3], the parent is copied, then the copy is copied, then the copy of the copy is copied, and so on. This allows some interesting effects when transformations are applied to each copy using the controls below.
Setting the First Copy to a value greater than 0 excludes the original object and shows only the copies.
Use the Time Offset slider to offset any animations that are applied to the source geometry by a set amount per copy. For example, set the value to -1.0 and use a cube set to rotate on the Y-axis as the source. The first copy shows the animation from a frame earlier; the second copy shows animation from a frame before that, etc. This can be used with great effect on textured planes—for example, where successive frames of a clip can be shown.
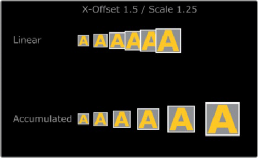
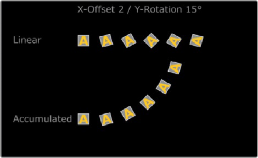
— Linear: When set to Linear, transforms are multiplied by the number of the copy, and the total scale, rotation, and translation are applied in turn, independent of the other copies.
![]()
— Accumulated: When set to Accumulated, each object copy starts at the position of the previous object and is transformed from there. The result is transformed again for the next copy
With this menu, the order in which the transforms are calculated can be set. It defaults to Scale- Rotation-Transform (SRT).
Using different orders results in different positions of your final objects.
The X, Y, and Z Offset sliders set the offset position applied to each copy. An X offset of 1 would offset each copy 1 unit along the X-axis from the last copy.
The buttons along the top of this group of rotation controls set the order in which rotations are applied to the geometry. Setting the rotation order to XYZ would apply the rotation on the X-axis first, followed by the Y-axis rotation, then the Z-axis rotation.
The three Rotation sliders set the amount of rotation applied to each copy.
The pivot controls determine the position of the pivot point used when rotating each copy.
— Lock: When the Lock XYZ checkbox is selected, any adjustment to the duplicate scale is applied to all three axes simultaneously. If this checkbox is disabled, the Scale slider is replaced with individual sliders for the X, Y, and Z scales.
— Scale: The Scale controls tell Duplicate how much scaling to apply to each copy.
Jitter Tab
![]()
The options in the Jitter tab allow you to randomize the position, rotation, and size of all the copies created in the Controls tab.

Duplicate 3D Jitter tab
The Random Seed slider is used to generate a random starting point for the amount of jitter applied to the duplicated objects. Two Duplicate nodes with identical settings but different random seeds produce two completely different results.
Click the Randomize button to auto generate a random seed value.
Adjusting this slider determines the percentage of copies that are affected by the jitter. A value of 1.0 means 100% of the copies are affected, while a value of 0.5 means 50% are affected.
Use the Time Offset slider to offset any animations that are applied to the source geometry by a set amount per copy. For example, set the value to –1.0 and use a cube set to rotate on the Y-axis as the source. The first copy shows the animation from a frame earlier; the second copy shows animation from a frame before that, etc. This can be used with great effect on textured planes—for example, where successive frames of a clip can be shown.
Use these three controls to adjust the amount of variation in the X, Y, and Z translation of the duplicated objects.
Use these three controls to adjust the amount of variation in the X, Y, and Z rotation of the duplicated objects.
![]()
Use these three controls to adjust the amount of variation in the rotational pivot center of the duplicated objects. This affects only the additional jitter rotation, not the rotation produced by the Rotation settings in the Controls tab.
Use this control to adjust the amount of variation in the scale of the duplicated objects. Disable the Lock XYZ checkbox to adjust the scale variation independently on all three axes.
Region Tab
The options in the Region tab allow you to define an area in the viewer where the copies can appear or are prevented from appearing. Like most parameters in Fusion, this area can be animated to cause the copied object to pop on and off the screen based on the region’s shape and setting.
Duplicate 3D Region tab
The Region section includes two settings for controlling the shape of the region and the affect the region has on the duplicate objects.
![]()
— Region Mode: There are three options in the Region Mode menu. The default, labeled
“Ignore region” bypasses the node entirely and causes no change to the copies of objects from how they are set in the Controls and Jitter tabs. The menu option labeled “When inside region” causes the copied objects to appear only when their position falls inside the region defined in this tab. The last menu option, “When not Inside region” causes the copied objects to appear only when their position falls outside the region defined in this tab.
— Region: The Region menu determines the shape of the region. The five options include cube, sphere, and rectangle primitive shapes. The mesh option allows you to connect a 3D model into the green mesh input on the node. The green input appears only after the Region menu is set to Mesh. The All setting refers to the entire scene. This allows the copies to pop on and off if the
Region mode is animated. When the Region menu is set to Mesh, four other options are displayed. These are described below.
— Winding Rule: Using four common techniques, the Winding Rule menu determines how the mesh of polygons is determined as an area of volume and consequently how copies locate the vertices in the mesh. Complex overlapping regions of a mesh can cause an irregular fit. Trying a different technique from this menu can sometimes create a better match between the mesh and how the copies interpret the mesh shape.