< Previous | Contents | Next >
The Axis mode menu provides four options for determining how each copy determines its rotational pivot point.
— Absolute: Allows you to set an X and Y position for the axis of rotation based on the original shape’s location. The axis of rotation is then copied and offset with each duplicated shape.
— Origin Relative: Each copy uses its center point as its axis of rotation.
— Origin Absolute: Each copy uses the center of the original shape as its axis of rotation.
— Progressive: Compounds each shape copy by progressively transforming each copy based on the previous shape’s position, rotation, and scale.
The X and Y pivot controls are displayed when the Axis mode is set to Absolute. You can use these position controls to place the axis of rotation.
Determines an offset rotation applied to each copy. The rotation is calculated from the offset rotation of the previous copy. To rotate all copies identically, use the Angle parameter on the original shape or use a sTransform node.
Common Controls
The Settings tab in the Inspector is common to all Shape nodes. These common controls are described in detail at the end of this chapter in “The Common Controls” section.
![]()
sEllipse
The sEllipse node
The sEllipse node is used to create circular shapes. Like almost all shape nodes, you can only view the sEllipse node’s results through a sRender node.
External Inputs
This node generates shapes and does not have any inputs.
Basic Node Setup
The sEllipse node is a shape generator, meaning it generates a shape and therefore has no input. The output of the sEllipse can go into a sRender for viewing and further compositing or, more likely, connect to another shape node like sGrid or sDuplicate.

An sEllipse node connecting to an sGrid node, and then viewed using an sRender node
Inspector
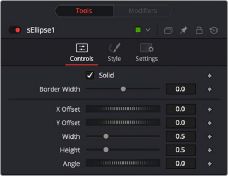
The sEllipse Controls tab
Controls
![]()
The Controls tab is used to define the elliptical shape characteristics, including fill, border, size, and position.
When enabled, the Solid checkbox fills the elliptical shape with the color defined in the Style tab. When disabled, an outline created by the Border Width control is displayed, and the center is made transparent.
This parameter expands or contracts the border around the shape. Although it can be used when the Solid checkbox is enabled, it is primarily used to determine the outline thickness when the checkbox is disabled.
When the Solid checkbox is disabled, three cap style options are displayed. The cap styles can create lines with flat, rounded, or squared ends. Flat caps have flat, squared ends, while rounded caps have semi-circular ends. Squared caps have projecting ends that extend half the line width beyond the end of the line.
The caps are not visible unless the length is below 1.0.
The position parameter is only displayed when the Solid checkbox is disabled. It allows you to position the starting point of the shape. When used in conjunction with the length parameter, it positions the gap in the ellipse outline.
The length parameter is only displayed when the Solid checkbox is disabled. A length of 1.0 is a closed shape. Setting the length below 1.0 creates an opening or gap in the outline. Keyframing the length parameters allows you to create write-on style animations.
These parameters are used to position the shape left, right, up, and down in the frame. The shape starts in the center of the frame, and the parameters are used to offset the position. The offset coordinates are normalized based on the width of the frame. An X offset of 0.0 is centered, and a value of 0.5 places the center of the shape directly on the right edge of the frame.
The width and height determine the vertical and horizontal size of the ellipse. If the values are identical, then you have a perfect circle.
The angle rotates the shape, which on a perfect circle doesn’t change the image all that much, but if you create an oval or an outline with a short length, you can rotate the shape based on the center axis.
![]()
Style Tab
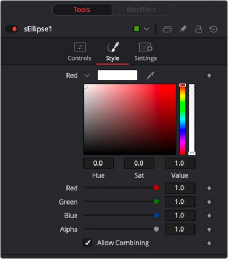
The sEllipse Style tab
The Style tab is used to assign a color to the shape and control its transparency.
The color controls determine the color of the fill and border. To choose a shape color, you can click the color disclosure arrow, use the color swatch, or drag the eyedropper into the viewer to select a color