< Previous | Contents | Next >

l
l
l
The Splitter Controls tab
Controls Tab
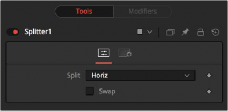
The Controls tab is used to define the type of stacked image connected to the node’s input.
The Split menu contains three options for determining the orientation of the stacked input image.
— None: No operation takes place. The output image on both outputs is identical to the input image.
— Horiz: The node expects a horizontally stacked image. This will result in two output images, each being half the width of the input image.
— Vert: The node expects a vertically stacked image. This will result in two output images, each being half the height of the input image.
Allows you to easily swap the left and right eye outputs.
Common Controls
![]()
The Settings tab in the Inspector is also duplicated in other Stereo nodes. These common controls are described in detail at the end of this chapter in “The Common Controls” section.
Stereo Align [SA]


NOTE: The Stereo Align node is available only in Fusion Studio and DaVinci Resolve Studio.
NOTE: The Stereo Align node is available only in Fusion Studio and DaVinci Resolve Studio.
NOTE: The Stereo Align node is available only in Fusion Studio and DaVinci Resolve Studio.
The StereoAlign node
Stereo Align Node Introduction
This extremely versatile node for fixing Stereo issues can be used for performing any of the following actions or combinations thereof:
— Vertical alignment of one eye to the other
— Changing the convergence
— Changing the eye separation

NOTE: Changing the eye separation can cause holes to appear, and it may not be possible to fill them since the information needed may not be in either image. Even if the
information is there, the disparity may have mismatched the holes. You may need to fill the holes manually. This node modifies only the RGBA channels.
By combining these operations in one node, you can execute them using only a single image resampling. In essence, this node can be thought of as applying scales and translation to the disparities and then using the modified disparities to interpolate between the views.

TIP: Stereo Align does not interpolate the aux channels but instead destroys them.
In particular, the disparity channels are consumed/destroyed. Add another Disparity node after the StereoAlign if you want to generate Disparity for the realigned footage.
TIP: Stereo Align does not interpolate the aux channels but instead destroys them.
In particular, the disparity channels are consumed/destroyed. Add another Disparity node after the StereoAlign if you want to generate Disparity for the realigned footage.
TIP: Stereo Align does not interpolate the aux channels but instead destroys them.
In particular, the disparity channels are consumed/destroyed. Add another Disparity node after the StereoAlign if you want to generate Disparity for the realigned footage.
Inputs
![]()
The two inputs on the Stereo Align node are used to connect the left and right images.
— Left Input: The orange input is used to connect either the left eye image or the stack image.
— Right Input: The green input is used to connect the right eye image. This input is available only when the Stack Mode menu is set to Separate.
Outputs
Unlike most nodes in Fusion, Stereo Align has two outputs for the left and right eye.
— Left Output: This outputs the left eye image with a new disparity channel, or a Stacked Mode image with a new disparity channel.
— Right Output: This outputs the right eye image with a new disparity channel. This output is visible only if Stack Mode is set to Separate.
Basic Node Setup
Below, the Stereo Align receives the left and right eye images with disparity. Once the adjustments are made, another Disparity node is added after it to generate disparity for the realigned footage.

A Stereo Align node destroys the disparity channel, so another Disparity node is placed after it
Inspector

![]()
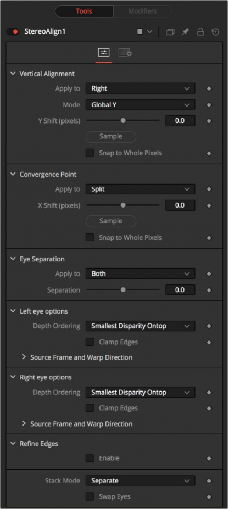
The Stereo Align Controls tab
Controls Tab
This option determines how the vertical alignment is split between two eyes. Usually, the left eye is declared inviolate, and the right eye is aligned to it to avoid resampling artifacts.
When doing per pixel vertical alignment, it may be helpful to roughly pre-align the images by a global Y-shift before disparity computation because the disparity generation algorithm can have problems resolving small objects that move large distances.
Also, be aware that you must be careful about lens distortion because even if two cameras are perfectly vertically aligned, they will still have vertical disparities due to lens distortion. As a best practice, remove the lens distortion before computing the disparity. When a vertical alignment of the right eye is done, you have essentially removed the Y-component of the lens distortion in the right eye, and it will look wrong later when you try to distort it again.
— Right: Only the right eye is adjusted.
— Left: Only the left eye is adjusted.
— Both: The vertical alignment is split evenly between the left and right eyes.
— Global: The eyes are simply translated up or down by the Y-shift to match up.
— Per Pixel: The eyes are warped pixel-by-pixel using the disparity to vertically align.
Keep in mind that this can introduce sampling artifacts and edge artifacts.
Y-shift is available only when the Mode menu is set to Global. You can either adjust the Y-shift manually to get a match or drag the Sample button into the viewer, which picks from the disparity channel of the left eye. Also remember, if you use this node to modify disparity, you can’t use the Sample button while viewing the node’s output.
You can snap the global shift to whole pixels by enabling this option. When enabled, there is no resampling of the image, but rather a simple shift is done so there will be no softening or image degradation.
![]()
The Convergence Point section is used as a global X-translation of L/R images.
This menu determines which eyes are affected by convergence. You can choose to apply the convergence to the left eye, right eye, or split between the two. In most cases, this will be set to Split. If you set the eyes to Split, then the convergence will be shared 50-50 between both eyes. Sharing the convergence between both eyes means you get half the shift in each eye, which in turn means smaller holes and artifacts that need to be fixed later. The tradeoff is that you’ve resampled both eyes rather than keeping one eye as a pure reference master.
You can either use the slider to adjust the X-shift manually to get a match or use the Sample button to pick from the disparity channels for easy point-to-feature alignment.
You can snap the global shift to whole pixels using this option. In this mode, there is no resampling of the image, but rather a simple shift is done so there will be no softening or image degradation.
Eye Separation changes the distance between the left/right eyes, causing objects in the left/right eyes to converge/diverge further depending on their distance from the camera.
This has the same effect as the Eye Separation option in the Camera 3D node.
This is a scale factor for eye separation.
— When set to 0.0, this leaves the eyes unchanged.
— Setting it to 0.1 increases the shifts of all objects in the scene by a factor of 10% in each eye.
— Setting it to 0.1 will scale the shifts of all objects 10% smaller.
Unlike the Split option for vertical alignment, which splits the alignment effect 50-50 between both eyes, the Both option will apply 100-100 eye separation to both eyes. If you are changing eye
separation, it can be a good idea to enable per-pixel vertical alignment, or the results of interpolating from both frames can double up.
The left and right eye options contain depth ordering and warp direction controls independently for the left and right eye.
The Depth Ordering is used to determine which parts of the image should be rendered on top. When warping images, there is often overlap. When the image overlaps itself, there are two options for which values should be drawn on top.
— Largest Disparity On Top: The larger disparity values will be drawn on top in the overlapping image sections.
![]()
— Smallest Disparity On Top: The smaller disparity values will be drawn on top in the overlapping image sections.
Under certain circumstances, this option can remove the transparent gaps that may appear on the edges of interpolated frames. Clamp Edges will cause a stretching artifact near the edges of the frame that is especially visible with objects moving through it or when the camera is moving.
Because of these artifacts, it is a good idea to use Clamp Edges only to correct small gaps around the edges of an interpolated frame.
Helps to reduce the stretchy artifacts that might be introduced by Clamp Edges.
If you have more than one of the Source Frame and Warp Direction checkboxes turned on, this can lead to doubling up of the stretching effect near the edges. In this case, you’ll want to keep the softness rather small at around 0.01. If you have only one checkbox enabled, you can use a larger softness at around 0.03.
The output of this node is generated by combining up to four different warps. You can choose to use either the color values from the left or right frame in combination with the Forward (left > right)
Disparity or the Backward (right > left) Disparity. Sometimes you will want to replace an existing eye. For example, if you want to regenerate the right eye, you would use only left eye warps.
It’s good to experiment with various options to see which gives the best effect. Using both the left and right eyes can help fill in gaps on the left/right side of images. Using both the Forward/Backward Disparity can give a doubling-up effect in places where the disparities disagree with each other.
— Left Forward: Takes the Left frame and uses the Forward Disparity to interpolate the new frame.
— Right Forward: Takes the Right frame and uses the Forward Disparity to interpolate the new frame.
— Left Backward: Takes the Left frame and uses the Back Disparity to interpolate the new frame.
— Right Backward: Takes the Right frame and uses the Back Disparity to interpolate the new frame.
In Stack Mode, L and R outputs will output the same image.
If High Quality is off, the interpolations are done using nearest-neighbor sampling, leading to a more “noisy” result. To ensure High Quality is enabled, right-click under the viewers, near the transport controls, and choose High Quality from the pop-up menu.
Allows you to easily swap the left and right eye outputs.
Common Controls

EXAMPLE
EXAMPLE
EXAMPLE
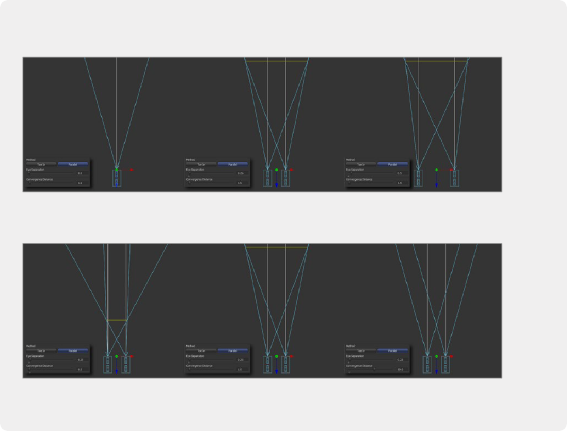
Different settings for Eye Separation…
Different settings for Eye Separation…
Different settings for Eye Separation…
…and example settings for Convergence
…and example settings for Convergence
…and example settings for Convergence
![]()
The Settings tab in the Inspector is also duplicated in other Stereo nodes. These common controls are described in detail at the end of this chapter in “The Common Controls” section.