< Previous | Contents | Next >
The Path modifier uses two splines to control the animation of points: an onscreen motion path (spacial) and a Time spline visible in the Spline Editor (temporal). To animate an object’s position control using a Path, right-click the Position control either in the Inspector or in the viewer and select Path from the contextual menu. This adds a keyframe at the current position. You can begin creating a path by moving the playhead and dragging the center position control in the viewer. The Spline Editor shows a displacement spline for editing the temporal value, or “acceleration,” of the path.
![]()
Inspector
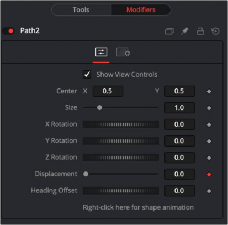
The Path modifier Controls tab
Controls Tab
The Controls tab for the path allows you to scale, reposition, and rotate the path. It also provides the Displacement parameter, allowing you to control the acceleration of an object attached to the path.
The actual center of the path. This can be modified and animated as well to move the entire path around.
The size of the path. Again, this allows for later modification of the animation.
The path can be rotated in all three dimensions to allow for sophisticated controls.
Every motion path has an associated Displacement spline in the Spline Editor. The Displacement spline represents the position of the animated element along its path, represented as a value between 0.0 and 1.0. Displacement splines are used to control the speed or acceleration of an object’s movement along the path.
To slow down, speed up, stop, or even reverse the motion of the control along the path, adjust the values of the points for the path’s displacement in the Spline Editor or in the Inspector.
— A Displacement value of 0.0 in the Spline Editor indicates that the control is at the very beginning of a path.
— A value of 1.0 indicates that the control is positioned at the end of the path.
— Each locked point on the motion path in the viewer has an associated point on the Displacement spline.
— Unlocked points have a control point in the viewer but do not have a corresponding point on the Displacement spline.
![]()
Connecting to the Heading adjusts the auto orientation of the object along the path. For instance, if a mask’s angle is connected to the path’s heading, the mask’s angle will adjust to follow the angle of the path.

TIP: Switching Default Paths
You can change the default path type used when animating a position or center control to a path (if this is the preferred type of animation). Open the Preferences window and select the Global Settings. In the Default category, select the Point With menu and choose Path. The next time Animate is selected from a Position or Center control’s contextual menu, a path is used.
It’s possible to animate the shape of the path as well or to connect it to other path controls like Polyline Masks or Paint Strokes.