< Previous | Contents | Next >
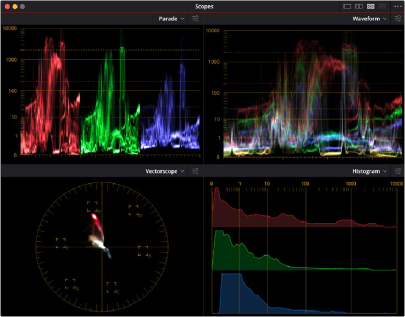
Optionally, you can click the Expand button at the top right of the video scope to open the video scopes into a floating window, within which you can display all four video scopes together, or individually, on any monitor connected to your workstation.
Video scopes in a floating window in HDR (ST.2084/HLG) mode
Additionally, the video scopes can appear docked on a second display as part of many of the dual- screen layouts available in DaVinci Resolve. However, if you have three computer displays and you’re using dual screen layouts, you still have the option to open the floating Scopes window and place it on your third display, as large as you need.
The video scopes aren’t just available in the Color page. They’re also available in the Media and Deliver pages for whenever you need to evaluate the video signal more objectively, such as when you’re setting up to capture from tape or scan from film, or when you’re setting up for output.
— Choose Workspace > Video Scopes > On/Off (Command-Shift-W) to open video scopes into a floating window.
![]()
— Choose Workspace > Dual Screen > On to open video scopes as part of a dual screen layout.
Video Scope Measurement Using Scales
Because you’re evaluating the internal state of the image data, by default the numeric scales of the WFM and Parade scopes always reflect 10-bit full range data from 0–1023, regardless of the Video/ Data Level setting you’ve selected in the Master Settings panel of the Project Settings. This gives you a window into how the image is being processed by DaVinci Resolve prior to being output via your computer’s video I/O interface.
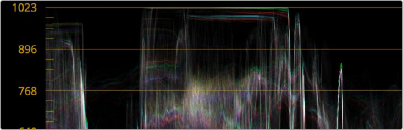
If you’re working on an HDR (High Dynamic Range) grade, you can choose HDR (ST.2084/HLG) from the Video Scopes option menu (this feature is only available in Studio version). This replaces the
10-bit scale of the Waveform, Parade, and Histogram video scopes with a scale based on nit values (or cd/m2) instead.
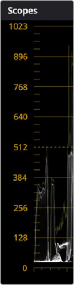
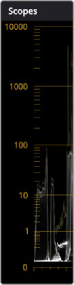
(Left) The Parade scope showing the data range scale, (Right) The Parade scope showing the HDR “nit” scale
Changing Waveform Scales
A Waveform Scale Style submenu in the Video Scopes option menu (the three dots menu) lets you choose how you want the numeric scale at the left of Waveform and Parade scopes to be represented. There are options for 10-bit display (the default), 12-bit display, Percentage (0 to 100), millivolt (mV), and HDR (ST.2084/HLG). Aside from the added flexibility this gives you, this also means that it’s no longer necessary to go to the Preferences to change the scope to have an HDR scale shown in nits (cd/m2).
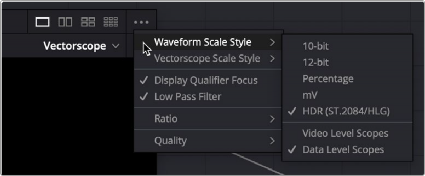
Waveform scale options

IMPORTANT: If you are working in a non-DaVinci Resolve Color managed workflow and activate the HDR (ST.2084/HLG) scopes, the waveform will always reflect HDR levels, even if you’ve manually selected the output color space as Rec.709, and thus not be 100% accurate.
IMPORTANT: If you are working in a non-DaVinci Resolve Color managed workflow and activate the HDR (ST.2084/HLG) scopes, the waveform will always reflect HDR levels, even if you’ve manually selected the output color space as Rec.709, and thus not be 100% accurate.
IMPORTANT: If you are working in a non-DaVinci Resolve Color managed workflow and activate the HDR (ST.2084/HLG) scopes, the waveform will always reflect HDR levels, even if you’ve manually selected the output color space as Rec.709, and thus not be 100% accurate.
![]()
Changing Vectorscope Scales
A Vectorscope Scale Style submenu in the Video Scopes option menu (the three dots menu) lets you choose how you want the hue reference indicators to be displayed.
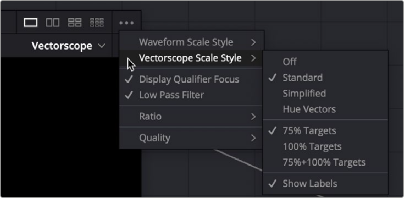
Vectorscope scale options
There are four available graticule options:
— Off: Disables all graticule overlays in the Vectorscope, giving you a clean view of the Vectorscope graph against black.
— Standard: The default layout. Cross hairs indicate the center of the scope, while boxes indicate the center target of each primary and secondary hue (red, magenta, blue, cyan, green, yellow). An outer circle provides a general frame of reference for the angle that any part of the graph might fall along.
— Simplified: Shows a crosshairs to indicate the center of the scope and smaller crosshairs to indicate each primary and secondary hue. Useful when you want references without extra complications.
— Hue Vectors: A graticule designed to provide a more useful colorist reference for creative decisions and image comparison. This isn’t simply decorative. Graticule lines stretch along the reference angle of each primary and secondary hue from the hue targets to the center, providing a more immediately useful frame of reference when comparing different vector scope graphs
to one another. These reference lines fade out within the region of average saturation in most images, so they don’t get in the way of discerning faint details. The center crosshairs are aligned with the red-cyan and yellow-blue axes, indicating the naturalistic warm to cool axis that lies between them. Tic marks indicate both the 75% and 100% levels of image saturation for each hue.
![]()
You also have the option of choosing whether or not the primary and secondary hue targets are shown for 75% image saturation, 100% image saturation, or both, and whether or not you want to show the text labels for each hue.
Displaying Scopes With Data or Video Levels
For projects being worked on at video levels, a setting in the video scope option menu’s Waveform Scale Style submenu lets you toggle between displaying video scopes scaled to either Data Levels (the default) or Video Levels (by turning on Video Level Scopes). This only affects how your scopes are displayed; it has no effect on monitored or rendered output.