< Previous | Contents | Next >
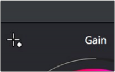
1 Click the White Point control. The pointer turns into the White Point tool.
The Auto Pick White Point control
2 In the Viewer, click on any feature that is supposed to be white such as a white wall, white trim around a window, white blinds, a white shirt, and so on. As you drag the White Point tool around, the RGB values appear as a tooltip to give you a better idea of what the color is of the feature you’re about to click on. Make sure the feature you click on is (a) supposed to be white, and not off-white, and (b) that it corresponds to an image detail that’s not clipped, because that can make parts of the image seem white that aren’t really.
As a result, the lightest parts of the image should appear much lighter than before, and any color imbalance in the highlights should be neutralized. Unlike the White Balance eyedropper, this adjustment is applied via the Gain controls in the Wheels and Bars mode, which should appear with some manner of adjustment as a result.
Auto Color
The Auto Color command provides a quick way to automatically balance the blacks and whites of a clip based on the current frame at the position of the playhead. As of DaVinci Resolve 16, the A button in the Primaries palette and the Shot Match command available from the Thumbnail Timeline contextual menu both now use advanced algorithms, based on the DaVinci Neural Engine, to provide superior results when automatically adjusting color balance and contrast. These controls have been developed to provide optimal results when working in the Rec. 709 color space, and at a gamma of 2.4, so they work well in conjunction with using Resolve Color Management (RCM) to normalize media first.
— The A button performs an automatic analysis of the current frame at the playhead to give a more consistently useful neutral starting point for further adjustment.
![]()
— The Shot Match command matches one or more clips to the color and contrast of a graded or ungraded target clip. This updated version of Shot Match has been designed to be used after you’ve used the A button on each clip in the operation, the clips you’re matching and the clip you’re matching to.
If you’re in need of a fast neutral starting point for a range of clips, you can also use these commands together, grading a target clip using the A button, and then using Shot Match to match a range of clips in the same scene to the automatically graded example. Please note that these commands are intended to provide you with a reasonably neutral starting point for continued grading; they’re not meant to create creative or artistic grades.
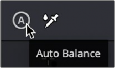
The Auto Color button