< Previous | Contents | Next >
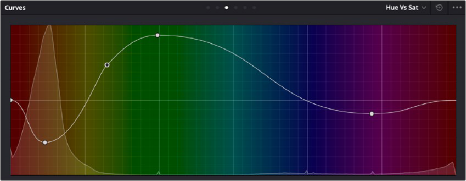
Each Hue or HSL curve shows a histogram analysis of the two color channels that Curve acts upon: hue against saturation level, luminance against saturation level, or saturation level against saturation level, to give three different examples. In the case of Hue or HSL curves, these histograms make it easy to see which parts of the Curve controls will actually affect image data.
The histogram appearing underneath the Hue vs Sat curve plots all saturation levels at each value of hue
Custom Curves
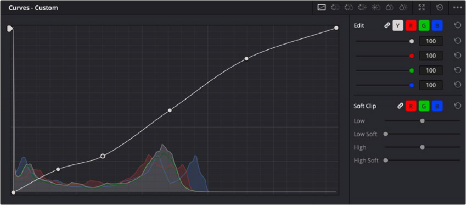
DaVinci’s Custom curves provide smooth adjustment of each clip’s Y, R, G, and B channels. The Custom curve mode of the Curves palette is divided into two areas, the Curve Editor to the left, and the Curve controls to the right. The editor contains the actual Curve controls you use to adjust the image.
The controls at the right let you choose which curves you’re adjusting, and adjust their intensity.
![]()
The Custom curves seen used to create a gentle “S” curve adjustment with four additional control points added
The Custom curves are useful for making more tonally specific, channel-by-channel adjustments to an image than can be accomplished using the Color Balance controls. They’re also useful for making strange and wonderful stylistic adjustments through unusual alterations to different combinations of color channels.
Although the ganged Custom curves appear to be a single curve control, the Custom curve editor is actually presented as a series of overlaid curves, and the YRGB curves all appear within a single editor. The default, neutral position of the Custom curves is a diagonal line that runs from the lower-left black point of the image through the upper-right white point.