< Previous | Contents | Next >
The focus of the Center panel is four trackballs that work as color balance controls in various palettes of the DaVinci Resolve Color page. Their functionality depends on which palette is currently open.
Each trackball has a surrounding control ring that has no end stop in either direction, letting you do continuous rotary adjustment. The rings typically are for adjusting image lightness and contrast in different ways but are sometimes used for other functions, depending on which Color page palette you have selected.
![]()
Additional buttons above and below the trackballs, and fixed-function rotary controls to the left and right, complete the center control cluster that provide a predictable set of central controls for making color and contrast adjustments.
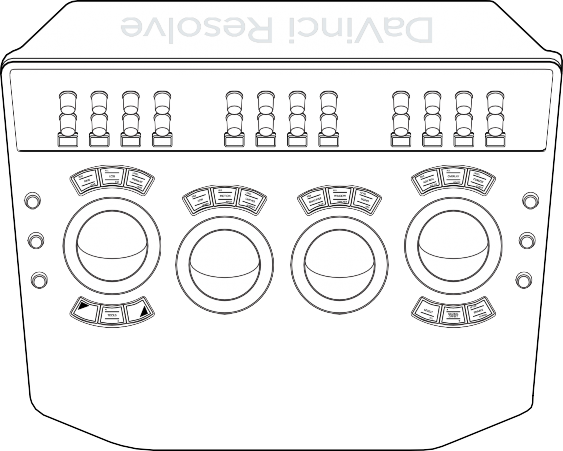
The controls surrounding the trackball/ring controls of the Center panel
Using Trackballs
The principal palettes you’ll use the trackballs with are the Color Wheels and Log Wheels modes of the Primaries palette, and the Global and Zones controls of the HDR palette. Whichever of these modes and palettes is selected will determine the functionality of the trackballs and rings.
However, keep in mind that whichever color controls the trackballs are assigned to, the topmost soft controls on the Trackball palette can be switched to work with other palettes, such as the Motion, Curves, or Qualifier palettes, for example. This means you can adjust the controls of a second palette while simultaneously making color and contrast adjustments with the trackballs and ring controls. This is exceptionally useful when making two kinds of adjustments that interact with one another.
Summarizing the Top Fixed Keys
Each of the four trackball/ring controls has three fixed keys above it. Individually, these keys provide separate Y and RGB reset controls for each trackball/ring pair. However, the first nine of these keys also collectively serve as a fast and convenient way of navigating the principal panels of grading functionality in the Color page.
Additionally, the left-most trackball has a pair of shift keys underneath it for choosing which button function to trigger, giving you fast access.
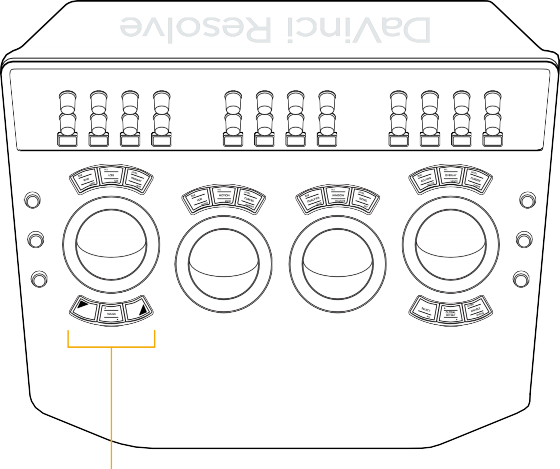
![]()
Shift keys under the left-most trackball let you access secondary functions.
Trackball and Ring Reset Controls
Each trackball’s reset controls are protected by having to press SHIFT UP to use them. This may feel like an extra step at first, but now that this top row of keys is also used to quickly switch among
different palettes on the Color page, using SHIFT UP protects you from accidentally pressing a reset when you meant to switch to another palette. If you’re used to the prior layout, this will take a bit if getting used to, but it isn’t so bad once you’ve built up the muscle memory.
— RGB: Resets red, green, and blue channel adjustments while leaving master level (luminance or Y) adjustments alone.
— All: Resets both RGB channel and master level adjustments.
— Level: Resets master level adjustments while maintaining the differential between the RGB channels (aka color balance).
Navigation controls above each trackball (primary and SHIFT DOWN functions)
One of the biggest departures from the previous layout is the introduction of palette switching functions on the top row of fixed keys. This makes it faster to switch among different sets of controls as you work, and frees up additional buttons on the T-bar panel to do other things, adding to the utility of the DaVinci Resolve Advanced panel.
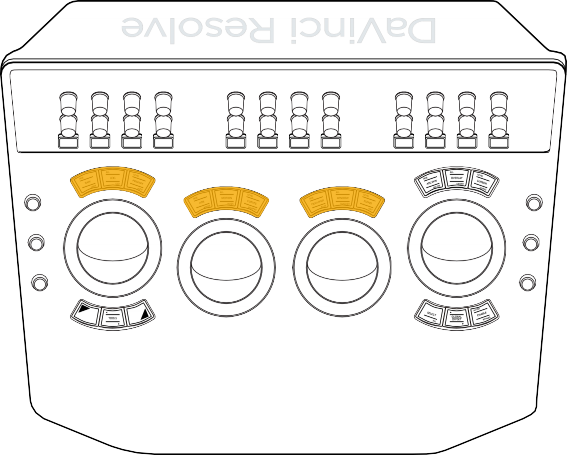
![]()
The first nine fixed keys above the trackballs work together to provide palette and mode switching.
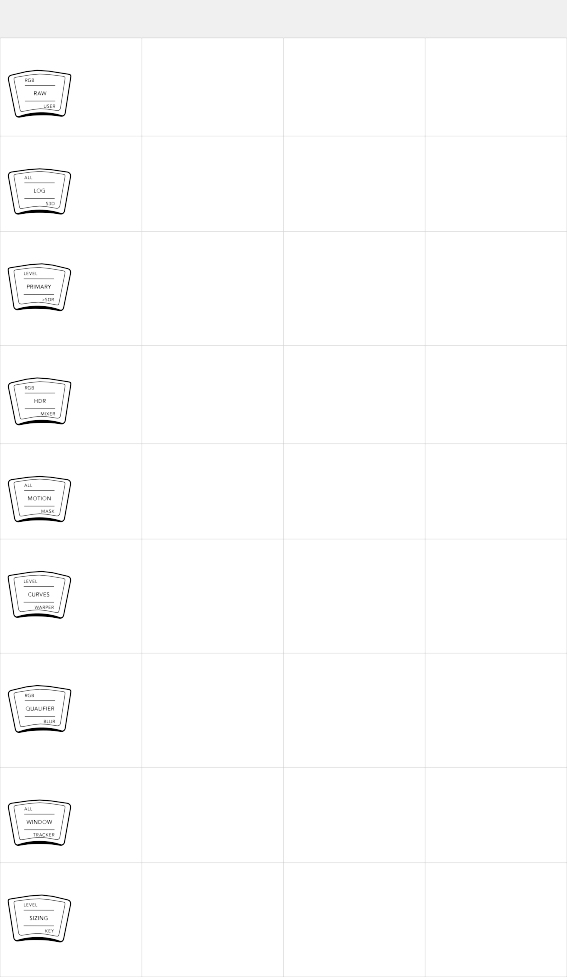
Key Shift Up Primary Function Shift Down
RAW/USER (RGB) Resets red, green, and blue channel adjustments only leaving master level adjustments alone
(RAW) Opens the Camera Raw palette
(USER) Not yet implemented at the time of this writing
LOG/S3D (ALL) Resets all YRGB adjustments
(LOG) Opens the Log mode of the Primaries palette
(S3D) Opens the Stereo 3D Palette for Stereo 3D timelines
PRIMARY/>SDR (LEVEL) Resets master level adjustments, leaving the differential between red,
green, and blue channels unchanged
(PRIMARY) Opens the Color Wheels mode (Lift, Gamma, and Gain) of the Primaries palette
(>SDR) Opens the Dolby Vision™ palette if it’s enabled in the Project Settings
HDR/MIXER (RGB) Resets red, green, and blue channel adjustments, only leaving master level adjustment alone
(HDR) Opens the High Dynamic Range (HDR) palette
(MIXER) Opens the RGB Mixer palette
MOTION/MASK (ALL) Resets all YRGB adjustments
(MOTION) Opens the Motion Effects palette
(MASK) Opens the Magic Mask palette
CURVES/WARPER (LEVEL) Resets master
level adjustments, leaving the differential between red,
green, and blue channels unchanged
(CURVES) Opens the Curves palette to the last used curve (all other curves can be accessed via soft menu buttons)
(WARPER) Opens the Color Warper palette
QUALIFIER/BLUR (RGB) Resets red, green, and blue channel adjustments, only leaving luminance channel adjustment alone
WINDOW/TRACKER (ALL) Resets all YRGB
adjustments
(QUALIFIER) Opens
the Qualifier palette to the last used Qualifier (you can choose which qualifier to use via soft menu buttons)
(WINDOW) Opens the Window palette
(BLUR) Opens the Blur palette
![]()
(TRACKER) Opens the Tracker palette to the last used mode
SIZING/KEY (LEVEL) Resets master level adjustments, leaving the differential between red, green, and blue channels unchanged
(SIZING) Opens the Input Sizing mode of the Sizing palette (Edit and Output Sizing can be accessed via soft menu buttons)
(KEY) Opens the Key palette
The Tools Button
A TOOLS button at the bottom center of the left-most trackball provides fast access to a soft menu that provides addition options using the soft controls. This is a future-proofing feature and exposes no additional functionality at the time of this writing.
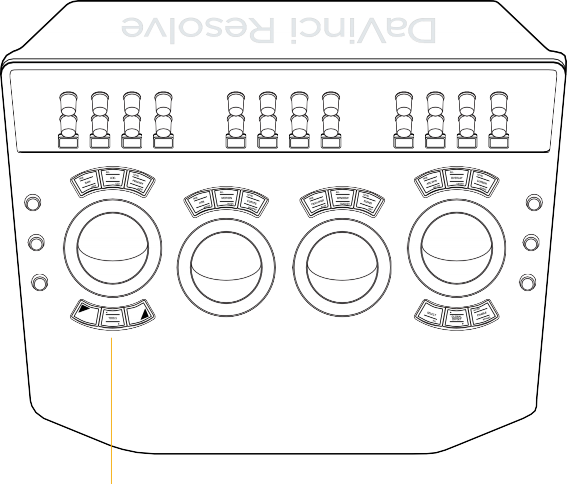
The TOOLS button under the left-most trackball
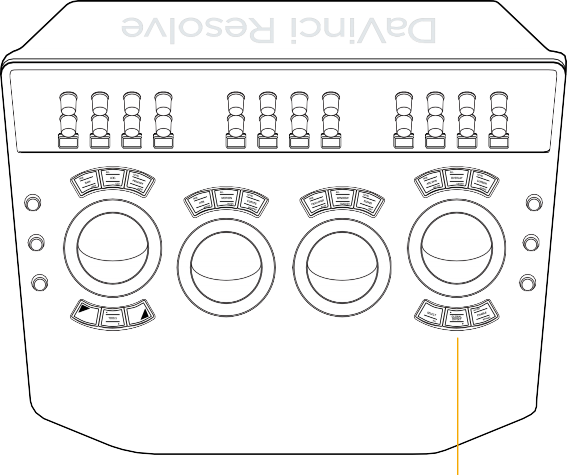
The Fourth Trackball
![]()
Depending on which palette you’re using in the Color page, the rightmost (fourth) trackball can be used for color adjustment in conjunction with the first three when acting as an Offset control in the Color Wheels and Log Wheel mode of the Primaries palette, or it can be toggled between Global controls or being the fourth Zone color control in the HDR palette.
However, the fourth trackball can also be set to perform many other functions using the three keys above and three keys below it. By choosing the appropriate palette and mode, it can be used as an eyedropper when sampling colors for qualification, it can be used to create, select, and adjust the control points of adjustment curves, or it can be used to adjust the position and rotation of Power Windows. All of these functions are described in the following table.
![]()
The fourth trackball gives access to additional functionality via the fixed keys above and below it.
Key | Shift Up | Primary Function | Shift Down |
RGB/ADJ WIN/SDI ZM”
| (RGB) Resets red, green, and blue channel adjustments, only leaving master level adjustments alone | (ADJ WIN) Lets the trackball adjust the position of the selected window, while the ring adjusts window angle. This key remains illuminated as long as this mode is enabled | (SDI ZM) Toggles “Gang viewer zoom with video output” on and off, letting the SDI output mirror pan and zoom being done in the Viewer |
ALL/OVERLAY/VIEWER
| (ALL) Resets all YRGB adjustments | (OVERLAY) Toggles onscreen control overlays, such as window outlines on and off for the Viewer and for video output. This key remains illuminated as long as this mode is enabled | (VIEWER) Sets onscreen control overlays, such as window outlines to be GUI only, so they only appear in the Viewer and not on video output |
Key | Shift Up | Primary Function | Shift Down |
LEVEL/CURSOR/CURVE
| (LEVEL) Resets master level adjustments, leaving the differential between red, green, and blue channels unchanged | (CURSOR) Toggles the eyedropper on and off for supporting palettes. In the Qualifier palette, the cursor lets you sample the image to create a key by pressing the SELECT button. In the Curves palette, you can sample the image to add a control point to the currently visible curve. This key remains illuminated as long as this mode is enabled. | (CURVE) Opens the Custom Curve and selects a control point to be freely adjusted (up, down, left and right) using the fourth trackball as you would the pointer in the GUI. Turning the ring to the left selects the next control point to the left, turning it to the right selects the next control point to the right. |
SELECT/ALL
| – | (SELECT) Used in conjunction with the CURSOR mode of the fourth trackball to sample a value for keying or for adding a control point to a curve | (ALL) Selects all clips in the Thumbnail Timeline |
GLOBAL OFFSET
| – | (GLOBAL OFFSET) In the Primaries palette, this sets the fourth trackball to adjust Offset color balance and Master levels. In the HDR palette, this sets the fourth trackball to adjust the Globals controls. This key remains illuminated as long as this mode is enabled. | – |
AFTER/ENABLE/ BYPASS
| (AFTER) Disables/ re-enables all nodes after the currently selected node | (ENABLE) Toggles the currently selected node (or nodes) off and on | (BYPASS) Toggles Bypass Grade on and off |
![]()
Hard-Coded Rotary Knobs
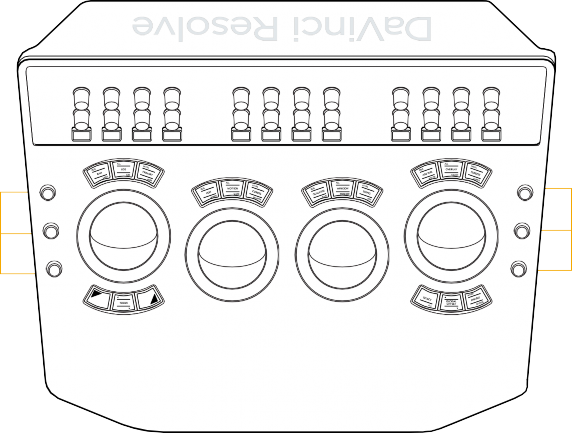
There are an additional six rotary knob controls to either side of the trackballs, arranged three to the left and three to the right.
— On the left side, from top to bottom, the rotaries control Y-only luminance Gain, Gamma, and Lift settings of the Color Wheels and Color Bars modes of the Primaries palette that control lift, gamma, and gain. If you have any other palettes or modes open, using these three knobs will continue to affect the Lift, Gamma, and Gain controls of the currently selected node.
— On the right side, from top to bottom, the rotaries control Saturation, Hue, and Luminance mix.
If you have any other palettes or modes open, using these two knobs will continue to affect the Saturation and Luminance Mix controls of the Color Wheels and Color Bars modes of the
Primaries palette. The Hue knob will affect the hue of either the Primaries Palette mode or HDR palette, whichever was selected last.
![]()
Two sets of three rotary controls to the left and right of the trackballs provide additional functionality.
Keyboard
The Center panel also offers a slide-out keyboard for naming files, stills, and nodes, triggering keyboard shortcuts, and writing novels about the innocence of newly hired colorists lost in the maelstrom of the film, television, and streaming industries.
Six Rotary Knob Controls