< Previous | Contents | Next >
The automation arming button above a fader in the Mixer
The automation arming button in the track header
3 Move the playhead to the beginning of the section of the timeline you want to record automation for.
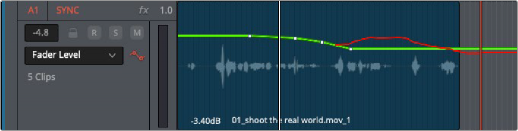
4 Next, initiate playback using any method (Spacebar, L, Play button, Fairlight or third-party audio control panel), and make whatever adjustments you want to the controls for which you’ve enabled automation recording. While you make adjustments, the affected fader control turns red to let you know you’re recording automation. If you’re displaying the same automation data in the Timeline that you’re recording, you can see the new automation being drawn in real time, in red.
New automation line in red while being recorded
5 When you’re finished, stop playback using any method (Spacebar, K, Stop button, Fairlight or third- party audio control panel). Automation recording stops as well. Displayed automation turns green once recording has stopped.
If you don’t like what you’ve done, you can undo and start over, or you can edit the automation using methods described later in this chapter. Or, you can back the playhead up and overwrite automation at any time with new automation.
Automation Preview Mode
![]()
Preview is an additional mix automation workflow, specifically for working across scene-based material. When enabled, mix items that are in preview are not controlled by pre-recorded automation, so they respond manually to their controls. These can subsequently be placed into write (or trim) to write actual automation.
Typically, Preview mode is used to audition new mix settings for one particular section of a timeline, while other sections already have recorded automation data. Preview mode prevents pre-recorded automation from moving the controls you are trying to adjust in a targeted section. As soon as you’re happy with the new adjustments, they can be written to the targeted section.