< Previous | Contents | Next >

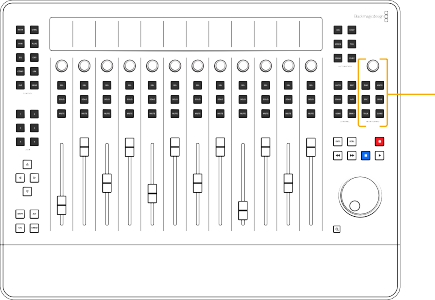
The Monitoring controls on the right side of the Fairlight Desktop Console is where you control the listening levels for the Control Room and Studio speakers. These controls default to Control Room monitor levels and can be changed at any time using the Monitor knob and buttons. Hold the CANS button to re-target all of the Monitoring controls for studio monitoring.
Fairlight Desktop Console Monitoring controls
Monitoring Knob
Use this knob anytime during recording, playback, or mixing to adjust the Control Room or Studio listening levels. Changes to the Control Room levels are reflected in the DaVinci Resolve Timeline monitoring controls located in the upper-right corner of the Edit page and Fairlight page Timelines. If you are using an optional HDMI Monitor, you’ll see the monitoring controls in the upper-left corner of the screen. Sometimes the monitoring environment must be set to a standard level and not changed. This is called Fixed Level monitoring. For example, if your control room has been calibrated with a sound pressure level (SPL) meter, you will probably want to set a Fixed monitoring level. When fixed, the Control Room knob has no affect on the monitoring levels. When Fixed Level monitoring is toggled on, the listening level meter in the upper-right of the Timeline GUI turns from green to blue.
![]()
![]()
![]()
Press to mute or unmute Control Room monitoring.
![]()
![]()
Hold CTL and press Mute to switch on or off Fixed Level monitoring.
When Fixed Level monitoring is switched on, the level slider in the onscreen monitoring controls turns blue.
![]()
![]()
Hold CTL + SHIFT while turning the Monitoring Control Knob to adjust the fixed level.
![]()
![]()
![]()
![]()

The Studio monitoring controls adjust the Studio monitoring circuit of a Fairlight accelerator card installed on your workstation. Hold the CANS button to target the monitoring controls for Studio monitoring.
The Studio monitoring controls adjust the Studio monitoring circuit of a Fairlight accelerator card installed on your workstation. Hold the CANS button to target the monitoring controls for Studio monitoring.
The Studio monitoring controls adjust the Studio monitoring circuit of a Fairlight accelerator card installed on your workstation. Hold the CANS button to target the monitoring controls for Studio monitoring.
![]()
![]()
![]()
![]()
![]() MUTE: Hold CANS and use this button to mute or unmute Studio monitoring.
MUTE: Hold CANS and use this button to mute or unmute Studio monitoring.
![]()
![]()
![]()
![]()
![]()
![]()
Press and hold the talk button to use talkback without latching. In this case, the talkback mic will remain live only during the momentary-press and shut off when you release. Engaging talkback also DIMS the Control Room circuit. You can modify the talkback functionality and general purpose input and output (GPI/GPO) in the Talkback controls available in the Fairlight menu in DaVinci Resolve.
![]()
![]()