< Previous | Contents | Next >
Hold CTL and press Right Arrow to mark an Out point.
![]()
![]()
Press Left Arrow to move the playhead one frame back.
![]()
![]() Hold Shift and press Left Arrow to move one second back.
Hold Shift and press Left Arrow to move one second back.
![]()
![]()
Hold CTL and press Left Arrow to mark an In point.

NOTE: Once you set an In or Out point in the Timeline, you can use the dial to extend the selected range. To clear the In and Out points (Range), press Option-X on the computer keyboard.
NOTE: Once you set an In or Out point in the Timeline, you can use the dial to extend the selected range. To clear the In and Out points (Range), press Option-X on the computer keyboard.
NOTE: Once you set an In or Out point in the Timeline, you can use the dial to extend the selected range. To clear the In and Out points (Range), press Option-X on the computer keyboard.
User Buttons
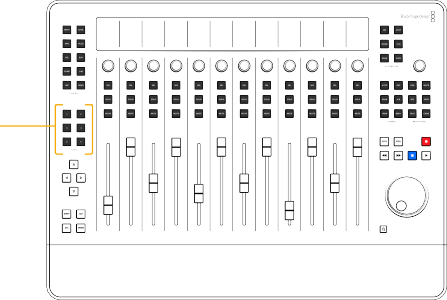
The six sequentially numbered User buttons are user-defined quick keys that change operation depending on the mode and function in combination with other button groups. For example, a re- recording mix engineer performs different tasks than the ADR engineer, so each professional would set up the User buttons to give them easy access to the functions and modes they need most for their workflow. User buttons can be used alone, or in combination with other buttons for specific functions and workflows.
![]()
User buttons
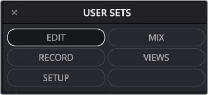
At the time of this writing, the User buttons are mapped to six User sets, including Edit, Mix, Record, Views, Setup, and a blank unassigned User set. Each of the six User Sets is then mapped to additional menu layouts each with six menu options related to that set. User button quick menus offer fast mouse-free two-handed editing options, like those available in the Fairlight Audio Editor. The difference is that you look at the Quick Menu dialog on the computer screen to see which functions are assigned to the User buttons instead of the labels on the console keys.
The current User Button Quick Menus are an early incarnation of this feature and will undergo visual GUI improvements and enhanced functionality in future updates.
Working with the User Buttons and the Quick Menu Dialog
![]()
![]()
![]()
The Quick Menu is a dialog in the Fairlight page user interface that you can show or hide by holding Zoom and pressing any of the User buttons. What makes the Quick Menu dialog unique is its 2x3 grid design containing six user-defined buttons that can be toggled from the corresponding User buttons on the Desktop Console. To select an option from the Quick Menu, once you’ve chosen the desired User Set page, you simply press the User button that corresponds to the function you need. This innovative physical button-to-dialog button relationship makes it easy to learn the quick menus and functions as well as build lightning-fast muscle memory to trigger the actions while you work.
![]()
![]()
![]()
Six User buttons in a 2x3 pattern and Quick Menu dialog with a 2x3 button grid that matches the User buttons; Quick Menu shows the User Sets menu and Edit set (User Button 1) option highlighted.

NOTE: The Quick Menu dialog can be moved anywhere on the Fairlight page interface, so you can see it at a glance, without obstructing view or workflow.
NOTE: The Quick Menu dialog can be moved anywhere on the Fairlight page interface, so you can see it at a glance, without obstructing view or workflow.
NOTE: The Quick Menu dialog can be moved anywhere on the Fairlight page interface, so you can see it at a glance, without obstructing view or workflow.
User Button and Quick Menu Functional Overview
The default Quick Menu layout is Edit, however you can change the layout anytime by pressing the appropriate modifier keys along with the corresponding User button. For ease of operation, you use the Zoom button to show or hide the Quick Menu, and the modifier keys to change layouts. It requires two modifier keys (ALT+CTL) to change to a different User set, and one modifier (ALT) to
![]()
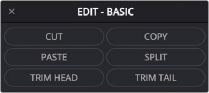
select a different submenu layout within the current User Set. This is similar to using a mouse to open a submenu in the Fairlight Page interface, or pressing Menu keys to reveal Menu Option keys on the Fairlight Audio Editor. Once you have selected a Quick Menu layout, such as Edit - Basic, you can then engage any of the six actions by pressing the corresponding User button. User Button layouts are identified by the name in the Quick Menu header. Hyphenated names represent the current User Set followed by the submenu layout. For example, EDIT - BASIC identifies the Edit User Set showing the Basic submenu layout of six different Edit actions that can be engaged by pressing the corresponding User button.
— Press Zoom plus any User button to Show the floating Quick Menu dialog on the Fairlight Page interface
![]()
![]()
![]() +
+ ![]()
![]() =
=
![]()
![]()
Six User buttons and the Edit-Basic User Set
— Once the Quick Menu dialog is showing, it will remain on screen until you press Zoom plus a User button to close. You can also close the Quick Menu dialog by clicking the Close (x) button on the dialog.
— The Quick Menu retains the most recently used layout whenever you show or hide it.
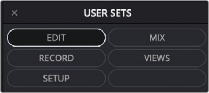
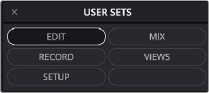
— Press CTL + ALT to show the six User Sets including; Edit, Mix, Record, Views, Setup, and Blank.
![]()
![]()
=
Press CTL + ALT to view the six User Sets
— To choose an option from the Quick Menu, press the User button in the same position. For example, in the Edit User Set, the Nudge submenu layout is in the same position as User 4, therefore, you press User 4 to choose the Edit-Nudge layout. The Edit-Nudge layout, in turn, offers two clip-based actions that can be engaged by pressing the corresponding User button. No modifier keys are needed to choose an option from the current user set layout, hence the name Quick Menu.
+ ![]() =
=
![]()
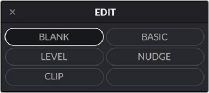
— Press ALT to show the submenu layouts for the current User Set. In this example, there are five Edit submenu layouts mapped to the first five buttons.
![]()
=

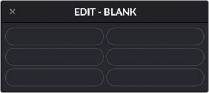
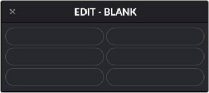
NOTE: Quick Menu buttons that are blank have not been mapped to a function. The Edit Blank layout is the default User set when engaging the User Button layouts for the first time. With this layout, none of the User buttons are assigned to actions, and therefore, new users can avoid accidentally applying editing actions to the Timeline.
NOTE: Quick Menu buttons that are blank have not been mapped to a function. The Edit Blank layout is the default User set when engaging the User Button layouts for the first time. With this layout, none of the User buttons are assigned to actions, and therefore, new users can avoid accidentally applying editing actions to the Timeline.
NOTE: Quick Menu buttons that are blank have not been mapped to a function. The Edit Blank layout is the default User set when engaging the User Button layouts for the first time. With this layout, none of the User buttons are assigned to actions, and therefore, new users can avoid accidentally applying editing actions to the Timeline.
— To choose an option from the Quick Menu, press the User button in the same position.
For example, In the Edit User Set, the Nudge submenu layout is in the same position as User 4, therefore, you press User 4 to choose the Edit-Nudge layout. The Edit-Nudge layout, in turn, offers two clip-based actions that can be engaged by pressing the corresponding User button. No modifier keys are needed to choose an option from the current user set layout, hence the name Quick Menu.
+ ![]() =
=
— To quickly change to a different submenu options layout in the same Quick Menu User Set, press ALT to show the submenu option sets, then press the User button for the desired layout. In this example, to change from the Edit-Clip options to the Edit-Blank options, press ALT to see the different submenu options, and User 1 to choose the Basic option in the 1 position.
![]() =
=
+ ![]() =
=
— To engage the options currently mapped to the Quick Menu, press the corresponding User button. For example, in the Edit-Basic Quick Menu, press User 1 to Cut, User 2 to Copy, User 3 to Paste, User 4 to Split, User 5 to Trim Head, and User 6 to Trim Tail.
— To hide the Quick Menu dialog, Press Zoom plus any User button.
![]()
![]()
![]()
![]()
![]()
+
![]()
![]()

NOTE: Once you incorporate User buttons and Quick Menu options into your everyday workflows, you’ll find that switching between layouts and engaging options is as effortless as using keyboard shortcuts or right-click menu options in the DaVinci Resolve interface.
NOTE: Once you incorporate User buttons and Quick Menu options into your everyday workflows, you’ll find that switching between layouts and engaging options is as effortless as using keyboard shortcuts or right-click menu options in the DaVinci Resolve interface.
NOTE: Once you incorporate User buttons and Quick Menu options into your everyday workflows, you’ll find that switching between layouts and engaging options is as effortless as using keyboard shortcuts or right-click menu options in the DaVinci Resolve interface.
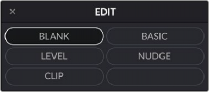
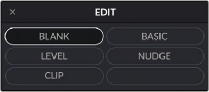
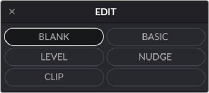
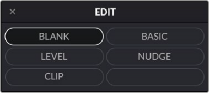
Edit User Set
There are five Edit menu layouts: Blank, Basic, Level, Nudge, and Clip. Press ALT to show the different Edit menu layouts in the Quick Menu dialog. Press the associated User button to choose an Edit layout. In this case, the Blank button is in the top-left grid position, and the Edit Basic layout is in
the User 2 position. Pressing User 2 button would select the Edit-Basic layout. Once selected, the button in the Quick Menu dialog is highlighted. Release Alt to show the selected Quick Menu layout with button-menu options related to specific Editing tasks. Similar to working with the Fairlight Audio Editor, the options on the EDIT-BASIC layout change from “Clip” to “Range” if a range is active in the Timeline. Additionally, the Shift and Control modifier keys offer secondary functions.
Edit Quick Menu layouts include Basic, Level, Nudge, and Clip.
![]()
Edit-Blank Quick Menu layout (default)
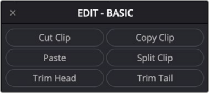
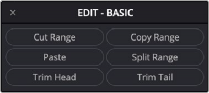
Edit-Basic Quick Menu layout Edit-Basic Quick Menu layout for clip-based editing for range-based editing
Edit-Level Quick Menu layout Edit-Level Quick Menu layout
with CTL and Shift keys
Edit-Level Quick Menu layout Edit-Level Quick Menu layout with Shift key with CTL key

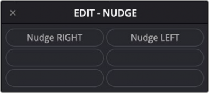
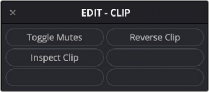
Edit-Nudge Quick Menu layout Edit-Clip Quick Menu layout
— BLANK: This default layout has no actions assigned to the six User buttons. This is to prevent new users from accidentally editing their projects via User buttons.
— BASIC: Use to this button layout to place common fast-editing actions at your fingertips. Use the dial and transport controls with your right hand for navigation and selection, while quickly choosing editing actions via the User buttons with your left hand.
— Cut Clip/Cut Range: Press User 1 to cut the currently selected material and place it in the clipboard. The cut material maintains its relationship to the playhead in a semi-transparent form, so you can see exactly where it will be pasted as you move the playhead or selection to a new location. To Paste the clip, press the User 3 button. Alternatively, you can cut and paste clips on-the-fly by holding the User 1 button to cut, continue playback or move the playhead until the semi-transparent clip is in position, then release the User 1 button to paste.
— Copy Clip/Copy Range: Press User 2 to copy the currently selected material to the clipboard. Move the semi-transparent copied clip to position, then press the User 3 button to paste. Since this is a standard clipboard editing tool, you can paste additional copies of the material by pressing User 2 again. If you’d rather copy and paste during playback, press and hold User 2 to copy the selection and release to paste.
— Paste: Press User 3 to paste the current clipboard material into the Timeline based on the selected tracks and playhead position.
— Split Clip/Split Range: Press User 4 to split the clip or range at the playhead position, creating a new edit point between two clips or at the range boundaries. The split editing action is based on the selected tracks and playhead position.
— Trim Head: Press User 5 to erase the portion of the selected clip to the left of the playhead. Alternatively, press and hold User 5 while the playhead is over a selected clip to reveal all of the clip’s handles (unused frames) to the left of the playhead. While continuing to hold User 5, move the playhead along the extended clip to find a new starting frame. Release User 5 to trim the head of the clip to the new playhead position.

NOTE: Although you can manually click to select individual clips with a mouse while editing with a standard keyboard. Fairlight Console audio editing is centered around automatic clip selection based on the selected tracks and playhead position for fast, on-the-fly workflows. As the playhead passes over a clip on a selected track, that clip is automatically selected, thus allowing effortless Cut, Copy, Paste, and Trim functions at the touch of a button.
NOTE: Although you can manually click to select individual clips with a mouse while editing with a standard keyboard. Fairlight Console audio editing is centered around automatic clip selection based on the selected tracks and playhead position for fast, on-the-fly workflows. As the playhead passes over a clip on a selected track, that clip is automatically selected, thus allowing effortless Cut, Copy, Paste, and Trim functions at the touch of a button.
NOTE: Although you can manually click to select individual clips with a mouse while editing with a standard keyboard. Fairlight Console audio editing is centered around automatic clip selection based on the selected tracks and playhead position for fast, on-the-fly workflows. As the playhead passes over a clip on a selected track, that clip is automatically selected, thus allowing effortless Cut, Copy, Paste, and Trim functions at the touch of a button.
— Trim Tail: Press User 6 to erase the portion of the selected clip to the right of the playhead. Alternatively, press and hold User 6 while the playhead is over a selected clip to reveal all of the clip’s handles (unused frames) to the right of the playhead. Continue holding User 6 while moving the playhead to the last desired frame. Release User 6 to trim the clip’s tail to the new playhead position.
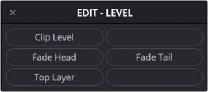
— LEVEL: As the name suggests, the options in this User Button menu are all based on controlling the selected clip’s level. Like the Edit-Basic options, the Edit-Level options are based on selection and playhead position. Additionally, modifier keys offer more User Button menu options. In most cases these expanded options are directly related to the default menu option so that you can quickly fine tune your actions as you go.
— Clip Level: Hold User 1 and turn the dial to increase or decrease the selected clip’s level.
This affects the selected clip beneath the playhead and can be performed while the transport is stopped or during playback as the playhead passes over a clip in the selected track.
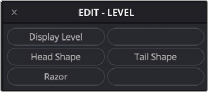
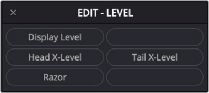
— Display Level: Hold User 1 + CTL and turn the dial to increase or decrease the waveform zoom level in the selected tracks. Changing the waveform display level does not change the volume levels of the affected clips or tracks.
— Fade Head: Press User 3 to apply a fade from the playhead to the head of the selected clip.
— Head Shape: Hold Shift + CTL to show the Head Shape menu option. Press User 3 and turn the dial to change the shape of the fade at the head of the clip.
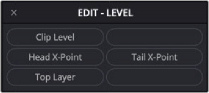
— Head X-Level: Hold CTL to show the Head X-Level menu option. Press User 3 and turn the dial to change the level curve of the fade or crossfade at the head of the clip beneath the playhead.
![]()
— Head X-Point: Hold Shift to show the Head X-Point menu option. Press User 3 and turn the dial to change the height of the crosspoint in the crossfade at the head of the clip beneath the playhead.
— Fade Tail: Press User 4 to apply a fade from the playhead to the tail of the selected clip.
— Tail Shape: Hold Shift + CTL to show the Head Shape menu option. Press User 4 and turn the dial to change the shape of the fade at the head of the clip.
— Tail X-Level: Hold CTL to show the Head X-Level menu option. Press User 4 and turn the dial to change the level curve of the fade or crossfade at the head of the clip beneath the playhead.
— Tail X-Point: Hold Shift to show the Head X-Point menu option. Press User 4 and turn the dial to change the height of the crosspoint in the crossfade at the head of the clip beneath the playhead.
— Top Layer/All Layers: Press User 5 to toggle between Top Layer and All Layers. When set to Top Layer, any clip level or editing actions that you apply to a stack of overlapping clips in
audio track layers will only be applied to the top clip. When set to All Layers any editing actions applied to a clip with overlapping audio clips in layers will be applied to the entire stack of clips beneath the playhead. This function works, even when audio track layers are hidden.
— NUDGE: This User Button menu layout focuses on refining the positions and timing of the clips.
— Nudge Left: Press User 1 to move the selected clip one frame at a time to the left.
— Nudge Right: Press User 2 to move the selected clip one frame at a time to the right.
— Media Left: Hold CTL to show the secondary option and Press User 1 to move the media within the selected clip one frame at a time to the left without chaining the clip duration or position.
— Media Right: Hold CTL to show the secondary option and Press User 2 the move the media within the selected clip one frame at a time to the right without chaining the clip duration or position.
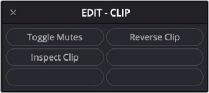
— CLIP: Use this menu layout for quick control of the selected clip.
— Toggle Mutes: Press User 1 to mute (disable) the selected clip or clips beneath the playhead on selected tracks. Press User 1 again to un-mute (enable) the clip or clips.
— Reverse Clip: Press User 2 to reverse the clip beneath the playhead on the selected track. Press User 2 again to reverse again, so it plays forward.
— Inspect Clip: Press User 3 to show the Inspector panel in the Fairlight Page interface. Press User 3 again to hide the Inspector.
Mix User Set
There are six Mix menu layouts for working with mix automation: Basic, Punch, Preview, Copy/Paste, Enables and Faders To. Press ALT to show the different Mix menu layouts in the Quick Menu dialog. Press the associated User button to choose a Mix options layout.
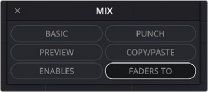
Mix Quick Menu layouts include Basic, Punch, Preview, Copy/Paste, Enables and Faders To.
![]()
Mix-Basic Quick Menu layout Mix-Punch Quick Menu layout
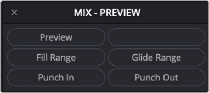
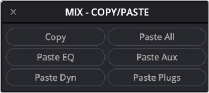
Mix-Preview Quick Menu layout Mix-Copy/Paste Quick Menu layout
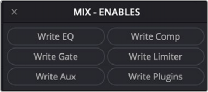
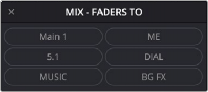
Mix-Enables Quick Menu layout Mix-Faders To layout
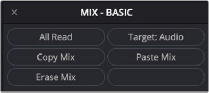
— BASIC: Use this submenu options layout to access common functions while previewing or working with previously recorded automation data.
— All Read: Press User 1 to get controls out of Write or Preview before the transport starts moving.
— Copy Mix: Press User 3 to copy all automation data within the selected range to the clipboard. This is the first step in copying automation data from one track or bus to another.
— Paste Mix: Press User 4 to paste data from a copied automation range into the range selection in the Timeline, based on enabled parameters in the Automation toolset. For example, if you copy a range of automation from the MUSIC 1 track, all of the automation data within that range is copied to the clipboard. However, if only the Fader and Pan parameters are enabled in the Automation toolset, only those automation curves will be pasted to the selected range on the Music 2 track in the Timeline.
— Erase Mix: Press User 5 to erase the automation data within the selected range.
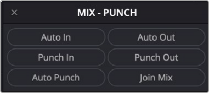
— PUNCH: As the name suggests, the options in this Mix layout offers range-based options to control when and where new automation data is written into an existing mix.
— Auto In: Press User 1 to start an automation pass, pre-rolling, then punching In at the range start point.
— Auto Out: Press User 2 to start an automation pass, pre-rolling, then punching in at the range Out point.
— Punch In: Press User 3 to switch automation from Preview or Read to Write during playback. Once you Punch In, all enabled parameters will remain in Write mode until you stop playback or press User 4 to Punch Out.
— Punch Out: Press User 4 to stop writing Automation and enter Read mode during playback.
— Auto Punch: Press User 5 performs an automation pass, pre-rolling, then punching In and Out at the range start and end points.
— Join Mix: Press User 6 to punch into Automation Write with all enabled parameters during playback, with exactly the parameter values you had when Write last stopped. This is handy for making a second pass and finessing a section you just mixed.
![]()
— PREVIEW: This Mix menu layout offers Preview-related mix options that allow you to suspend Automation Read or Write for enabled controls while you find new settings for them.
— Preview: Press User 1 to switch on the Preview automation controls and audition new settings for the enabled controls without changing the recorded automation data.
— Fill Range: Press User 3 to perform and instant automation pass, writing the current values of all parameters that are in Preview mode through the range.
— Glide Range: Press User 4 to perform an instant automation pass that writes a glide through the range from the value at the start of the range to the current control level of the parameter, for all parameters that are in Preview mode.
— Punch In: Press User 5 to switch from Preview to Write mode starting at the point where you press Punch In and applying the current control levels until you stop playback or press User 6 to Punch Out.
— Punch Out: Press User 6 to stop writing automation and return to Preview mode during playback.
— COPY/PASTE: Use this Mix menu layout to quickly copy and paste automation from one range to another.
— Copy: Press User 1 to copy all automation data within a range.
— Paste All: Press User 2 to paste all copied automation data to a range.
— Paste EQ: Press User 3 to paste only the copied EQ automaton data to a range.
— Paste Aux: Press User 4 to paste only the copied Aux buss automaton data to a range.
— Paste Dyn: Press User 5 to to paste only the copied Dynamics automaton data from the built- in Fairlight Dynamics processing on each track to a range. Dynamics include: Expander, Gate, Compressor, and Limiter automation.
— Paste Plugs: Press User 6 to paste only the copied plugins automaton data to a range.
— ENABLES: Use this menu layout to quickly enable or disable automation recording for specific parameter sets.
— Write EQ: Press User 1 to enable or disable EQ automation.
— Write Comp: Press User 2 to enable or disable Comp button automation.
— Write Gate: Press User 3 to enable or disable Gate automation.
— Write Limiter: Press User 4 to enable or disable Limiter button automation.
— Write Aux: Press User 5 to enable or disable Aux automation.
— Write Plugins: Press User 6 to enable or disable Plugin automation.
— FADES TO: Use this menu layout to remap faders to the first six sends.

NOTE: The Mix user set and subsequent Quick Menu options are only functional while the Automation toolset is On and showing in the Fairlight Page user interface. Press the On button in the Automation area at the top of the Desktop Console to toggle Automation On or Off. The Faders To menu layout allows users to re-map faders to Sends 1-6 via the User keys and does not require Automation to be turned on.
NOTE: The Mix user set and subsequent Quick Menu options are only functional while the Automation toolset is On and showing in the Fairlight Page user interface. Press the On button in the Automation area at the top of the Desktop Console to toggle Automation On or Off. The Faders To menu layout allows users to re-map faders to Sends 1-6 via the User keys and does not require Automation to be turned on.
NOTE: The Mix user set and subsequent Quick Menu options are only functional while the Automation toolset is On and showing in the Fairlight Page user interface. Press the On button in the Automation area at the top of the Desktop Console to toggle Automation On or Off. The Faders To menu layout allows users to re-map faders to Sends 1-6 via the User keys and does not require Automation to be turned on.
Record User Set
This user set offers the same recording options that are available in the Fairlight Audio Editor for both Manual and ADR recording. There are four Record Quick Menu layouts: Manual, Rate Clip, ADR List, and ADR Record.
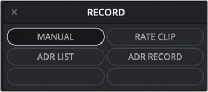
Record Quick Menu layouts include Manual, Rate Clip, ADR List, and ADR Record.
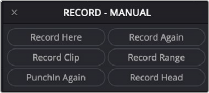
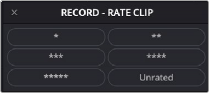
Record-Manual Quick Menu layout Record-Rate Clip Quick Menu layout
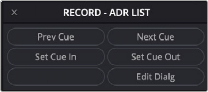
Record-ADR List Quick Menu layout Record-ADR Record Quick Menu layout
— MANUAL: Use to this button layout to place common fast-editing actions at your fingertips. Use the dial and transport controls with your right hand for navigation and selection, while quickly choosing editing actions via the User buttons with your left hand.
— Record Here : Press User 1 to initiate the Record Here action from the current playhead position. When you engage Record Here, the playhead goes back the pre-roll duration, then punches into Record at the location where you issued the command.
— Record Again: Press User 2 to repeat the last recording you made, both entry and exit, whether it was manually or automatically punched in.
— Record Clip: Press User 3 to initiate the Record Clip manual recording method. After pre-roll, the playhead punches in and out to match the duration of the clip under the playhead on the selected track. If no clip is beneath the playhead, the transport moves forward to the next clip in the track and records there.
— Record Range: Press User 4 to record the current range. With this manual recording method, the playhead includes a pre-roll and punches into Record at the Range In point, and then punches out at the Range Out point.
![]()
— PunchIn Again: Press User 5 to engage Punch Again recording. Punch Again pre-rolls, then enters record at the exact same place as last time, whether it was manually or automatically activated. When entering this record operation, you still need to manually Punch Out. This allows you to get the same start point for recording but with a manual exit.
— Rec Head: Press User 6 to enter the Record Head method, which pre-rolls, then starts recording at the head of the first clip to come beneath the playhead in the selected track. When entering this record operation, you still need to manually Punch Out.
— RATE CLIP: As the name suggests, the options in this User Button menu are all based on rating the ADR recordings from 1-Star (*) to 5-stars (*****). These ratings appear in the ADR Record panel Take list after each recorded take.
— * : Press User 1 to mark a 1-star rating on the selected take.
— **: Press User 2 to mark a 2-stars rating on the selected take.
— ***: Press User 3 to mark a 3-stars rating on the selected take.
— ****: Press User 4 to mark a 4-stars rating on the selected take.
— *****: Press User 5 to mark a 5-stars rating on the selected take.
— Unrated: Press User 6 to remove star ratings.
— ADR LIST: This ADR recording layout offers actions available in the ADR List panel. These actions are used for selecting and setting ADR cues.
— Prev Cue : Press User 1 to select the previous cue in the Cue list.
— Next Cue: Press User 2 to select the next cue in the Cue list.
— Set Cue In: Press User 3 to set the current Timeline In point as the Cue In.
— Set Cue Out : Press User 4 to set the current Timeline Out point as the Cue Out.
— Edit Dialg : Press User 6 to highlight the text field and active text cursor in the ADR List panel so that you can type or edit the text for the current cue.
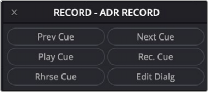
— ADR RECORD: Use this this ADR recording layout for rehearse and record options available in the ADR Record panel.
— Prev Cue: Press User 1 to select the previous cue in the Cue list.
— Next Cue: Press User 2 to select the next cue in the Cue list.
— Play Cue: Press User 3 to play the currently selected take from the Take list (described below). If no take is selected, the most recently recorded one on top is played.
— Rec. Cue: Press User 4 to initiate recording of the cue to the specified audio track, with cue beeps and video streamer cues.
— Rhrse Cue: Press User 5 to rehearse the selected cue. This runs the section of the Timeline specified by a cue without actually recording anything, giving the talent an opportunity to run through their dialog and practice their timing and delivery. Beeps and on-screen streamers are not played during a rehearsal.
— Edit Dialg: Press User 6 to highlight the text field and active text cursor in the ADR List panel so that you can type or edit the text for the current cue.
Views User Set
This user set offers quick access to view options and track zoom views that can be toggled on or off as needed while you work. There are two View Quick Menu layouts: Misc and Tracks.
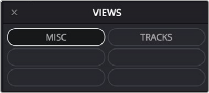
Views Quick Menu layouts include Misc and Tracks.
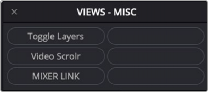
Views-Misc Quick Menu layout
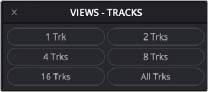
Views-Tracks Quick Menu layout Press A/B button to show custom
Views-Tracks User Quick Menu layout
— MISC: Use to this button layout to quickly show or hide common enhanced view features that are also available in the Setup mode layout on the Fairlight Audio Editor.
— Toggle Layers : Press User 1 to show or hide Audio Track Layers.
— Video Scrolr: Press User 2 to show or hide the Video Scroller.
— Mixer Link: Press User 3 to toggle on or off the Mixer Link feature. When Mixer Link is on, the Fairlight page mixer automatically scrolls to show the most recently selected track.
— Tracks: As the name suggests, the options in this User Button menu are all based on rating the ADR recordings from 1-Star (*) to 5-stars (*****). These ratings appear in the ADR Record panel Take list after each recorded take.
— 1 Trk : Press User 1 to vertically scale the Timeline tracks to show only the active track.
— 2 Trks: Press User 2 to vertically scale the Timeline to show two tracks, including the active track.
— 4 Trks: Press User 3 to vertically scale the Timeline to show four tracks, including the active track.
— 8 Trks : Press User 4 to vertically scale the Timeline to show eight tracks, including the active track.
— 16 Trks: Press User 5 to vertically scale the Timeline to show sixteen tracks, including the active track.
— All Trks: Press User 6 to vertically scale the Timeline tracks to show all tracks.
![]()
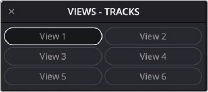
— Tracks View Presets: Press the A/B button while the Views-Tracks Quick Menu is showing to see the Tracks View presets. Each of the six user-defined View presets can be used to quickly change which tracks/buses are visible in the Timeline and Mixer. These View presets can be customized in the Tracks Index tracklist and are based on the tracks and buses marked as visible when a numbered User View is selected.
— View 1 : A/B + 1 to scale the Timeline to show the View 1 preset.
— View 2: A/B + 2 to scale the Timeline to show the View 2 preset.
— View 3: A/B + 3 to scale the Timeline to show the View 3 preset.
— View 4 :A/B + 4 to scale the Timeline to show the View 4 preset.
— View 5: A/B + 5 to scale the Timeline to show the View 5 preset.
— View 6: A/B + 6 to scale the Timeline to show the View 6 preset.
Setup User Set
This User set offers setup options that are available in the Fairlight Audio Editor setup mode. There are four Setup Quick Menu layouts: Misc, Jogger, Talkback and Console.
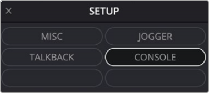
Setup Quick Menu layouts include Misc, Jogger, Talkback, and Console.
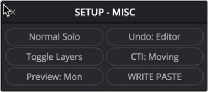
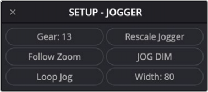
Setup-Misc Quick Menu layout Setup-Jogger Quick Menu layout
Setup-Talkback Quick Menu layout Setup-Console Quick Menu layout
— MISC: Use to this button layout to quickly access common features that can enhance your Fairlight user experience.
— Normal Solo/Solo Follow: Press User 1 to toggle between Normal Solo and Solo Follow. When set to Normal Solo, pressing a Solo button on the Desktop Console or soloing a track on the Fairlight page results in the normal track solo behavior. When set to Solo Follow, solo is linked to track selection, so that any track you select or deselect will automatically solo or unsolo the corresponding track.
— Undo: Editor/Undo All: Press User 2 to toggle between Undo Editor and Undo All. This functionality is a matter of operator preference. When set to the default, Undo Editor, tasks performed in Mix mode, including recording and editing automation data, will not be undoable. You can, however, simply record new mixing data to override the previous data as needed. Latching this key enables the Undo All mode, which in turn will undo all actions including automation applied in Mix mode
— Toggle Layers: Press User 3 to on or off Audio Track Layers.
— CTI:Moving/CTI:Fixed: Press User 4 to choose whether the playhead (CTI) moves across the Timeline, or is fixed in place with the Timeline scrolling past.
— Preview:Mon/Preview:Track: Press User 5 to determine where preview monitoring goes when auditioning a sound and comes in handy when you need to preview a clip in the Media Pool or Sound Library. When toggled to Preview Track, you will put the track in Thru mode so it works like a live mic input and the sound you preview will be subject to the track’s fader
levels, solo or mute state, and any processing applied to the track. If toggled to Preview Mon, the sound goes directly to the monitors without any processing or controls via the track’s channel strip in the mixer or console.
— Write Paste: Press User 6 to automatically set controls to write when pasting from one channel to another.
— Jogger: As the name suggests, the options in this User Button menu are all based on Jog settings for the Search Dial. These options are identical to those found on the Fairlight Audio Editor.
— Gear:13: Press User 1 and turn the dial to change the “gear ratio” when jogging between 1 and 20. In other words, it determines how quickly the transport moves in response to turning the jog wheel. The lower the Gear number, the slower the transport will go; the higher the Gear number, the faster the transport will go. The default Gear setting is 13.
— Rescale Jogger: Press User 2 to change the gear ratio based on the current zoom level so that three revolutions a second of the jog wheel reaches normal play speed.
— Follow Zoom: Press User 3 to toggle Follow Zoom on or off. When on, the gear ratio of the jog wheel is affected by the Zoom setting.
— Jog DIM: Press User 4 to toggles Jog Dim on and off. When on, it causes the monitoring level to automatically dim during Loop Jog to the user-defined value set in the Monitor mode Dim level.
— Loop Jog: Press User 5 to toggles Loop Jog on and off. When Loop Jog is on, the transport plays a small length of audio (between 5ms and 2000ms), repeatedly, at play speed. The loop moves as you jog the transport forward or backward. This is a great tool for editing, because it maintains the correct pitch of the audio, allowing you to hear clicks, pops, sibilants in the middle of words, and so on. Some of the other soft keys in this menu control additional
Loop Jog parameters.
— Width:80: Press User 6 and turn the dial to sets the width for the Loop Jog in milliseconds between 5ms and 2000ms. This is the amount of audio that is repeated in each loop.
The default width is 80ms.
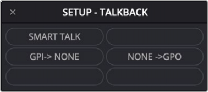
— Talkback: This Setup layout offers three options to customize the Desktop Console Talkback functionality.
— Smart Talk/Push-2 Talk: Press User 1 to toggle between the default unlatched Smart Talk option and the latched Push-2-Talk option. Smart Talk allows the user to either latch the Talk button for extended hands-free talkback, or Push-2-Talk with a momentary press on the Talk button. Latching this key toggles on the Push-2-Talk mode, which limits talkback to the momentary-press Push-2-Talk method similar to using a 2-way radio.
![]()
— GPI>None/Talk/DIM: Press User 2 to toggle the Monitoring Controls for the general purpose input (GPI) between None, Talk plus DIM, or DIM only.
— None/Talk/Armed/Record>GPO: Press User 3 to determine when the general purpose output (GPO) sends a signal during a session. This Quick Menu button toggles between Talk, None, Armed and Record.
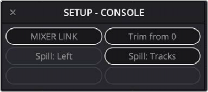
— Console: This Setup layout offers four options to customize the console functionality.
— Mixer Link: Press User 1 to toggle Mixer Link on/off. When Mixer Link is on, the DaVinci Resolve Mixer GUI will scroll any newly selected tracks into view.