< Previous | Contents | Next >
Editing metadata is like taking vitamins. Nobody wants to, but you know you probably should. To encourage you to undertake this task so you can reap the benefits, here are a few pointers.
![]()
— Don’t start editing until you review your footage and add metadata. If you get into the habit of entering your clip metadata before you get preoccupied with your edit, you’ll be in a much better position to edit faster using organizational tools that leverage the metadata you’ve entered.
— Enter metadata starting with groups of clips and then moving to individual clips. Since the Metadata Editor lets you add metadata for multiple selected clips at once, it becomes easy to select groups of clips based on their thumbnails for entering information such as Scene designations, Interior or Exterior keywords, Character keywords, and Framing keywords. You’ll be surprised how fast this goes, and how useful this information is later on, for both editing and grading.
— After you’ve entered all the metadata you can in groups of clips, then switch to entering clip-specific metadata such as Shot designations, Take numbers, descriptions of action, and other clip-specific keywords.
— There’s no right or wrong way to edit or use metadata, but a lack of consistency will make it less useful. For example, if you’re identifying each clip that takes place at the same diner, try to use the same keyword or descriptive text. If you call half the shots “diner” and the other half “restaurant,” your ability to easily search for all the diner shots will be compromised.
Audio Classification for Clips (Studio Version Only)
You can have DaVinci Resolve’s Neural Engine analyze the audio for any clip in the Media Pool, and then automatically assign it a Category and add keywords about its contents in the clip’s Subcategory audio metadata. This lets you categorize and organize large amounts of audio clips extremely efficiently by letting the computer do the tedious work of listening to all the media and assigning it metadata for you. Of course, you can then modify or change any metadata necessary in the Metadata Editor in case the computer had miscategorized it.
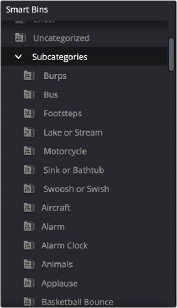
Each clip analyzed gets Audio Category and Subcategory metadata applied to it. Audio Categories are types of audio commonly used in post-production; as of this writing the available choices are: Dialogue, Effect, Music, Silence, and Uncategorized. Subcategories are more detailed keywords that are assigned based on what sounds the Neural Engine can recognize in the clip. Subcategories can be anything like sirens, water, dog, etc. Audio Category and Subcategory are available as Smart Bin filters that let you quickly organize persistent folders for whatever combination of Categories and Subcategories you desire. For example, you could create a Smart Bin that contains all clips that have both Dialogue (category) and sirens and dogs (subcategories) in them.
![]()
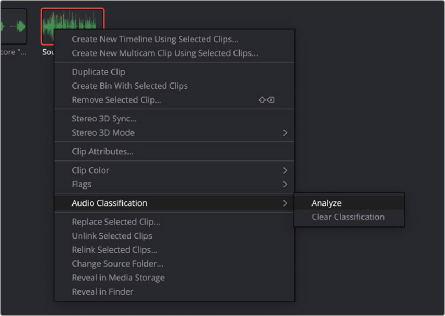
Analyzing an audio clip
1 Select the clip or clips in the Media Pool you want to classify the audio for.
2 Right-click on any of the selected clips and select Audio Classification > Analyze from the contextual menu. DaVinci Resolve will work its way through analyzing all the selected clips and will automatically add the metadata to the Audio Metadata for each clip.
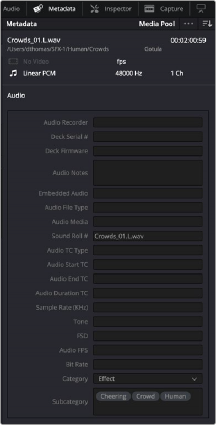
3 Optionally, you can then review the Audio Metadata for each clip and correct, delete, or add additional metadata manually.
The results of the analysis in Category and Subcategory