< Previous | Contents | Next >
4 Set the Frame where the 3:2 cadence started in the “First Frame of Clip” drop-down (this is usually the “A” frame).
5 Click OK.
The footage will now behave like a 24fps progressive clip.
![]()
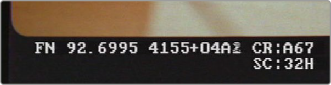
Telecine footage with 3:2 pulldown removed; the scrambled number (mix of the numbers 1 and 2) at the end of the KeyKode is a field indicator, showing that this A frame was created properly from fields 1 and 2 of the interlaced signal.
Audio Attributes
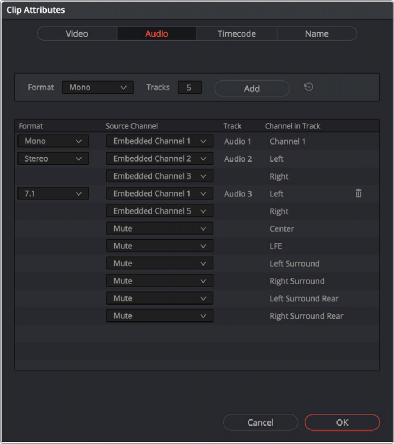
The Audio panel lets you alter the channel format and channel assignments for one or more clips. These settings affect what appears in the audio tracks of the Timeline when you edit a clip into a program. When you first import clips into the Media Pool, you can use the Audio Attributes panel to define which embedded audio channels can be exposed as tracks in the Edit and Fairlight page timelines for editing, and how they will appear.

The Audio panel of the Clip Attributes window
Add Track Controls
A set of controls at the top of the Track/Channel list lets you add additional tracks to a clip. Adding additional tracks to a clip lets you remap that clip’s available channels to appear in the Timeline when you edit it.
![]()
— Format: A drop-down that lets you choose a format for new tracks that you add. The setting you choose here affects how many channels appear in the Channel Assignments list below, as well as what kind of Timeline audio track will be required to expose all channels of that clip. If you choose a Channel Format with fewer channels than are embedded in a clip, all extraneous channels will be disabled. The available options are:
— Mono: Appropriate for single-channel clips
— Stereo: Appropriate for clips with two-channel left/right audio
— 5.1: Appropriate for 5.1 surround mixes
— 7.1: Appropriate for 7.1 surround mixes
— Adaptive: Appropriate for multiple-mono production audio, such as multi-channel recordings where a boom microphone, two separate lavaliere microphones, and a mixdown track are recorded simultaneously.
— Tracks: Lets you adjust how many tracks you want to add to the current clip or clips. Each track you add will result in an additional linked audio item being edited into an additional audio track when this clip is edited into the Timeline. For example, if you have a multi-channel production recording with four different microphones, you can add 3 mono audio tracks, and then assign each channel to a separate track to expose each channel as an individual audio clip in the Timeline for purposes of editing each microphone separately.
— Add button: Lets you add the tracks you’ve specified to the current clip or clips.
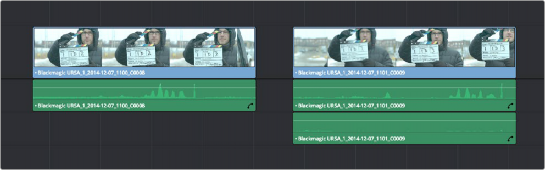
A clip with a single track of two-channel stereo audio at left, compared to a clip with two tracks of single channel mono audio at right
Audio Track and Channel List
The list below the Add Track controls show an entry for each track defined within the currently selected clip or clips. Pop-ups within this list let you redefine and map how that clip’s channels are spread across the differently mapped tracks you’ve created.
— Format: The format of each audio track. Can be Mono, Stereo, 5.1, 7.1, or Adaptive.
— Source Channel: Each track lists however many channels the specified format requires. A Stereo track has two source channels, a 7.1 track has eight source channels. Channels appear hierarchically underneath the track they belong to.
— Track: The name of each track in a clip.
— Channel in Track: The name of each channel in that track.
— Delete Track button: Hovering the pointer over a track reveals a trashcan icon you can click to delete that track.
![]()
A trashcan button you can use to delete an audio track within Clip Attributes; it only appears when you hover the mouse over a track
![]()
Support for Mixed Audio Track Formats from Source Clips
DaVinci Resolve also supports media with multiple audio tracks that have differently formatted channels embedded within them. For example, a clip with one stereo track, one 5.1 surround track, and six mono tracks can all be appropriately set up in the Audio panel of Clip Attributes after that clip has been imported.
The Audio panel of Clip Attributes now has controls over what format (Mono, Stereo, 5.1, 7.1, Adaptive) the channels embedded within a particular clip should be configured as. This means that you can set up clips with multiple tracks, each one using potentially different formats of audio employing different combinations of clips, which is handy for mastering.
Clip Attributes now lets you assign channels among different tracks with different channel assignments