< Previous | Contents | Next >
When the Inspector is open, the Source and Timeline viewers move to the left, to sit alongside the Inspector showing the selected clip’s parameters. However, if your computer display’s resolution is not high enough, opening the Inspector may result in the Source Viewer being hidden.
— To open a video or audio clip’s transform settings when the Inspector is closed: Select that clip, and then click the Inspector button at the far right of the Edit page toolbar.
— If the Inspector is already open: You need only select a clip or effect to reveal its controls in the Inspector.
— If the Inspector is closed: Double-clicking any transition will automatically open it.
The Inspector shows different buttons at the top that let you switch among different pages of parameters. For example, when you select a clip with both audio and video components, the Inspector shows Video and Audio buttons at the top that let you switch among each set of controls.
Timeline
The Timeline shows whichever timeline you’ve double-clicked in the Timelines browser. It’s where you either edit programs together from scratch, or import sequences from other applications.
![]()
For imported programs, the Timeline provides a visual representation of the edited program that’s helpful for verifying that the project was imported correctly, checking the media corresponding to each clip in the program, and performing whatever editorial tasks are necessary to prepare a project for grading (such as replacing or adding clips, superimposing composites, and modifying composite modes or transitions).
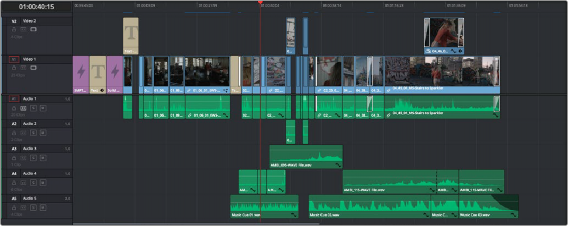
An edited timeline
— Timeline Ruler: The Timeline Ruler shows the program’s timecode, and the playhead indicates the current frame of the current clip. Whichever clip intersects the playhead is the one that you’ll be working on in the Color page. Dragging within the Timeline Ruler moves the playhead. When you add markers to the timeline, these markers appear within the Timeline Ruler, as well.
— Playhead: The playhead automatically syncs with the Timeline Viewer’s jog bar playhead, the playheads in the Mini-Timeline and Thumbnail timeline of the Color page, Cut page, and the playhead on the Deliver page. Furthermore, the Edit Index event that corresponds to the clip intersecting the playhead is automatically highlighted.
— Timecode field: Shows the current timecode value corresponding to the position of the playhead.
— Video Tracks: DaVinci Resolve supports multiple video tracks. At the left of each track is a header area that contains a number of controls.
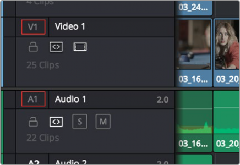
— Track Header: The Track Header contains different controls for selecting, locking/unlocking, and enabling/disabling tracks. Each track header also lists how many clips appear on that track. The Track Header contains the following five controls, from left to right:
Track Header area showing the controls for each track that are located within
![]()
— Track Color: Each track can be color-coded with one of 16 different colors. These color codes correspond to the Edit page Mixer, and to the Fairlight page Mixer and Audio Meters. You can choose a new color for any track by right-clicking the track header and choosing from the Change Track Color submenu.
— Destination control and Track Number: These controls are highlighted orange when that track is selected for editing, dark gray when that track is not selected, and flat gray if that track is disabled for editing. The Destination buttons dictate into which tracks audio and video media in the Source Viewer will be placed when an edit is executed. Ordinarily, there is one video destination control (V1) and one audio destination control (A1). If you add additional tracks, you can see that each destination control is numbered according to its track position. The bottom track is “V1,” and subsequently numbered tracks appear higher in the Timeline. Click any track’s number to select that track for different editing functions; the selected track is highlighted black.
— Track Name: Each track has a name that defaults to the type of track and the track number, such as Video 1, Audio 1. However, you can click any track’s name and edit it to be whatever you like. For example, you can rename each audio track with the type of audio you’re editing onto it, such as Production, Ambience, SFX, or Music. These track names are also used to identify each track’s channel in the Edit page Mixer and in the Fairlight page Mixer.
— Enable Track/Mute button: A slash indicates when a track is disabled. This control lets you turn tracks on and off. Clips on tracks that are turned off aren’t visible in the viewer, don’t show up in the Color page, and aren’t available for rendering or output. For Audio tracks this is the Mute button.
— Lock Track button: Light gray when turned on, dark gray when turned off. When a track is locked, clips can’t be replaced, moved, or otherwise edited, although clips on locked tracks can be graded.