< Previous | Contents | Next >
Replace edits are a unique three-point edit type that aligns the frame at the Source Viewer playhead with the frame at the Timeline playhead when the edit is executed. This is the fastest edit type to use when you need to align an action at a specific frame of video, or a sound at a specific frame of audio, to a particular frame’s action or sound in the video or audio of the Timeline.
The fastest way of using the replace edit is to not bother setting either In or Out points in the Source Viewer, and to either use the duration of an existing clip intersecting the Timeline to define the edit, or a pair of timeline In/Out points specifying either a section of a clip you want to overwrite, or an empty section of the Timeline to which you want to edit.
Replace edits do not ripple the Timeline.
Replace Edits to Replace Existing Clips in the Timeline
A replace edit automatically replaces an existing clip in the Timeline with a clip in the Source Viewer, so long as that clip overlaps the playhead and is on a track with its destination control enabled. When you make a replace edit in this way, DaVinci Resolve automatically uses the duration of the Timeline clip to define the duration of the incoming media, and the positions of the Viewer and Timeline playheads
to line up how the incoming media should be placed. This is an extremely fast edit to make, since you needn’t use any In or Out points at all.
![]()
1 Move the playhead in the Timeline to the clip that you want to replace, and align it with a frame that you want to line up with a frame in the clip you’ll be replace editing into the Timeline.
2 Click the appropriate audio and video destination controls of the track containing the clip you want to replace.
3 Open a clip into the Source Viewer.
4 Move the playhead in the Source Viewer to the frame that you want to line up with the frame at the position of the playhead in the Timeline.
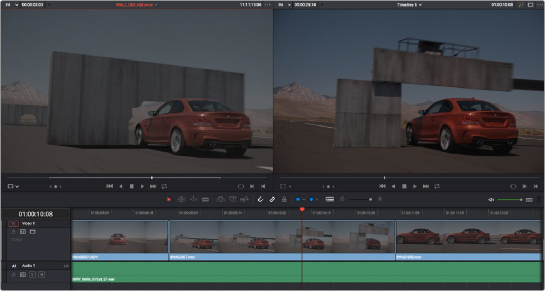
In the Source Viewer to the left is a VFX clip we want to edit into the Timeline to replace the existing Timeline clip, shown in the Timeline Viewer at right
In the example shown above, the original clip that was shot on location of a car driving past a slab of real concrete (shown in the Timeline Viewer at right) is going to be replaced by a VFX shot of a concrete wall with a small hole for the car to drive through (shown in the Source Viewer at left). The playhead in the Source Viewer is aligned on the very same frame as the playhead in the Timeline Viewer, which can be seen by the identical position of the white stripe on the road in the lower right-hand corner of the picture.
5 Now that the playheads are aligned on the frames that must match one another in both the Source and Timeline Viewers, choose Edit > Replace, click the Replace Clip button in the toolbar, press F11, or drag any clip onto the Replace overlay in the Timeline Viewer.

The resulting replace edit, in which the original timeline clip is replaced by the incoming Source Viewer clip by aligning the frames at each playhead
The camera original clip in the Timeline is now replaced with the VFX source clip from the Media Pool, with the source frame at the Source Viewer playhead aligned with the frame at the Timeline playhead.
![]()
Replace Edits to Edit Clips Into Empty Tracks
You can also use a replace edit to edit a clip into an empty track of the Timeline so that the frame at the position of the Source playhead is aligned with the Timeline playhead, and the In and Out points of the incoming clip fall where they may. This is useful when you want to “spot” a particular action of an alternate take or a cue in a sound effect to a specific frame of the Timeline.
1 Move the playhead in the Timeline to the clip that contains the moment you want to align the new incoming audio or video clip with, and position it on the exact frame that you want to line up with a frame of the clip you’re going to edit into the Timeline.
2 Click the appropriate audio and video destination controls of the empty track you want to edit the incoming clip into.
3 Open a clip into the Source Viewer.
4 Move the playhead in the Source Viewer to the frame that you want to line up with the frame at the position of the playhead in the Timeline. This may be the sample of a sound effect that
corresponds to the action in a particular frame of your program’s video, or a frame of video that corresponds to a particular sound in your program’s audio.
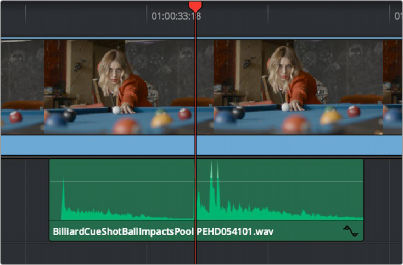
In the example shown below, the beginning of an audio cue of a billiard ball being hit is being lined up with the frame in which the cue ball is first hit in the video.
5 If necessary, set In and Out points in the Timeline to restrict how much of the incoming clip will be edited. Otherwise, the entire source clip will be edited into the Timeline.
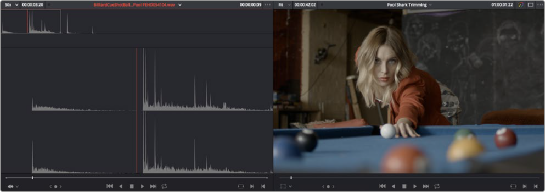
In the Source Viewer to the left is an SFX clip we want to edit into the Timeline to match the visuals of a cue ball being hit, shown in the Timeline Viewer at right
![]()
6 Now that the playheads are aligned on the frames that must match one another in both the Source and Timeline Viewers, choose Edit > Replace, click the Replace Clip button in the toolbar, press F11, or drag any clip onto the Replace overlay in the Timeline Viewer.
The resulting replace edit, in which the incoming Source Viewer clip is aligned perfectly with the video
The SFX source clip has now been edited into the specified audio track, with the source frame at the Source Viewer playhead perfectly aligned with the frame at the Timeline playhead so that the cue ball hit is in sync with the visuals.
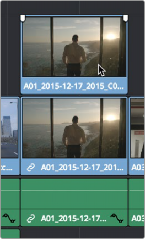
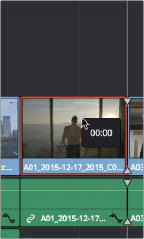
Replace Edit Using Clips Already in the Timeline
To facilitate workflows where multiple clips are stacked in the Timeline to manually track different takes or versions of stock footage, VFX clips, or other versionable media, there’s a method of drag and drop replace editing that copies the grade of the clip being replaced to the clip you’re replacing it with at the same time, so that newer versions of effects can inherit the same grade as the previous version of the effect being replaced. This only works for clips that have already been edited into the
Timeline and that are superimposed (over or under) other clips in the Timeline, such as in the following screenshot. Be aware that this technique can also be used for multiple selected clips on the Timeline to do several replace edits all at once.