< Previous | Contents | Next >
Setting timeline In and Out points to mark a gap
2 Next, you’ll need to set both In and Out points in the Source Viewer to define a longer or shorter source clip that you want to fill into the available space. In this example, we have a very short section of the source clip defined that, because of the matching action in the Timeline, must be fit into the larger gap seen above.
![]()
Setting In and Out points in a source clip to define a shorter duration segment that you want to completely fill the gap
![]()
3 Click the audio and video destination controls of the tracks you want to edit the incoming source clip onto. If necessary, create new tracks.
4 Choose Edit > Fit to Fill, drag any clip onto the Fit to Fill overlay in the Timeline Viewer, or press Shift-F11.
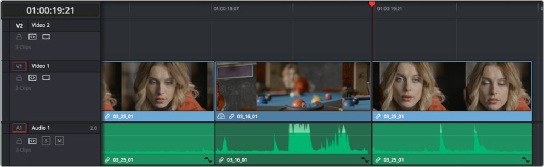
The resulting edit; the shorter source clip is retimed to fit into the longer timeline gap
The incoming source clip is retimed, as necessary, to fit into the specified duration of the Timeline. This can be seen by the retiming badge that appears within the clip that’s just been edited into the Timeline.
Place on Top
Place on top edits automatically superimpose clips onto the first empty track above (for video clips) or below (for audio clips) any other clips in the Timeline that either intersect the playhead or fall in between the currently set Timeline In and Out points, regardless of the current track specified by the destination controls. It’s designed to make it easy to superimpose titles and other clips you want to composite over another clip, or to add additional versions of clips such as VFX on top of previous versions that you want to preserve.