
< Previous | Contents | Next >
A sub category of the Color tools in Fusion that gives you access to various color processing tools.
ACESTransform [ATr]
The ACES Transform node
ACES Transform Node Introduction
A simple node that lets you perform color transforms using the ACES Input Device Transform and ACES Output Device Transform parameters.
Inputs
The two inputs on the ACES Transform node are the input and effect mask.
— Input: The orange input connects the primary 2D image for the auto gain.
![]()
— Effect Mask: The blue input is for a mask shape created by polylines, basic primitive shapes, paint strokes, or bitmaps from other tools. Connecting a mask to this input limits the adjustment to only those pixels within the mask. An effect mask is applied to the tool after the tool is processed.
Basic Node Setup
The ACES Transform node, like many 2D image-processing nodes, receives a 2D image, such as a Loader node or the MediaIn1 shown below. The output continues the node tree by connecting to another 2D image-processing node or a Merge node.

An ACES Transform node applied to a MediaIn1 node
Inspector
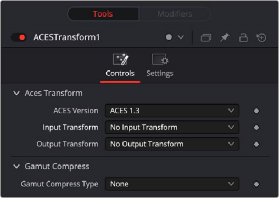
ACES Transform controls
Controls Tab
The Controls tab contains the few primary controls necessary for performing the ACES transform on the input.
Lets you choose which version of ACES you want to use.
This menu lets you choose which IDT (Input Device Transform) to use to process the image. Typically you would pick the camera that your footage was shot with here.
![]()
This menu lets you choose an ODT (Output Device Transform) with which to transform the image data to the color space for your exported timeline.
This lets you choose the type of ACES Gamut compression applied to the node. Choosing either option can prevent monochromatic highly saturated light sources (LEDs, neon signs, tail lights, etc.) from clipping the gamut.
Common Controls
The Settings tab in the Inspector is also duplicated in other Color nodes. These common controls are described in detail at the end of this chapter in “The Common Controls” section.