
< Previous | Contents | Next >
(Left) Original SDR grade seen within an HDR scale, (Right) After an automatic SDR to HDR conversion
— 0-50 nits (18% mid-gray) in your program is mapped to 0-50 nits on output (no change).
— Everything from 51 to 100 nits in your program is remapped from 51-90 nits (slightly compressed).
— Everything from 101 to 1000 nits in your program is remapped from 91-100 nits (greatly compressed).
While these methods of converting between SDR and HDR provide an effective starting point for conversion, they’re not meant to be an automatic solution. It’s critical that you do a trim pass
NOTE: When converting SDR to HDR, this behavior may exaggerate noise in imported SDR media that happens to have large flat expanses of bright colors. If you see particular clips that show this issue, you can disable this behavior on a clip by clip basis in the Media Pool clip contextual menu, or the Thumbnail Timeline contextual menu in the Color page, by toggling “Inverse DRT for SDR to HDR Conversion.”
NOTE: When converting SDR to HDR, this behavior may exaggerate noise in imported SDR media that happens to have large flat expanses of bright colors. If you see particular clips that show this issue, you can disable this behavior on a clip by clip basis in the Media Pool clip contextual menu, or the Thumbnail Timeline contextual menu in the Color page, by toggling “Inverse DRT for SDR to HDR Conversion.”
NOTE: When converting SDR to HDR, this behavior may exaggerate noise in imported SDR media that happens to have large flat expanses of bright colors. If you see particular clips that show this issue, you can disable this behavior on a clip by clip basis in the Media Pool clip contextual menu, or the Thumbnail Timeline contextual menu in the Color page, by toggling “Inverse DRT for SDR to HDR Conversion.”
whenever outputting a deliverable in a new color space and EOTF, so you can check every clip and make adjustments to improve the result when necessary.
Advanced RCM Setup
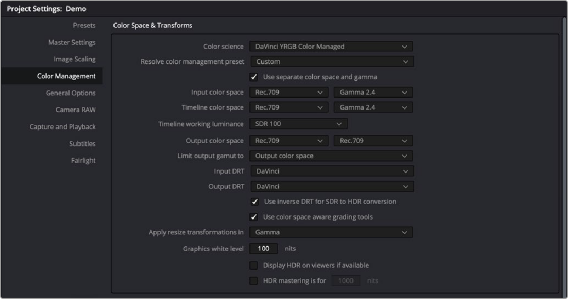
Advanced users who need more detailed control over every aspect of RCM can choose Custom from the Resolve Color Management preset menu. This exposes every control that’s available, which opens a world of workflow possibilities for advanced users and post production facilities.

NOTE: Older projects using RCM will have Color science set to Legacy, to preserve the older color management settings and color transformations effect on your work. For more information on how the previous generation of RCM works, see the September 2020 version of the DaVinci Resolve 16 Manual.
NOTE: Older projects using RCM will have Color science set to Legacy, to preserve the older color management settings and color transformations effect on your work. For more information on how the previous generation of RCM works, see the September 2020 version of the DaVinci Resolve 16 Manual.
NOTE: Older projects using RCM will have Color science set to Legacy, to preserve the older color management settings and color transformations effect on your work. For more information on how the previous generation of RCM works, see the September 2020 version of the DaVinci Resolve 16 Manual.
Because each of the settings encompasses a significant amount of functionality, the following sections cover each particular parameter in detail.
![]()